Solution overview
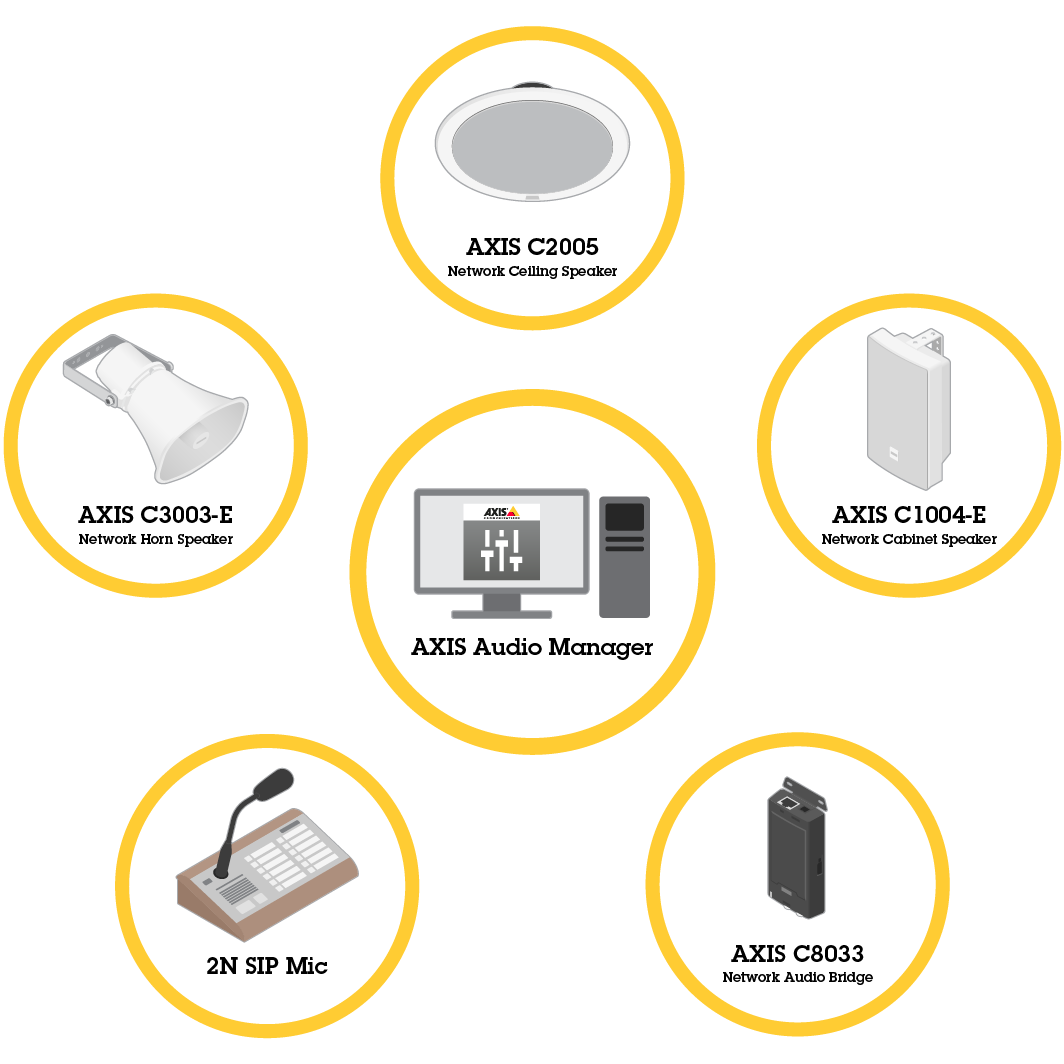
AXIS Audio Manager Pro 3 provides a user interface to control large and advanced audio installations. With AXIS Audio Manager Pro 3 you can manage all your Axis audio devices from a single point. You can set up zones, audio sources and scheduling.
If you are looking for the user manual for the latest version of AXIS Audio Manager Pro, see AXIS Audio Manager Pro 4 - User Manual.
Session
The audio is managed through sessions. A session is an audio source with a configuration and a destination (a zone). In short you play a specific audio source, with a defined configuration at a specific place.
Example
Audio source: Announcement
Configurations: Audio volume, priority, etc.
Destination: Zone 1
Configure a session
To configure a session you must first:
Connect devices to the AXIS Audio Manager Pro
Configure zones
Configure audio sources
Connect devices
First scan the network to find devices to connect, see Connect audio devices.
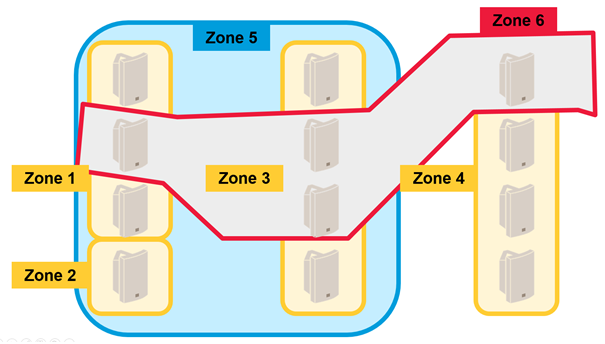
Create zones
A zone is a collection of several audio devices that is connected to AXIS Audio Manager Pro. One audio device can belong to several zones at the same time, see Create a zone.
Configure audio sources
An audio source is the type of audio input that is used with AXIS Audio Manager Pro. AXIS Audio Manager Pro has the following type of audio sources:
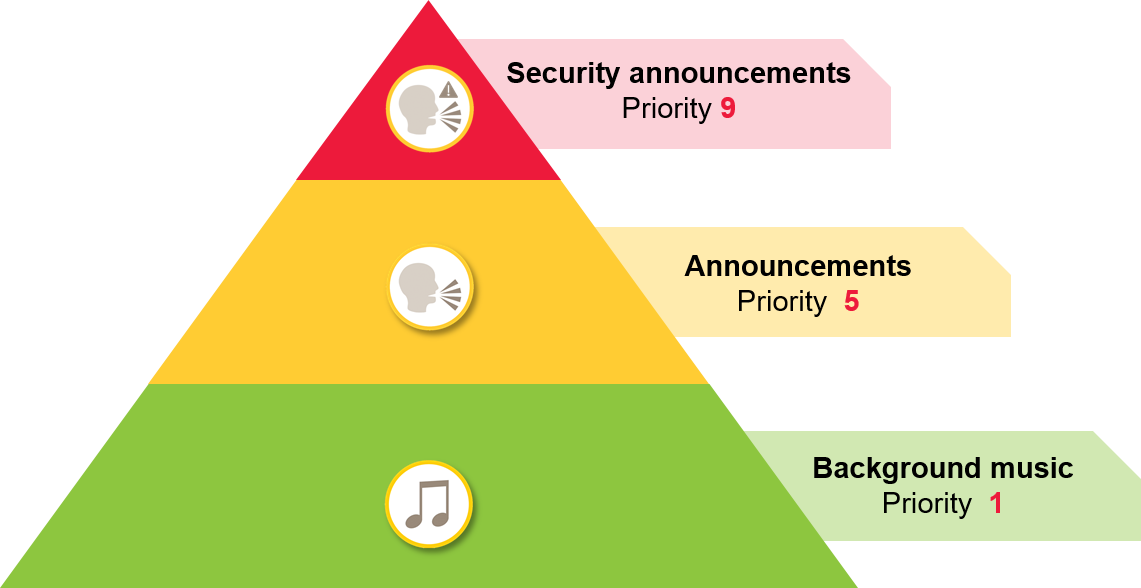
Create a session
Combine an audio source and zones to a session. You can set different priorities to the sessions. If several sessions play to the same zone at the same time, it is the one with the highest priority that will be played, see Create a session.
Scheduler
Use the Scheduler to create events and actions for controlling playlists or sessions. A set of actions for a playlist is called an event, and you can control multiple playlists in multiple sessions within one event, see Create a schedule.
DanteTM system
You can connect AXIS Audio Manager Pro to a DanteTM system, using virtual soundcards. Dante is a protocol for Audio over IP commonly used in the AV industry. With Dante you can connect and bridge Axis network audio systems to other AV systems, see Connect to Dante.
Considerations
Network topology
Take the following into consideration before using AXIS Audio Manager Pro:
Make sure to have a low latency and congestion free network with enough bandwidth available.
It is recommended to use Multicast to lower overall bandwidth for audio and to enable a scalable audio system. The network needs to be multicast enabled to transmit the audio source in multicast.
It's important to ensure that AXIS Audio Manager Pro and all audio devices are a part of the same broadcast domain and discoverable using Multicast DNS / BonjourTM.
General
Take the following into consideration before using AXIS Audio Manager Pro:
If your Windows® system goes to sleep, then audio transmission will stop. Go to Start > Settings > System > Power & sleep and set sleep mode to Never.
Only Axis audio devices are compatible with AXIS Audio Manager Pro.
The audio devices must be reset to factory default settings before connecting it to AXIS Audio Manager Pro. To find out how, see the user manual of the device.
SIP-settings needs to be activated in the local interface on each audio device before configuring SIP in AXIS Audio Manager Pro.
Currently none of the speaker models have line-in.
HTTPS radio streams are not supported.
We do not recommend more than one server in a local subnet. Using more than one server in a local subnet may cause interference between the servers and audio devices may switch location.
We do not recommend to set highest priority to an audio source with line-in. Line-in is always active, even if there is no sound from the audio source. If a session with that type of audio source is given the highest priority, no other audio sources can be used.
A 2N SIP Mic can't access its native web interface when it is connected to AXIS Audio Manager Pro.
Port list
| Port | TCP | UDP | Incoming | Outgoing | Service name |
| 23 | x | x | Telnet | ||
| 69 | x | x | TFTP | ||
| 123 | x | NTP | |||
| 6543 | x | x | XML API | ||
| 6990 | x | x | Proprietary protocol speaker server | ||
| 6991 | x | x | Proprietary protocol speaker server debug mode | ||
| 6992 | x | x | Proprietary protocol | ||
| 6996 | x | x | x | Broadcast listener | |
| 6998 | x | x | Passive mode | ||
| 6999 | x | x | Active mode / search mode | ||
| 7000 | x | x | Expander connection | ||
| 8088 | x | x | HTML API |
First time use
Login for the first time
Install the hardware according to the installation guide.
Turn on the PC.
Follow the instructions in the setup wizard to configure the PC.
Click on the AXIS Audio Manager Pro Client icon.
Leave the password field empty and click Connect.
Change admin password
Go to Administrator > AXIS Audio Manager Pro Authorization > Administrator login authentication password.
Click Change password.
Enter a password and click Save.
Click Save configuration.
Configuration
Connect audio devices
This section describes how to connect devices from the same broadcast domain. If you want to connect devices that are not in the same broadcast domain, then go to Add audio device with AXIS Device Manager.
Reset the Axis audio devices to factory default settings. To find out how, see the user manual of the device.
Go to Administrator > Audio devices scanner.
Select the audio devices to pair with AXIS Audio Manager Pro and click Start using Axis devices.
Follow the AXIS Audio Manager Pro wizard.
The status icon turns green when the audio device and AXIS Audio Manager Pro are successfully paired.
Add audio device with AXIS Device Manager
This topic describes how to add an audio device that is located outside the broadcast domain.
- Requirements:
All ports must be open. See Port list.
The audio devices you want to add must be connected to your network.
If you don’t have AXIS Device Manager, then you need install it:
Download AXIS Device Manager from the AXIS Device Manager product page.
To start the installation, unpack and run the downloaded file.
Make sure AXIS Device Manager is accessible and can reach the devices you want to configure:
Run AXIS Device Manager.
Set password.
Select Use this password for all devices without a root password.
Click OK.
Deploy the AXIS Audio Manger ACAP on the devices:
Select all the speakers.
Right-click the selection and choose Install Camera Application....
Click Browse.
Select the file AXIS_Audio_Manager_3_3–6_mipsisa32r2el.eap and click Open.
Click Next.
Select No and click Next.
Click Finish.
Configure the AXIS Audio Manger ACAP via AXIS Device Manager:
Select all the speakers.
Righ-click the selection and choose Configure Devices > Configure....
In the filter box, type “netspeaker”.
Type the IP address of the AXIS Audio Manager Pro server.
Click Next.
Click Finish.
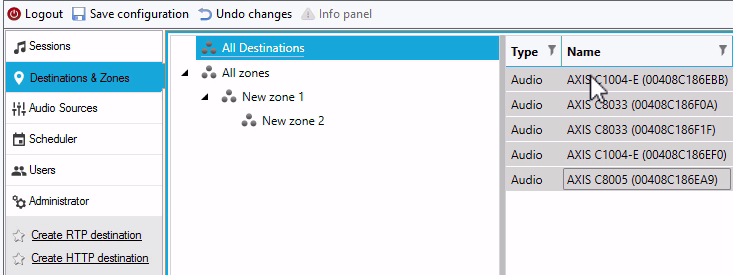
In AXIS Audio Manager Pro, check that all devices show up as connected:
Go to Destinations & Zones > All Destinations.
Check that the status is Connected for your devices.
Create a zone
Go to Destination & Zones > All zones.
Click Create zone.
Right-click on the newly created zone.
Click Rename and enter a name for the zone.
Click All Destinations and select the audio devices you want to include in the zone.
Drag and drop on the zone.
A device can belong to more than one zone.
Configure audio sources (background music)
These audio sources could be relevant for background music:
Internet radio
Go to Administrator > Network settings > Proxy.
Set Access to Manual settings.
Enter a Host–URL and set a Port.
Click Save configuration.
Go to Audio Sources > Create Internet radio.
Enter a name for the Internet radio.
Enter an URL from where to broadcast.
Set a value for Delay (buffering time in milliseconds).
Click Save configuration.
Playlist
Go to Audio Sources > Create Playlist.
Right-click on the newly created playlist.
Click Rename and enter a name for the playlist.
Click Add song-icon.
Browse and select what audio tracks to include.
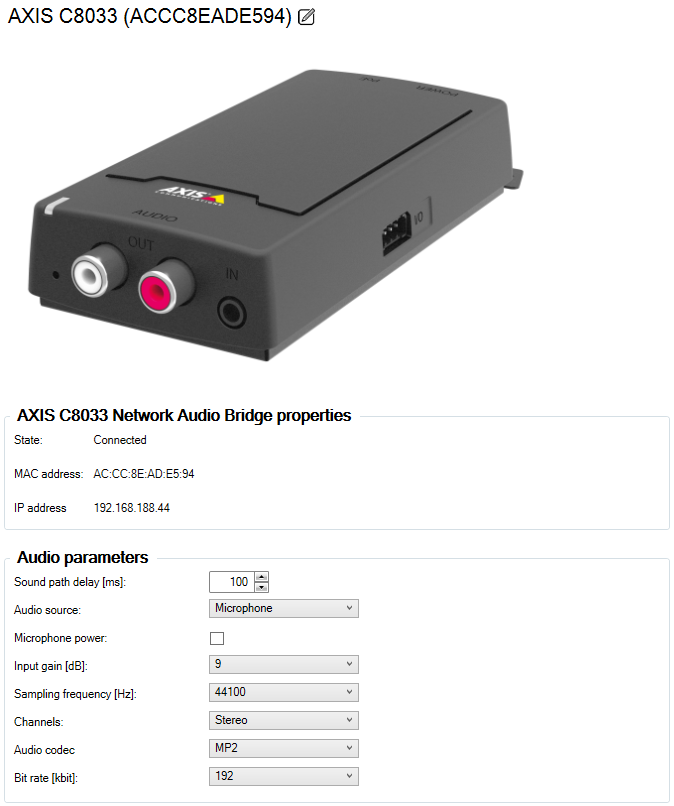
Line-in
Connect an audio source to the AXIS Network Audio Bridge or the AXIS Network Audio Amplifier with a line-in cable.
Connect the Axis Network Audio Bridge or an AXIS Network Audio Amplifier to AXIS Audio Manager Pro by following the same procedure as for other audio devices, see Connect audio devices.
Go to Destination & Zones and select the audio device.
Scroll the property list of the audio device and select Audio source from Advanced settings. The audio device can now be used as an audio source with line-in as input.
Configure audio sources (public address)
These audio sources could be relevant for public address:
2N SIP Mic (local network)
To connect a 2N SIP Mic on the local sub network to AXIS Audio Manager Pro, follow the same procedure as for other audio devices, see Connect audio devices.
2N SIP Mic (remote network)
This example explains how to configure a SIP Mic on a remote network and connect it to an AXIS Audio Manager Pro server.
In the 2N SIP Mic web page:
Access the 2N SIP Mic.
Go to System > AXIS Audio Manager Pro.
Enter a device description.
In Device mode select Server active.
In TCP channel select Server.
Enter the IP address for the AXIS Audio Manager Pro server.
Keep Local port to the default choice.
Enter a password.
Click APPLY.
In AXIS Audio Manager Pro:
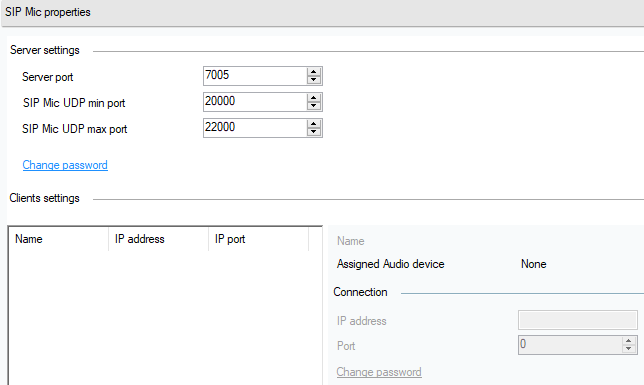
Go to Administrator > Audio device settings > SIP Mic properties.
Right-click in the Clients settings field and select Create new connection.
Double-click on the newly created connection and rename it.
Select the IP address field and enter the IP address of the 2N SIP Mic.
Keep the Port to the default choice.
Click Change password and enter the same password as in 2N SIP Mic web pages.
Click Save configuration.
Axis speakers (remote network)
- To connect an Axis speaker to an AXIS Audio Manager Pro server:
Start AXIS Device Manager.
Connect AXIS Device Manager to the same network as your speakers.
Click Add devices.
Select the devices you want to add and click Next.
Set passwords if AXIS Device Manager ask you to do so.
Click Finish.
Select your speakers, right-click the selection and choose Install Camera Application....
Browse to the application file.
The file is called
netspeakerand is downloaded from axis.com.Click Next.
Click No for the license and then Next.
Click Finish.
On the Ready to Install page, select your speakers, right-click the selection and go to Configure Devices > Configure....
Search for
netspeaker.Mark the checkbox for Server ip addr and enter the ip address of the AXIS Audio Manager Pro server.
Click Next and then Finish.
Go to the AXIS Audio Manager Pro client.
Enter passwork and click Connect.
Go to Destinations & Zones > All Destinations to find the speakers.
VoIP input (SIP) for peer-to-peer setup
Go to Audio Sources > Create VoIP input (SIP).
Right-click on the newly created VoIP Input.
Click Rename and enter a name.
Select Local VoIP input (SIP) to set up a VoIP configuration using a peer-to-peer setup.
Enter a port number in Listening port.
Enter an IP address or a domain in Realm (Domain).
VoIP input (SIP) for PBX setup
Before setting up a VoIP input you need to set up a PBX-server including a username and a password. For instruction about setting up a PBX-server refer to the product’s manual.
Go to Audio Sources > Create VoIP input (SIP).
Right-click on the newly created VoIP Input.
Click Rename and enter a name.
Select VoIP (SIP) Trunk and Proxy registration to set up a VoIP configuration using a PBX-server.
Enter an IP address in Connect to.
Keep UDP/TCP as a protocol.
Select Register line, enter a value for register line and keep the value for Expiry.
Enter the Username and Password for the number to use on the PBX-server.
Click Save configuration. When Stack status changes from Gateway registering to Ready the configuration has been completed.
Configure audio sources (other)
This audio source could be relevant for other type of installations than background music or public address:
RTP source
Go to Audio Sources > Create RTP source.
Right-click on the newly created RTP source.
Click Rename and enter a name for the RTP source.
Configure the RTP source settings.
If the source is a multicast stream: Select Multicast IP address, enter an IP address and set a Port.
If the audio source is specified stream: Select Source IP address and enter an IP address.
Click Save configuration.
Create a session
Go to Sessions > Create session.
Drag and drop an audio source to the session.
Drag and drop zones to the DESTINATIONS section of the session.
Lower the volume in the MASTER CONTROL section of the session.
To start playing music, turn on the session in the MASTER CONTROL section of the session.
Repeat the process to create sessions for other audio sources. If several sessions have been created you can prioritize the sessions. Set a value between 1 and 9 in Priority.
- Priority 1 is the lowest priority.
- We recommend you to only add one audio source to each session. If multiple audio sources are added to the same session the audio will be mixed.
Create a schedule
Schedule recurring background music
This example explains how to schedule background music. The playlist starts daily at 09:00 and ends at 17:00.
Prerequisites
A session including a playlist with background music.
The playlist is set to loop (configured in the session menu).
The session is set to ON in (Master Control in the sessions menu).
How to set up the schedule
Go to Scheduler and select Tab view.
Select Create event in the left main menu.
Set How to schedule to Daily.
Set Start time to
09:00.In List of sessions, select the session including background music.
The session will appear in Tab view.
Select Play as action for the session and select Create new action.
- Note
When you create the first action, Activate session and Deactivate session are automatically created.
Select what track to start playing from.
Select Stop as an action, enter
08:00:00in the left field and select Create new action.- Note
The time in the left field indicates the time between the start time of the scheduled event and the start of the action. Since the event started at 09:00 and you added eight hours, the playlist will stop at 17:00.
Select Save configuration.
Schedule an interrupting announcement
This example explains how to schedule an announcement to interrupt the background music. The background music plays daily between 08:00 to 17:00. The announcement will play daily at 16:45. After the announcement, the background music starts to play again.
Prerequisites
Background music, see Schedule recurring background music.
A session that includes a playlist with the announcement.
The playlist for the announcement is not set to loop.
The session for the announcement has the same destination zones as the background music.
The session for the announcement is set to ON under MASTER CONTROL.
The background music session has lower priority than the announcements session (1=the lowest priority).
- How to set up the schedule
Go to Scheduler and select Tab view.
Select the event for the background music (you find it below the calendar).
Under List of sessions, select the checkbox of the session with the announcement playlist.
The session will appear in Tab view.
Select Play as action for the announcement session, enter
07:45:00in the left field and select Create new action.- Note
The time in the left field indicates the time between the start time of the event and the start of the action. Since the event started at 09:00 and you added seven hours and forty-five minutes, the announcement starts at 16:45.
Select Save configuration.
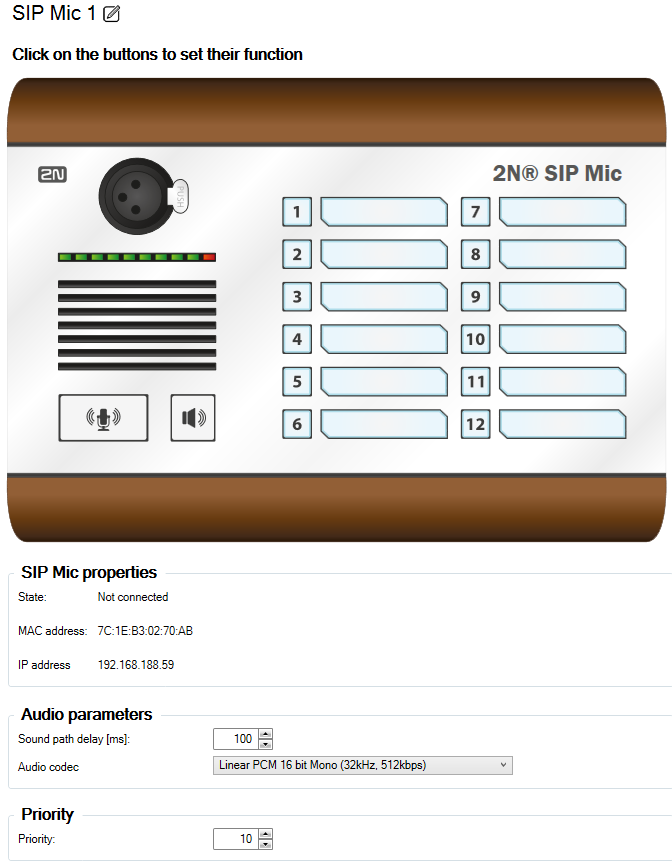
Configure 2N SIP MIC buttons
This example explains how to set up one of the buttons of the 2N SIP Mic as a peer-to-peer SIP input to AXIS Audio Manager Pro.
Prerequisites:
The 2N SIP Mic needs to be connected to AXIS Audio Manager Pro, see 2N SIP Mic (local network), 2N SIP Mic (remote network).
One or several zones need to be created, see Create a zone.
One or several playlists need to be created, see Playlist.
Go to Audio Sources and select the SIP MIC from the list.
Press one of the numbered buttons on the representation of the 2N SIP Mic.
Enter a name for the button.
Select pre-recorded message to zones.
Drag-and-drop zones to Selected zones.
Drag and drop the playlist.
Connect to Dante
- Prerequisites
Dante Virtual Soundcard software from AudinateTM installed.
Dante Controller software from AudinateTM installed.
Start Dante Virtual Soundcard and click Start.
Restart AXIS Audio Manager Pro.
Log in to AXIS Audio Manager Pro.
In Audio Sources, check that Dante Virtual Soundcard receivers exist.
Start Dante Controller and connect receivers and transmitters.
In AXIS Audio Manager Pro, go to Sessions.
Create a new session, using the Dante Virtual Soundcard receivers as audio source. For information on how to create a session, see Create a session.
User Interface
This section gives you basic information about the user interface for AXIS Audio Manager Pro.
Sessions
Sessions are used for combining audio sources and zones to be played in audio devices that are connected to AXIS Audio Manager Pro.
Session Creation and Preparation for Playing
Create a session by:
Clicking on Create session empty session.
Pointing the cursor within the Audio Sources area, right-click and select Create session.
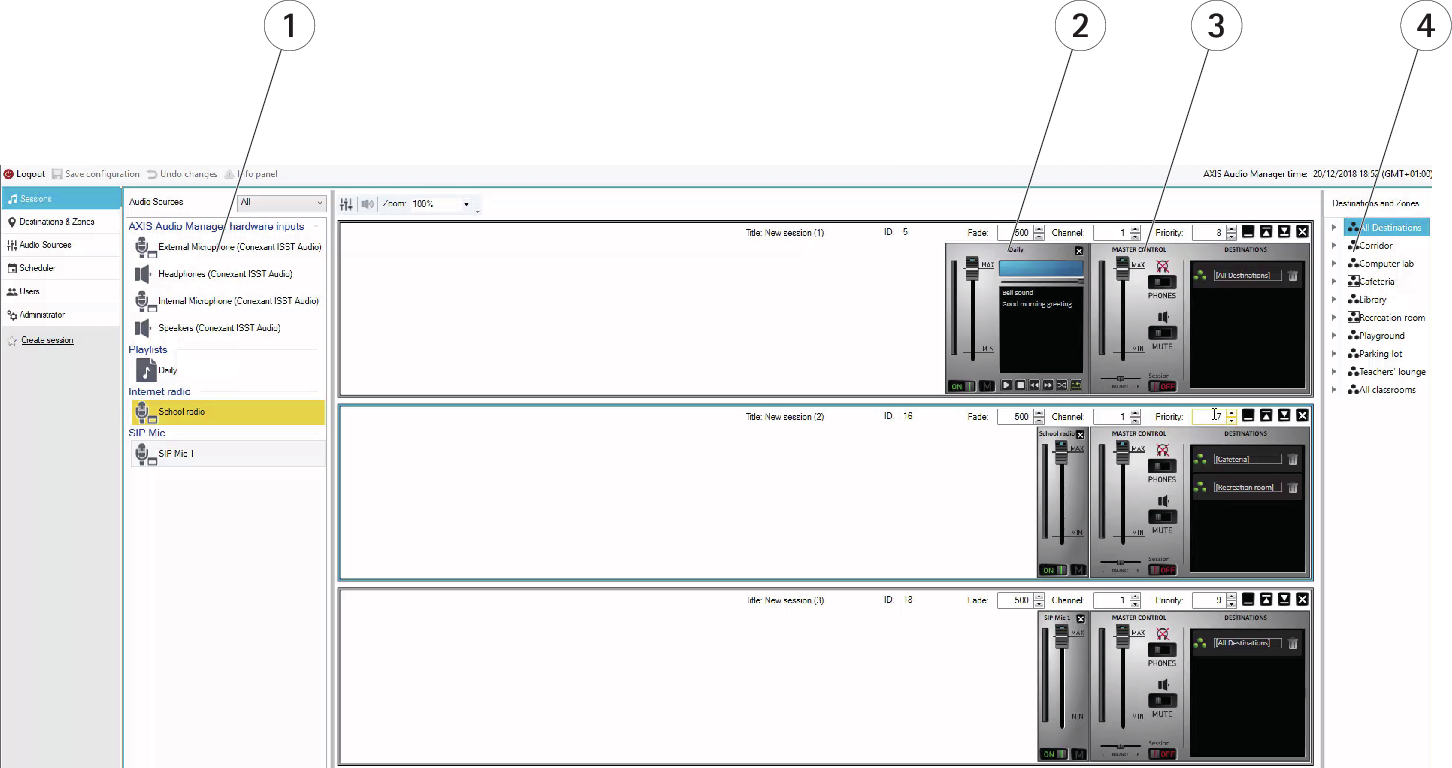
- Available audio sources
- Audio source in session
- Master control of session
- Destination and zones
Drag-and-drop audio sources to a created session. Zones can be dragged-and-dropped to the destination list.
Session Control and Launch
Click ON to launch a session.
Balance – set balance for the right/left channel.
Listening in – listen to remote destinations locally.
Volume – set the main session volume.
Sound activation/deactivation – enable/disable sound for the active session.
Destinations − list of used destinations and zones.
Priority – set the session priority. The priority range is 1-10. A higher value equals a higher priority.
Channel – set the channel for each session. The audio devices supports four channels from four different sources.
Fade – set the session fade. The parameter can be used for a gradual sound volume change. The fade range is 500–2000 ms.
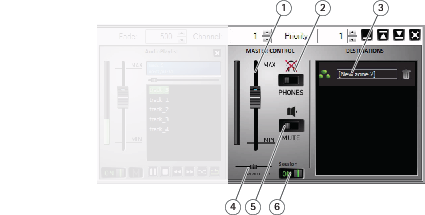
- Master volume
- Listening in
- Zones in session
- Balance
- Mute
- ON/OFF session
Audio Sources
Audio sources within a session are controlled with the master control and an audio source control panel. The audio source control panel looks the same for all type of audio sources except for playlist.
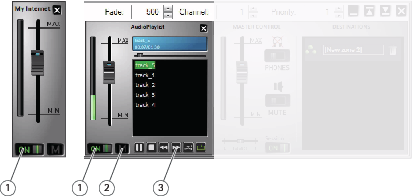
- ON/OFF
- Mute
- Playlist control
Audio source control panel – helps you control volume, balance and sound activation/deactivation.
Playlist – controls mp3 files with play/stop, pause, next, previous, shuffle and repeat.
Destinations & Zones
A zone is a collection of several audio devices which can be managed together to play music from playlists, play audio streams, announcements etc.
Create a zone:
Click Create zone.
Point the cursor on All zones, right-click and select Create zone.
Drag-and-drop audio devices from the list of audio devices to a created zone.
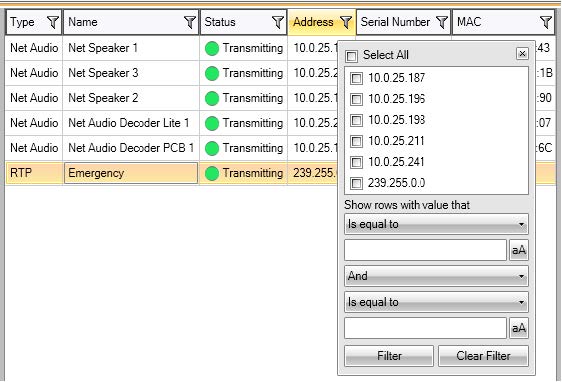
Destination List and Filter
In the list of audio devices in the network you can select which columns shall be visible. Right-click anywhere in the list and select Select columns.
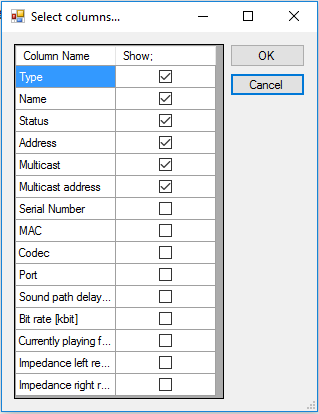
Click on one of the headings to go to the filter settings.
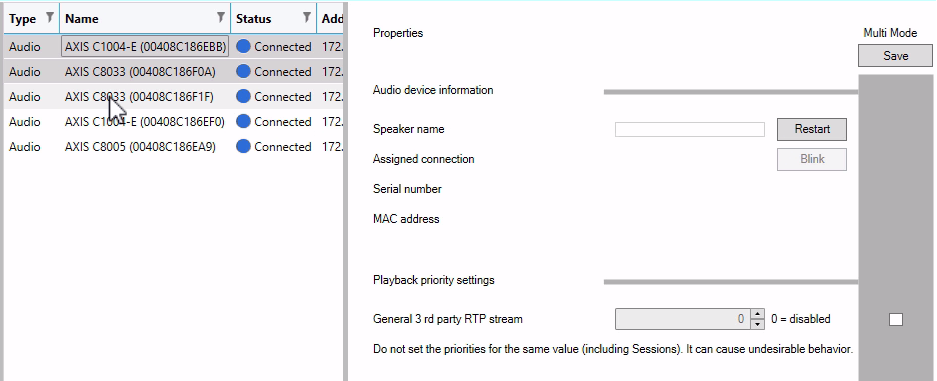
Properties
You can go to All Destinations and click an audio device to see its properties:
Restart – Restart the audio device
Blink – Enable LED blinking and sound notification.
Speaker name
Assigned connection – name and assigned connection in case the audio device is in the passive mode.
Serial number
MAC address
Playback Priority Settings
General 3rd party RTP stream
Audio Parameters
Volume and mute – sets the audio device volume.
Sound path delay [ms] – set the expected value.
Channels – set number of used channels
stereo – two independent audio channels are used for two independent speakers.
mono – only one channel is used for audio transmission and both speakers produce the same sound.
Bit rate [kbit] – define the count of bits to be transmitted in 1 s of the audio signal. The IP packet overhead is not included in this information.
Advanced Settings
Audio source - Enable or disable audio from line-in.
Disable multicast – multicast can reduce the network bandwidth and server resources. Multicast can be adjusted for each speaker individually.
Enable Telnet – Telnet connection is disabled by default. Select this option to enable Telnet during this connection. Only used for advanced troubleshooting.
Channel – set the audio device.
Generic RTP Output
Generic RTP output enables sending of the audio from AXIS Audio Manager Pro to all the devices that support audio via the RTP protocol with codec G711, L16. Codec is defined in this output. The audio stream will be sent to the defined IP address and port. A licence is necessary for a proper function of the RTP destinations.
Properties of RTP Destinations
This section is devoted to RTP destinations.
Destination name – this parameter shows the name of the RTP destination and can be changed.
Audio codec – allows you to select the required audio codec . You can choose one of the following options:
G711 u-Law
G711 A-Law
Liner PCM 16 bit Stereo
Liner PCM 16 bit Mono
IP Address – set the multicast IP address.
Port – set the port.
TTL − set the TTL (Time to Live) for multicast packets: -1 means system default and we recommend you not to change this parameter. This parameter may cause network overload if not used in cooperation with a network specialist.
Licence owned – shows if a valid licence was successfully added.
Change the settings for several audio devices simultaneously
If you select multiple audio devices you can save the settings for several audio devices. A grey strip indicates that you can change settings for more audio devices. Select a parameter, change it and click Save.
Audio Sources
An audio source is the type of audio input that is used with AXIS Audio Manager Pro. Before an audio source is used it must be configured. AXIS Audio Manager Pro has the following type of audio sources:
Hardware Inputs
Playlist
VoIP
Internet radio
RTP
SIP Mic
Audio bridge
Hardware Inputs
HW inputs are inputs of your server PC on which AXIS Audio Manager Pro is running.
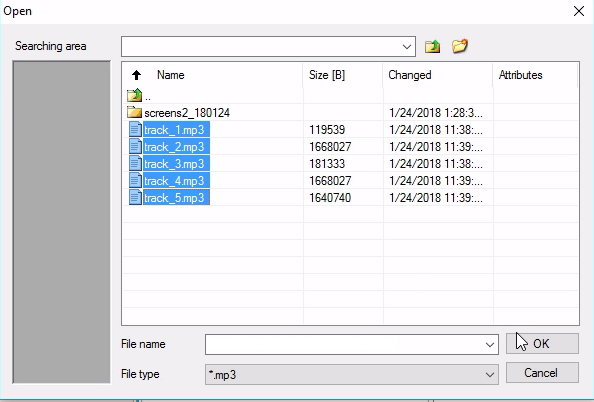
Playlists
Click the + button and add audio files to create a new playlist. You can select several files at once by using Shift/Ctrl.
Internet Radio
- Use an internet radio channel:
Go to Audio sources > Internet radio.
Enter a URL for and internet radio channel.
Set the radio delay in milliseconds.
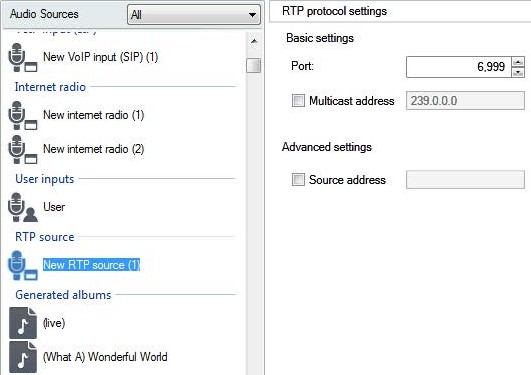
Generic RTP Input
Generic RTP input is a common audio input. All the devices that can transmit audio using RTP protocol and codec G711, L16 can serve as a sound source for the session. The sound source is defined by the listening port, the IP address (except for unicast, i.e. IP address of the server). If AXIS Audio Manager Pro listens on the defined multicast address, it is necessary to enter this address. You can define the source IP address to make the sound source secure.
SIP Mic
Go to Audio sources > SIP mic to connect and set up the 2N SIP Mic directly from AXIS Audio Manager Pro.
Audio bridge
To connect and set up an audio bridge directly from AXIS Audio Manager Pro, go to Audio sources and select the audio bridge.
VoIP Input
Go to Audio sources > VoIP input (SIP) connect an audio device to a VoIP (Voice over IP) PBX as a VoIP station via the SIP or a VoIP trunk.
Enter the PBX IP address, username, password (if requested) and the port to establish a connection to the PBX.
You can also allow direct VoIP calls to AXIS Audio Manager Pro by selecting Local VoIP input (SIP) and assign the source to a session. AXIS Audio Manager Pro can then receive peer-to-peer VoIP calls from VoIP phones.
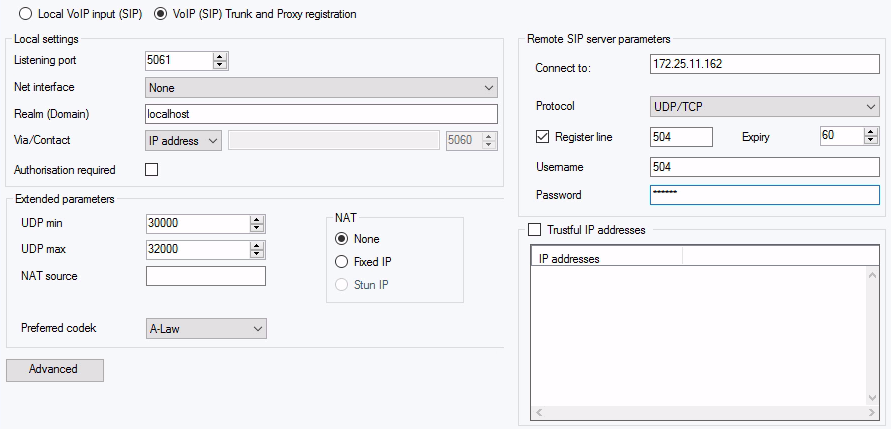
Local Settings
Listening port – is a local port of AXIS Audio Manager Pro which the given gateway is communicating with the counterparty.
Realm (Domain) – defines the domain over which this gateway is communicating. The domain and port specified here are relevant for subsequent call routing to AXIS Audio Manager Pro. The Request–URI field including Realm (Domain) + port are checked for incoming INVITE messages. If the values match the SIP GW setting, the packets are routed to AXIS Audio Manager Pro. The INVITE messages are served to the Request–URI values included in the Aliases field.
Via/Contact header – defines the contents of the Via and Contact headers. The following options are available:
IP address – fill in the unique PBX IP address.
FQDN – the header includes the PBX Host Name, which can be filled on the PBX IP interface.
NAT – fill in the fixed public IP address and NAT port to which signalling messages for the PBX should be sent by the counterparty. Packets are routed to the PBX based on the set port routing IP address on the router.
STUN – fill in the STUN server address and port to identify the current address behind the NAT router.
Authorisation required – activate authorisation request for incoming calls from the counterparty. User login data are used for call authorisation. All login are always searched through.
Remote SIP Server Parameters
Connect to – set the IP address or DNS name of the counterparty (operator or another PBX) to which you want to connect AXIS Audio Manager Pro via a trunk (where call and registration requests shall be routed). To use a port other than 5060, specify the port behind the colon (192.168.122.43:5071).
Protocol – specify whether UDP and/or TCP shall be used for transmission. If you choose NAPTR (Name Authority PoinTeR), a query to the DNS is made first and, depending on the reply, the proper transmission protocol is set.
Register line – enable registration with the counterparty and specify the gateway registration number (Caller ID). No call setup requests can be resent to an unregistered gateway.
Trustful IP Addresses
The parameter helps secure AXIS Audio Manager Pro against undesired call attempts via the given SIP gateway. Tick off this option to only let through requests from IP addresses included in the list. Add, remove or modify an IP address in the list using the buttons to the right of the IP address list or the context menu that you get when right-clicking in the IP address list.
Advanced VOIP (SIP) settings
Click on Advanced to go to the Advanced VOIP (SIP) settings.
SIP
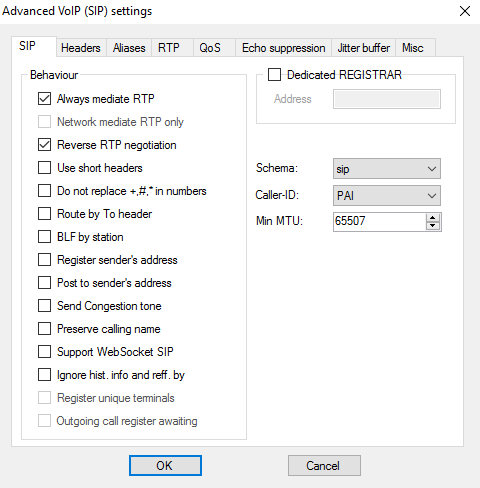
Always mediate RTP – route the RTP stream via the PBX VoIP card in all cases. Otherwise, the RTP stream might be routed outside the PBX (for VoIP – VoIP connections) and the PBX processes only signalling for such a call.
Reverse RTP negotiation – set the codec negotiating method. If you do not tick off this option, the PBX offers codecs in the INVITE message.
Use short headers – use abbreviated header items for outgoing SIP packets. Example: From = f, To = t, Via = v. This optimisation helps minimise data to be transmitted.
Do not replace +,#,* in numbers – the characters (+,#,*) will be replaced with adequate strings %xx in numbers.
Route by To header – incoming call routing on the port will obey the header setting. Otherwise To (and by default!), calls are routed by the Request URI header.
Register sender's address
Post to sender's address
Send Congestion tone
Preserve calling name
Ignore hist- info and reff. by
Schema – sets the sip or tel scheme in the "To" and "From" headers of the SIP. tel is used for networks based on the numbering plan according to recommendation E.164.
Caller-ID
Min. MTU – the minimum packet length for obligatory use of TCP in the UDP & TCP mode. The recommended maximum value is 1448 bytes.
Headers
Complete domain – specify the domain to be used within the From, To and headers.
Send information – P-Asserted-Identity – activate the P-Asserted-Identity header for the INVITE message. This header is used for CLIR transmission to the counterparty, giving it information on the calling number even in the case of active CLIR (Calling Line Identification Restriction). By default, the header is enabled on the SIP Gateway and disabled on the SIP Proxy.
Complete users
Aliases
Use this option to specify additional Realms (Domains) to be accepted on this port. Such incoming calls (their INVITEs) will be routed to this port whose Request–URIs match the given SIP GW or SIP Proxy settings and Domains or Aliases.
RTP
DSP – optimise data to be transmitted. Packets are not sent while the user is not speaking. VAD stands for Voice Activity Detection.
VAD off
VAD according to G.729 Annex B
VAD light
Generate comfort noise – enable comfort noise generating. As users of classic analogue lines are used to some background noise, this option simulates a similar call impression to them.
Mask lost packets – enable optimised computing of probable contents of lost packets.
Send with period
QoS
The TOS/DiffServ section helps you set outgoing packet parameters which define the packet priority for processing by network elements.
SIP – hexadecimal priority value for SIP packets.
RTP – hexadecimal priority value for RTP packets.
Default values – restore the default values for the two parameters
Echo Suppression
Use this tab to activate various echo cancelling methods.
Suppression off
Profile G.168 8 ms
Profile G.168 16 ms
Profile G.168 32 ms
Profile G.168 64 ms
Profile G.168 128 ms
Delay [ms]
Adaptive suppression
Non–linear processing
Reuse of coefficients
Automatic control
Jitter Buffer
Set the parameters in this tab to optimise packet delay fluctuation during network passage.
Type: Fixed, Adaptive, Short-run Adaptive, Non-Managed Network
Delay [ms]
Depth [ms]
Automatic adaptation
Short adaptation parameters
Low range [ms]
High range [ms]
Threshold
Miscellaneous
Send marks by INFO method
DTMF – select one of the two DTMF sending modes using the SIP INFO method. The modes have different formats of the DTMF transmitting message.
Receive marks in call
Mode – set the supported DTMF receiving mode for calls.
STUN server – The STUN server helps NAT clients (i.e. PCs behind the firewall) set up telephone calls with the VoIP provider hosted outside the LAN.
Address – complete the STUN server address (IP or domain name) to be used if the STUN IP method is selected in the port RTP interface configuration. The default value is stunserver.org.
Port – set the port to be used for STUN. The default value is port 3478.
KeepAlive
Period – define the KeepAlive packet sending interval. The default value is 10s.
Scheduler
Use the Scheduler to create events and actions for controlling playlists or sessions. A set of actions for a playlist is called an event, and you can control multiple playlists in multiple sessions within one event, see Create a schedule.
Create an event
Prepare a session with a playlist before creating an event.
To create an event, go to Scheduler and click Create event.
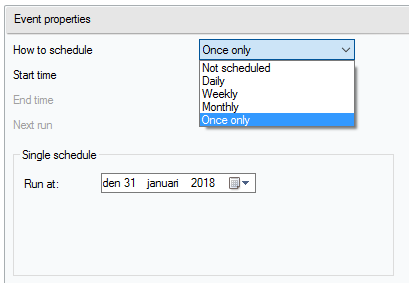
Event properties
Set the frequency of the event. The following options are available:
Not scheduled – this event will never be performed.
Daily – the event will start at the specified time every day (or Every xth day).
Weekly – the event will start at the specified time of the set days every week or Every xth week.
Monthly – select a day in the month for the action start and also in which months the action shall occur.
Once only
Set an action
Select a date where an event have been added. Drag and drop the required action. Click an action and edit its parameters in Action properties. You can set the following properties for actions:
Play, Stop Others and Previous and Activate/Deactivate session - set the start time only.
Volume – set the playlist volume – the volume level plus a smooth volume change.
Balance – set the playlist balance – set start time, time for the balance change and amount of balance change.
Show events
There is an event list in the left part of the Scheduler tab. Display the list in any of the following views: Month, Day or All events.
Month view – displays a calendar for navigation. Click a date to run the events associated with the selected date.
Day view – displays the details and what actions assigned to the selected date.
All events – displays all the events available.
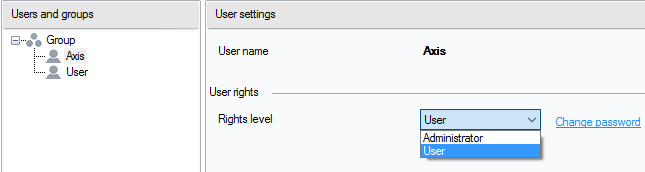
Users
Go to the Users tab to create and delete users, and change user rights.
Administration
The Administrator tab helps you set other system parameters and monitor the state of the system. The tab contains general settings and administration.
General settings - General
General allows you to set the language and external syslog server for logs.
The SYSLOG server is used for sending the AXIS Audio Manager Pro logs to an external Syslog server. After the IP address and destination port are set, the server messages will be sent automatically. The TCP protocol is used for packets and therefore it is necessary to enable TCP connection on your syslog server.
1,RADIO_DISCONNECT,"New session (1)","http://api.play.cz/danceradio192.mp3.
m3u","New internet radio (1)"
Par1: 1 - id of message. After server restart number is set to 0.
Par2: RADIO_DISCONNECT - type of message (see below)
Par3: "New session (1)" - source of message
Par4: "http://api.play.cz/danceradio192.mp3.m3u" - subject of change
Par5: "New internet radio (1)" - name of subject
The parameters are UTF-8 encoded and Type writer double quotes (" ") are used. If the text contains ' " ', then prefix '\' is used. It means that Speaker "Kitchen" will be encoded as "Speaker \"Kitchen\"" in the parameters.
SPEAKER_LOGIN - NetSpeaker has been logged in; Par3=Speaker
SPEAKER_LOGOUT - NetSpeaker has been logged off; Par3=Speaker
SPEAKER_CONNECT - NetSpeaker has been connected to session;
Par3=Speaker,Par4=Session
SPEAKER_DISCONNECT - NetSpeaker has been disconnected from session;
Par3=NetSpeaker name
FILE_CONNECT - Session starts playing song; Par3=Session,Par4=name of
file with full path,Par5=Name of playlist
FILE_DISCONNECT - Session stops playing song; ,Par3=Session,Par4=name
of file with full path,Par5=Name of playlist
USER_CONNECT - User was connected to session; Par3=Session,Par4=User
USER_DISCONNECT - User was disconnected from session; Par3=Session,
Par4=User
VIRTUAL_CONNECT - Virtual input was connected to session; Par3=Session,
Par4=Virtual input
VIRTUAL_DISCONNECT - Virtual input was disconnected from session;
Par3=Session,Par4=Virtual input
RADIO_CONNECT - URL input (radio) was connected to session;
Par3=Session,Par4=URL address,Par5=Name of radio
RADIO_DISCONNECT - URL input (radio) was disconnected from session;
Par3=Session,Par4=URL address,Par5=Name of radio
HW_CONNECT - HW input was disconnected to session; Par3=Session,Par4=HW
input source's name
HW_DISCONNECT - HW input was disconnected from session; Par3=Session,
Par4=HW input source's name
VOIP_CONNECT - VoIP input was connected to session; Par3=Session,
Par4=Voip source's name
VOIP_DISCONNECT - VoIP input was disconnected from session;
Par3=Session,Par4=Voip source's name
RTP_CONNECT - RTP source was connected to session; Par3=Session,
Par4=Rtp source's name
RTP_DISCONNECT - RTP source was disconnected from session; Par3=Session,
Par4=Rtp source's name's name
SESSION_MUTED - Session was muted; Par1=Session source's name's name
SESSION_UNMUTED - Session was unmuted; Par1=Session source's name
General settings - Audio Devices
Audio devices allows you to select and route audio to a single a local audio device. It makes troubleshooting easier.
General settings - Licences
License administration. Licences are mandatory for advanced functions of AXIS Audio Manager Pro. The licence will be valid after PC Windows/HW upgrade.
Interfaces
Gives an overview of available network interfaces.
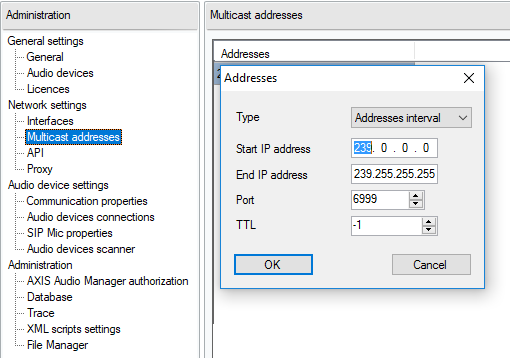
Network settings - Multicast addresses
To set the multicast addresses, go to Multicast addresses under Network settings. Select multicast for the address range, multicast for the port range or single IP address transmission. The default address scope is 239.0.0.0/8. Each group of speakers with the same settings (session, delay, bitrate...) use one multicast stream.
You can change the parameter for TTL (time to live) multicast packets. Use -1 to ensure that the system default is used. Some applications may require a change of these settings, but it should be done only in cooperation with a network specialist.
Network settings - API
Set port for AXIS Audio Manager Pro API connection and client restriction.
XML API allows an external 3rd party application (e.g. iPhone application, tablet application) to control the system. HTML API allows to send basic commands to the AXIS Audio Manager Pro and control sessions. HTML API is primary used by VoIP phones or intercoms but the command can be also sent from a web application.
Network settings - Proxy
Enable or disable the use of proxy. Enter the proxy host address.
Audio device settings - Communication properties
Set the manager domain for the connected audio devices to avoid connection to another AXIS Audio Manager Pro in the network.
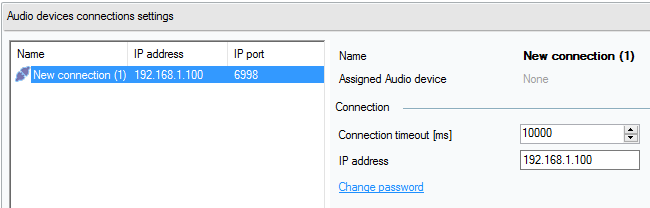
Audio device settings - Audio devices connections
Set the connection parameters for audio devices in passive mode. Save the parameters to establish a connection to the audio devices.
Go to Audio device connections under Audio device settings to set the parameters:
Connection timeout – define the time interval between the connection making attempts.
IP address – set the IP address for the audio device.
SIP Mic properties
Set the following parameters for the SIP Mic:
Server port: Set the server port to use when AXIS Audio Manager Pro initiates a connection to the SIP mic.
Mic UDP min port: Set minimum value for the port that will be used for announcement from the SIP mic to AXIS Audio Manager Pro.
SIP Mic UDP max port: Set the maximum value for the port that will be used for announcement from the SIP mic to AXIS Audio Manager Pro.
Change password: Set a new password for the communication between AXIS Audio Manager Pro and the SIP mic.
- Note
The GUI does not indicate if a password is already set. If a new password is entered the old password will be overwritten.
Audio device settings - Audio devices scanner
Use the scanner to search for the audio devices and their settings in the network. All speakers available in the network are displayed to the left. Having selected a speaker, you can change its parameters.
If there is a yellow-highlighted audio device in the scanner, please check the domain (both on the manager and end device sides), or check the license for excessive count of devices for trial use.
Go to Audio devices and select Audio devices scanner to set the parameters:
Description – enter optional details on the selected audio device.
Domain – Audio device with the set domain is assigned to the server with the same domain.
Serial number
MAC address
Mode – select the passive/active/search mode.
Passive mode necessary to set connection to an audio device from the server side in the Net Audio device settings & Net Audio devices connections section.
Active mode device gets connected to AXIS Audio Manager Pro automatically using the Server IP address parameter.
Search mode means that the audio device finds AXIS Audio Manager Pro in the network automatically, takes over the domain and connects to the server.
IP address – actual IP address for an audio device.
AXIS Audio Manager Pro IP address
AXIS Audio Manager Pro TCP port
Administration - AXIS Audio Manager Pro authorization
AXIS Audio Manager Pro authentication to audio device – set the password for manager authentication to the audio device.
Audio device authentication to AXIS Audio Manager Pro – set the password for the audio device authentication to AXIS Audio Manager Pro.
Administrator login authentication password – change the main administrator password of the Administrator user.
The GUI does not indicate if a password previously has been set. If a new password is entered the old password will be overwritten.
Only update the password for AXIS Audio Manager Pro authentication to audio device and Audio device authentication AXIS Audio Manager Pro when trouble shooting. Make sure telnet has been enabled before.