Introduction
Axis Communications strives to apply cybersecurity best practices in the design, development, and testing of our devices to minimize the risk of flaws that could be exploited in an attack. However, securing a network, its devices, and the services it supports requires active participation by the entire vendor supply chain, as well as the end-user organization. A secure environment depends on its users, processes, and technology. The purpose of this guide is to support you in securing your network, devices, and services.
From an IT/network perspective, the Axis switch is a network device like any other. Unlike a laptop computer, however, a network switch does not have users visiting potentially harmful websites, opening malicious email attachments, or installing untrusted applications. Nevertheless, a network switch is a device with an interface that may expose risks to the system it is connected to. This guide focuses on reducing the exposure to these risks.
The guide provides technical advice for anyone involved in deploying Axis solutions. It establishes a baseline configuration as well as a hardening guide that deals with the evolving threat landscape. You may need the product’s user manual to learn how to configure specific settings.
Web interface configuration
The guide refers to modifying device settings within the web interface of the Axis device according to the following instructions:
| Web interface configuration path |
|---|
| Advanced > Security |
Changelog
| Date and time | Version | Changes |
| September 2022 | 1.0 | Initial version |
Scope
The hardening instructions outlined in this guide are written for, and can be applied to, Axis managed switches that are manageable via web interface or SSH console, such as the AXIS T85 PoE+ Network Switch Series. Depending on the device, some functions might not be applicable or available.
Security notifications
We recommend that you subscribe to Axis security notification service to receive information about newly discovered vulnerabilities in Axis products, solutions, and services as well as how to keep your Axis devices secure.
CIS protection levels
We follow the methods outlined in the Center for Internet Safety (CIS) Controls Version 8 to structure our cybersecurity framework recommendations. The CIS Controls, formerly known as the SANS Top 20 Critical Security Controls, provide 18 categories of Critical Security Controls (CSC) focused on addressing the most common cybersecurity risk categories in an organization.
This guide refers to the Critical Security Controls by adding the CSC number (CSC #) for each hardening topic. For more information about the CSC categories, see the 18 CIS Critical Security Controls at cisecurity.org.
Default protection
Axis devices come with default protection settings. There are several security controls that you don’t need to configure. These controls provide a base level of device protection and serve as the foundation for more extensive hardening.
The AXIS OS Security Architecture diagram outlines AXIS OS cybersecurity capabilities across various layers. It provides a comprehensive overview of the security foundation, silicon-assisted security, AXIS OS operating system, and the application and access control layer.
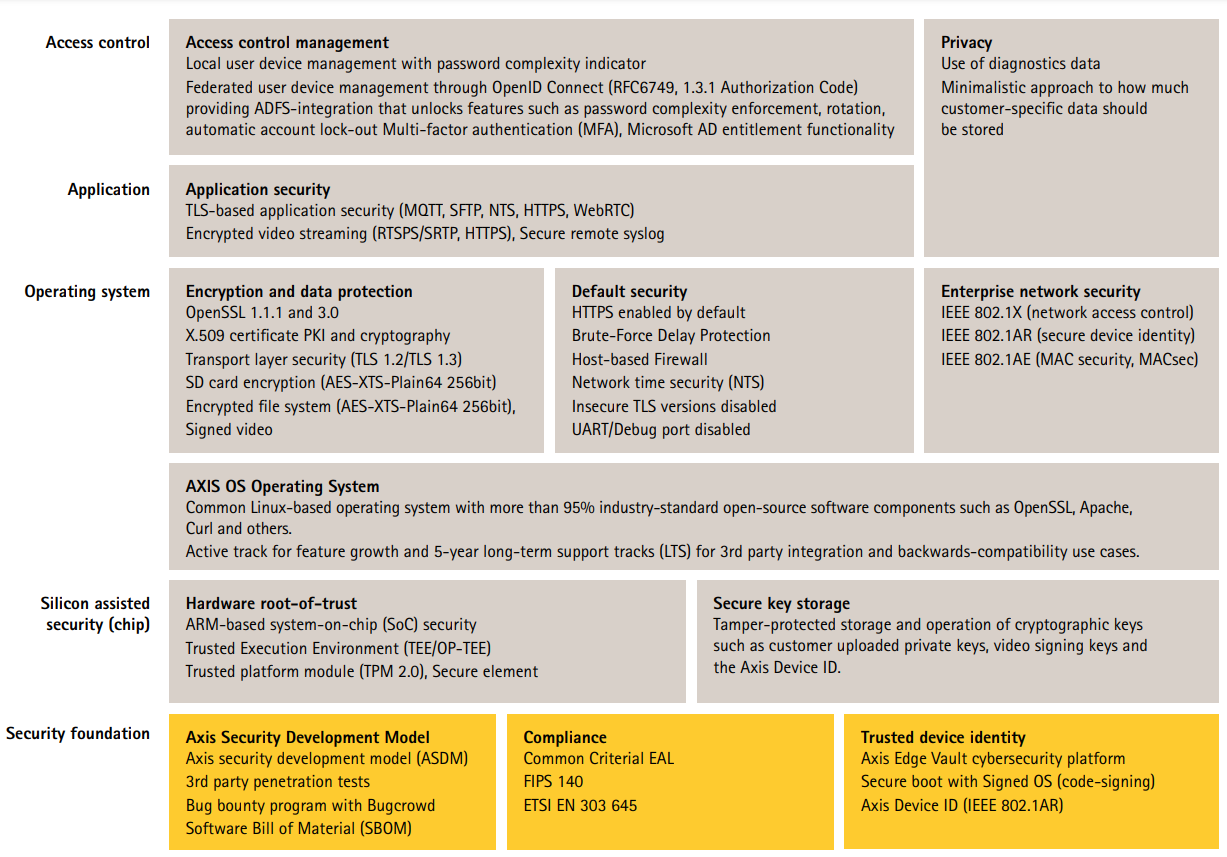
Right click and open the image in a new tab for a better visual experience.
Credentialed access
An Axis network switch will be able to operate out-of-the box using its default settings. Access to administrative functions can however only be reached using the automatic randomly generated password located on the product label on the bottom of the Axis switch. During first setup, the user will need to change the password during first access. For more information, see Set device root password.
Network protocols
CSC #4: Secure Configuration of Enterprise Assets and Software
Only a minimum number of network protocols and services are enabled by default in Axis network switches. In the table below you can see which these are.
| Protocol | Port | Transport | Comments |
|---|---|---|---|
| HTTP | 80 | TCP | General HTTP traffic such as web interface access or VAPIX. |
| HTTPS | 443 | TCP | General HTTP traffic such as web interface access or VAPIX. |
| NTP | 123 | UDP | Used by the Axis device for time synchronization with a NTP server. |
| SSDP/ UPnP | 1900 | UDP | Used by 3rd party applications to discover the Axis device via UPnP discovery protocol. |
| Bonjour | 5353 | UDP | Used by 3rd party applications to discover the Axis device via mDNS discovery protocol (Bonjour). |
It is recommended to disable unused network protocols and services whenever possible.
HTTPS enabled
CSC #3: Data Protection
HTTPS is enabled by default with a self-signed certificate. This enables setting the device password in a secure way.
| Web interface configuration path |
|---|
| Advanced > Security > Configuration > Switch > Auth Method Advanced > Security > Configuration > Switch > HTTPS |
Decommissioning
CSC #3: Data Protection
When decommissioning an Axis device, a factory default should be executed. After the factory default, all settings applied by the customer are erased.
Axis devices use both volatile and non-volatile memory, and while the volatile memory is erased when removing the power, information stored in the non-volatile memory remains and is made available again at start-up. To securely delete persistent, sensitive data on the device, a factory default needs to be performed.
Basic hardening
Basic hardening is the minimum recommended level of protection for Axis devices. The basic hardening topics are "configurable on the edge". This means that they can be directly configured in the Axis device without further dependencies to third-party network infrastructure, video, or evidence management systems (VMS, EMS), equipment or applications.
Factory default settings
CSC #4: Secure Configuration of Enterprise Assets and Software
Before starting, make sure that the device is in a known factory default state. The factory default is important when decommissioning devices as well as clearing user-data.
| Web interface configuration path |
|---|
| Advanced > Maintenance > Factory Defaults |
Upgrade to latest firmware
CSC #2: Inventory and Control of Software Assets
Patching software and firmware is an important aspect of cybersecurity. An attacker will often try to exploit commonly known vulnerabilities, and if they gain network access to an unpatched service, they may succeed. Make sure you always use the latest firmware since it may include security patches for known vulnerabilities. The release notes for a specific firmware may explicitly mention a critical security fix, but not all general fixes.
Firmware can be downloaded at https://www.axis.com/support/firmware.
| Web interface configuration path |
|---|
| Advanced > Maintenance > Firmware > Firmware Upgrade |
Set device root password
CSC #4: Secure Configuration of Enterprise Assets and Software
CSC #5: Account Management
The device root account is the main device administration account. During first setup, the user will need to change the password during first access. Make sure to use a strong password and limit the usage of the root account to administration tasks only. It is not recommended to use the root account in daily production.
When operating Axis devices, using the same password simplifies management but lowers the security in case of breach or data leak. Using unique passwords for each single Axis device provides high security but comes with an increased complexity to device management. Password rotation is recommended.
It is recommended to implement sufficient password complexity and length, such as NIST password recommendations. Axis switches support passwords up to 31 characters. Passwords shorter than 8 characters are considered weak.
| Web interface configuration path |
|---|
| Advanced > Security > Configuration > Switch > Users |
Create a client account
CSC #4: Secure Configuration of Enterprise Assets and Software
CSC #5: Account Management
The default root account has full privileges and should be reserved for administrative tasks. It is recommended to create a client user account with limited privileges for daily operation (if required). This reduces the risk of compromising the device administrator password.
| Web interface configuration path |
|---|
| Advanced > Security > Configuration > Switch > Users |
Configure network settings
CSC #12: Network Infrastructure Management
The device IP configuration depends on the network configuration, such as IPv4/IPv6, static or dynamic (DHCP) network address, subnet mask and default router. It is recommended to review your network topology when adding new types of components.
It is recommended to use static IP address configuration on Axis devices to ensure network reachability and disentangle the dependency to e.g., a DHCP server in the network that might be a target for attacks.
| Web interface configuration path |
|---|
| Advanced > System > Configuration > IP > IP Interfaces |
Correct date and time configuration
CSC #8: Audit Log Management
From a security perspective, it is important that the date and time are correct so that, for example, the system logs are time-stamped with the right information, and digital certificates can be validated and used during runtime. Without proper time-sync, services that rely on digital certificates such as HTTPS, IEEE 802.1x, and others may not work correctly.
It is recommended that the Axis device clock is synchronized with a Network Time Protocol (NTP) server, preferably two. For individuals and small organizations that do not have a local NTP server, a public NTP server may be used. Check with your internet service provider or use a public NTP server such as pool.ntp.org.
| Web interface configuration path |
|---|
| Basic > Date & Time |
Configure VLANs
CSC #1: Inventory and Control of Enterprise Assets
CSC #4: Secure Configuration of Enterprise Assets and Software
CSC #13: Network Monitoring and Defense
By the means of VLANs, it is possible to segment the physical network virtually into several different networks. By breaking up the network into multiple, distinct, and mutually isolated broadcast domains, the received network traffic of hosts in the network can be lowered, the network attack surface can be minimized, and network hosts and resources are bundled organizationally within one VLAN, without the need of being made available to the entire physical network. This increases overall network security.
| Web interface configuration path |
|---|
| Advanced > VLANs |
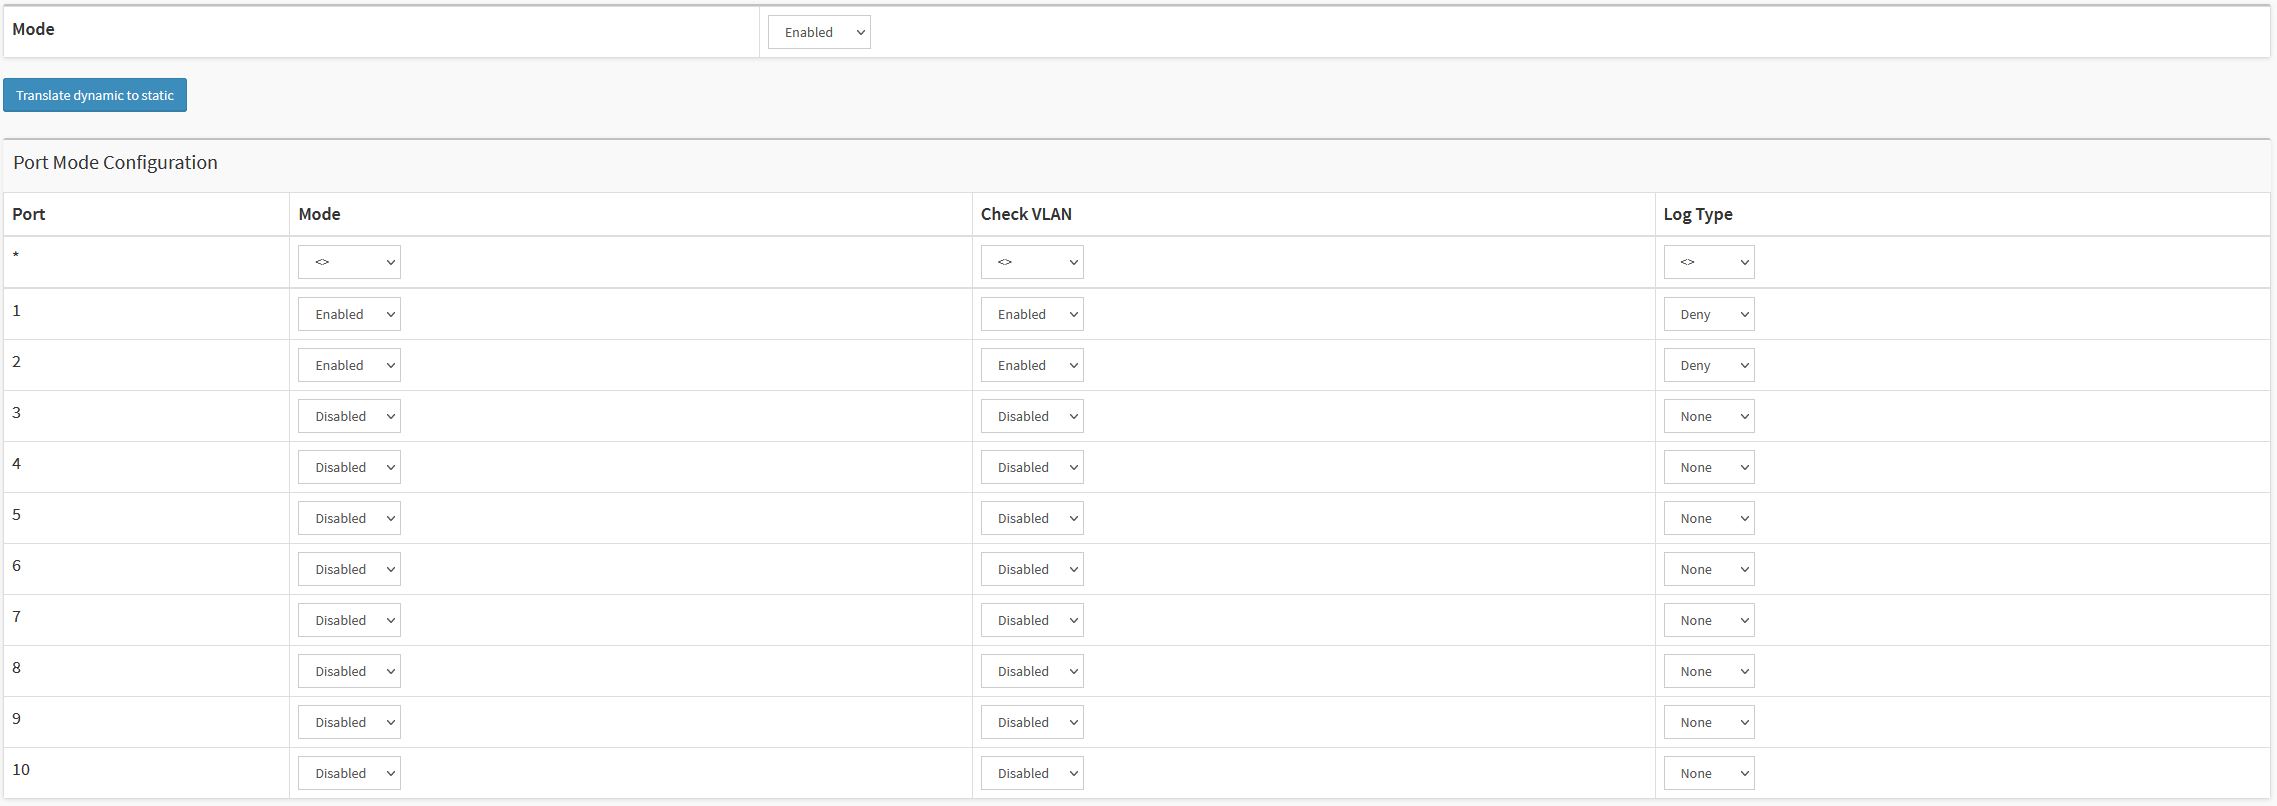
Configure IP source guard
CSC #4: Secure Configuration of Enterprise Assets and Software
CSC #13: Network Monitoring and Defense
IP source guard is a feature used to restrict IP traffic on DHCP snooping untrusted ports by filtering traffic based on the DHCP snooping table or manually configured IP source bindings. It helps prevent IP spoofing attacks when a host tries to spoof and use the IP address of another host.
Example of an IP source guard configuration allowing only one dynamic client on switch port 1. On switch port 2 only statically configured clients are allowed.
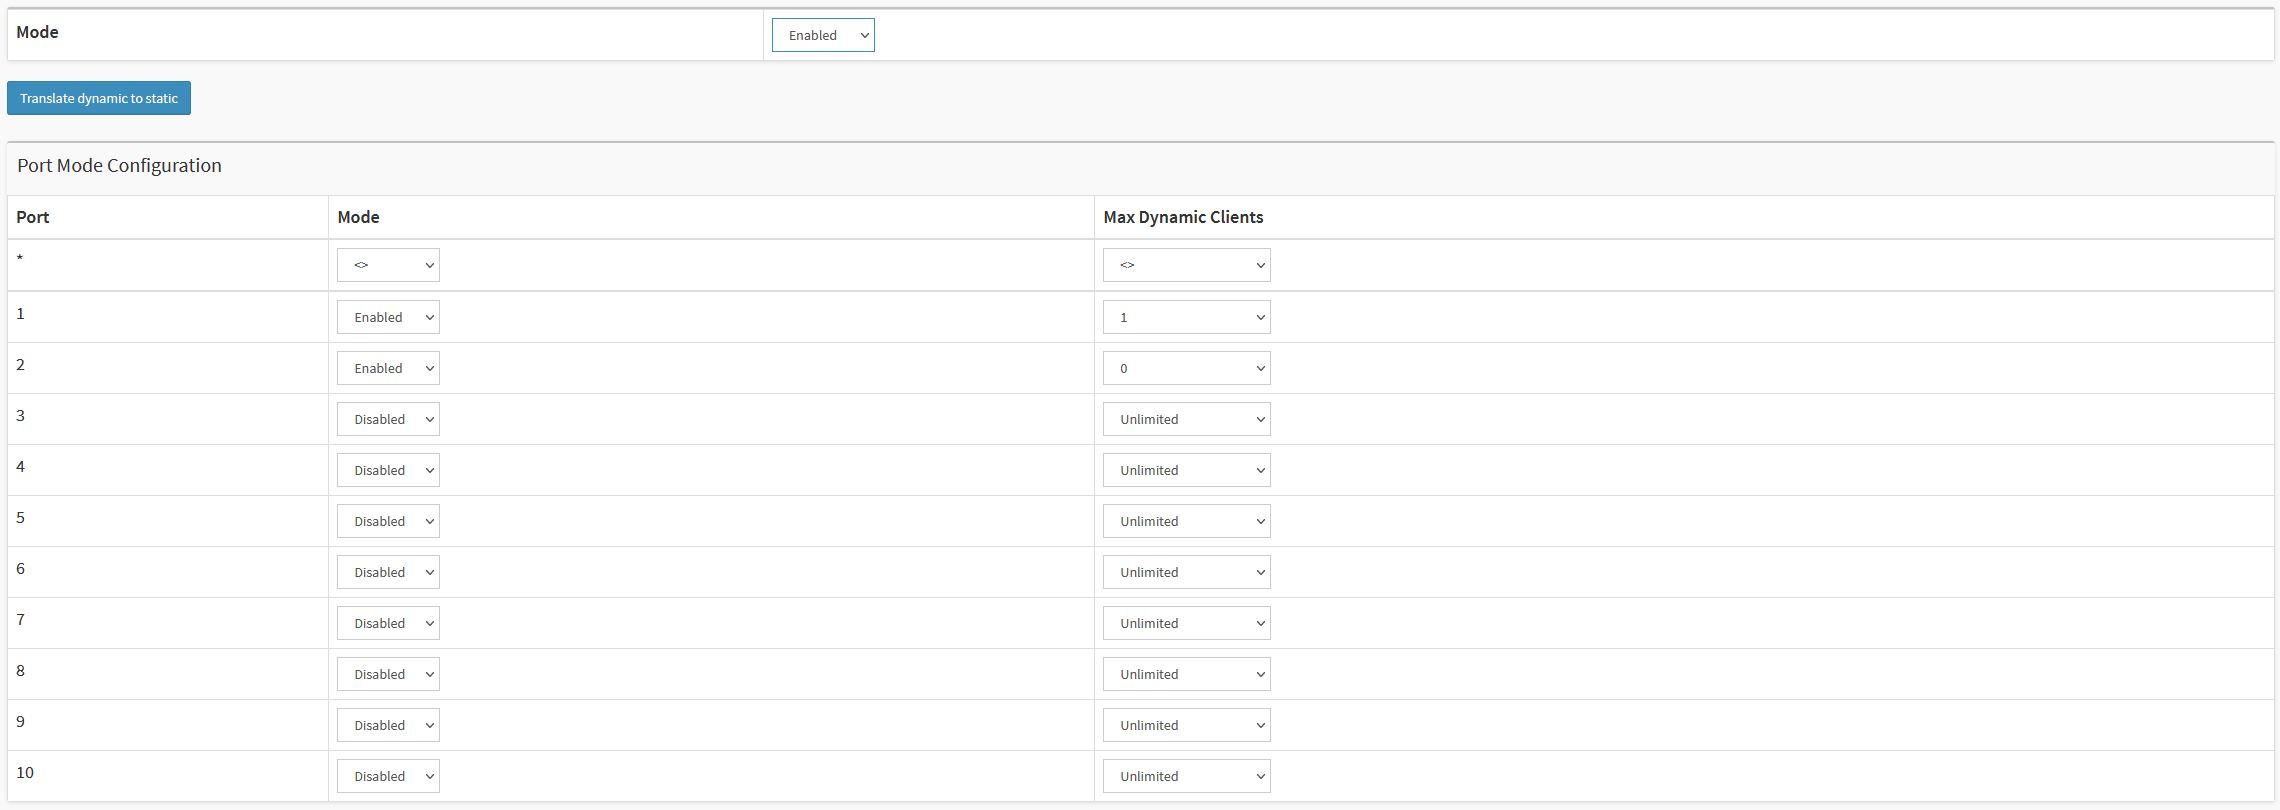
Example of an IP source guard static table.

| Web interface configuration path |
|---|
| Advanced > Security > Configuration > Network > IP Source Guard > Configuration |
Configure ACLs
CSC #4: Secure Configuration of Enterprise Assets and Software
CSC #13: Network Monitoring and Defense
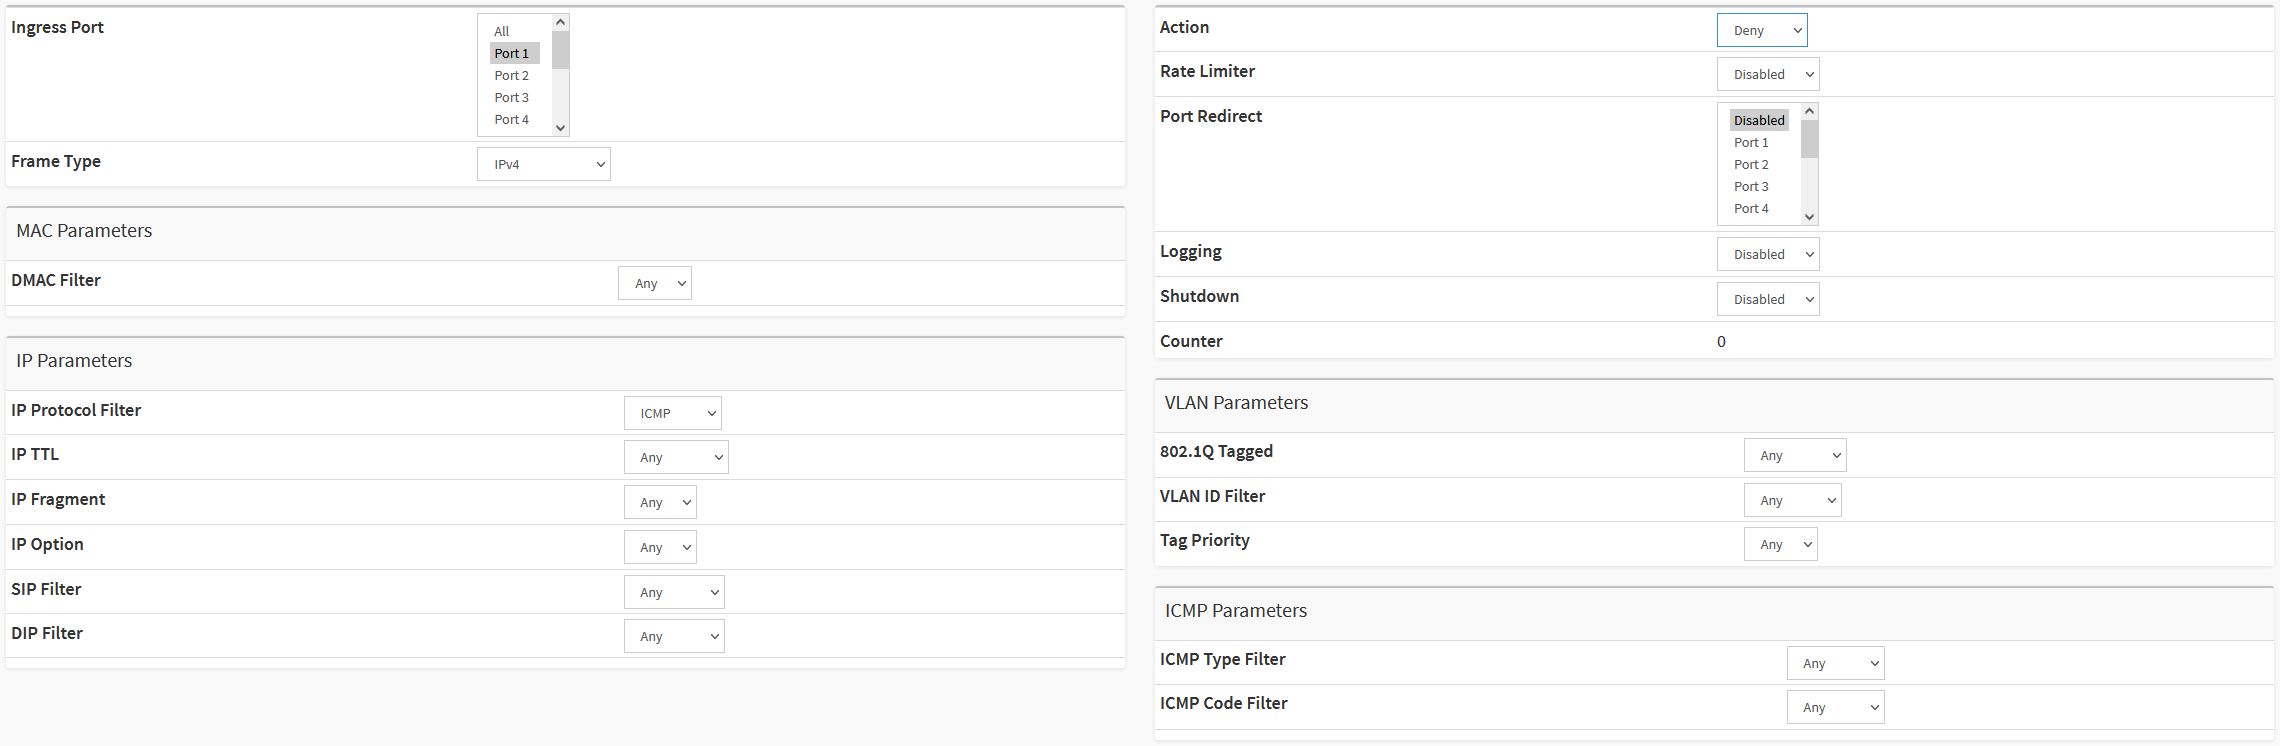
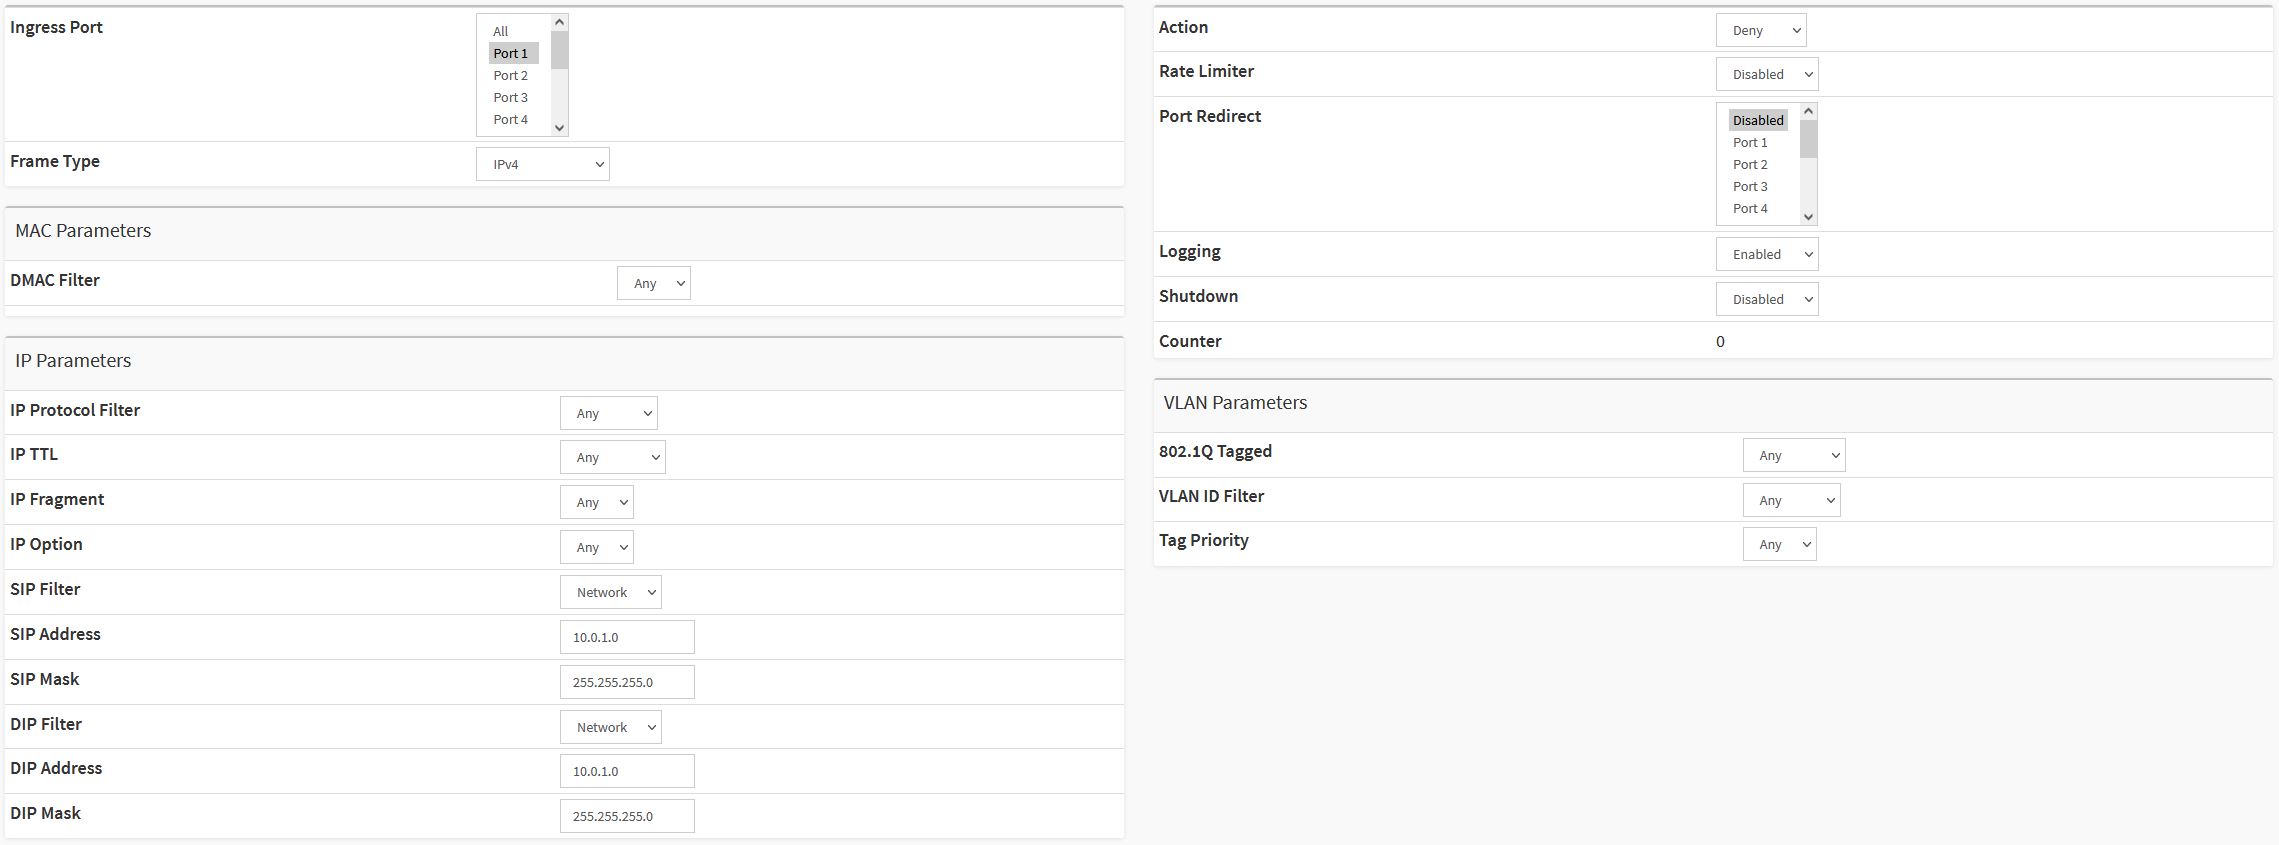
ACL is an acronym for Access Control List. It is a list containing access control entries (ACE) which specify individual users or groups permitted or denied to specific traffic objects, such as a process or a program.
ACL implementations can be quite complex. In networking, the ACL refers to a list of service ports or network services that are available on a host or server, each with a list of hosts or servers permitted or denied using the service. ACL can generally be configured to control inbound traffic, and in this context, they are like firewalls.
Example of an ACE configuration blocking ICMP traffic on switch port 1.
Example of an ACE configuration blocking all IPv4 traffic on switch port 1 to/from the 10.0.1.0/24 subnet.
| Web interface configuration path |
|---|
| Advanced > Security > Configuration > Network > ACL > Access Control List |
Disable unused services/functions
CSC #4: Secure Configuration of Enterprise Assets and Software
Even though unused services and functions are not an immediate security threat, it’s good practice to disable unused services and functions to reduce unnecessary risks. Keep reading to learn more about services and functions you can disable if they are not in use.
SSH
Access to the network switch via SSH allows for more granular and detailed configuration than the web interface. It is also used for troubleshooting and debugging purposes. While being a secure communication protocol, it is recommended to make sure that the SSH access is disabled when no longer used.
| Web interface configuration path |
|---|
| Advanced > Security > Configuration > Switch > Auth Method |
Discovery protocols
Discovery protocols, such as Bonjour or UPnP, are support services that make it easier to find the Axis device and its services on the network. After deployment, once the Axis device IP address is known, it is recommended to disable the discovery protocol to stop the Axis device from announcing its presence on the network.
| Web interface configuration path |
|---|
| Advanced > System > Configuration > Information > Bonjour Discovery Advanced > UPnP |
Unused physical network ports
Not all physical network ports might be occupied at all times. It is recommended to disable unused network ports administratively on the switch side. Leaving unused network ports unattended and active imposes a severe security risk.
| Web interface configuration path |
|---|
| Advanced > Ports > Configuration |
Switch reboot schedule
CSC #2: Inventory and Control of Software Assets
During normal operation, any recurrent scheduled restart of the switch should not be required since this would also involve disconnection or restart of the connected devices (if powered by the switch). It is recommended to keep this option disabled until needed for troubleshooting and debugging purposes only.
| Web interface configuration path |
|---|
| Advanced > Maintenance > Reboot Schedule |
HTTPS
CSC #3: Data Protection
It is recommended to configure the Axis device for HTTPS only (no HTTP access possible). HTTP access is insecure with no encryption at all, HTTPS encrypts the traffic between the client and the Axis device. We recommend that you use HTTPS for all administrative tasks on the Axis device. While self-signed certificate is not trusted by design, it is adequate for secure access to the Axis device during initial configuration and when no public key infrastructure (PKI) is available at hand. If available, the self-signed certificate should be removed and replaced with proper signed client certificates of the PKI-authority of choice.
| Web interface configuration path |
|---|
| Advanced > Security > Configuration > Switch > Auth Method Advanced > Security > Configuration > Switch > HTTPS |
Configure ARP inspection
CSC #4: Secure Configuration of Enterprise Assets and Software
CSC #13: Network Monitoring and Defense
Several different types of well-known attacks known as "ARP Cache Poisoning" can be launched against a host or devices connected to layer 2 networks by "poisoning" the ARP caches of the network switch. The result of a successful attack would be a temporary loss of network hosts and traffic. ARP inspection is used to block such attacks. Only valid ARP requests and responses can go through the switch device.
Example of an ARP inspection configuration on switch port 1 and 2.
| Web interface configuration path |
|---|
| Advanced > Security > Configuration > Network > ARP Inspection |
Configure port security limit control
CSC #4: Secure Configuration of Enterprise Assets and Software
CSC #13: Network Monitoring and Defense
Port security limit control allows for limiting the number of users on a given port. A user is identified by a MAC address and VLAN ID. If limit control is enabled on a port, the limit specifies the maximum number of users on the port. If the number is exceeded, a selected action is taken.
While port security limit control can be enabled through the web interface, the limit can only be set via the command line interface.
Example of a port security limit control configuration on switch port 1 and 2.
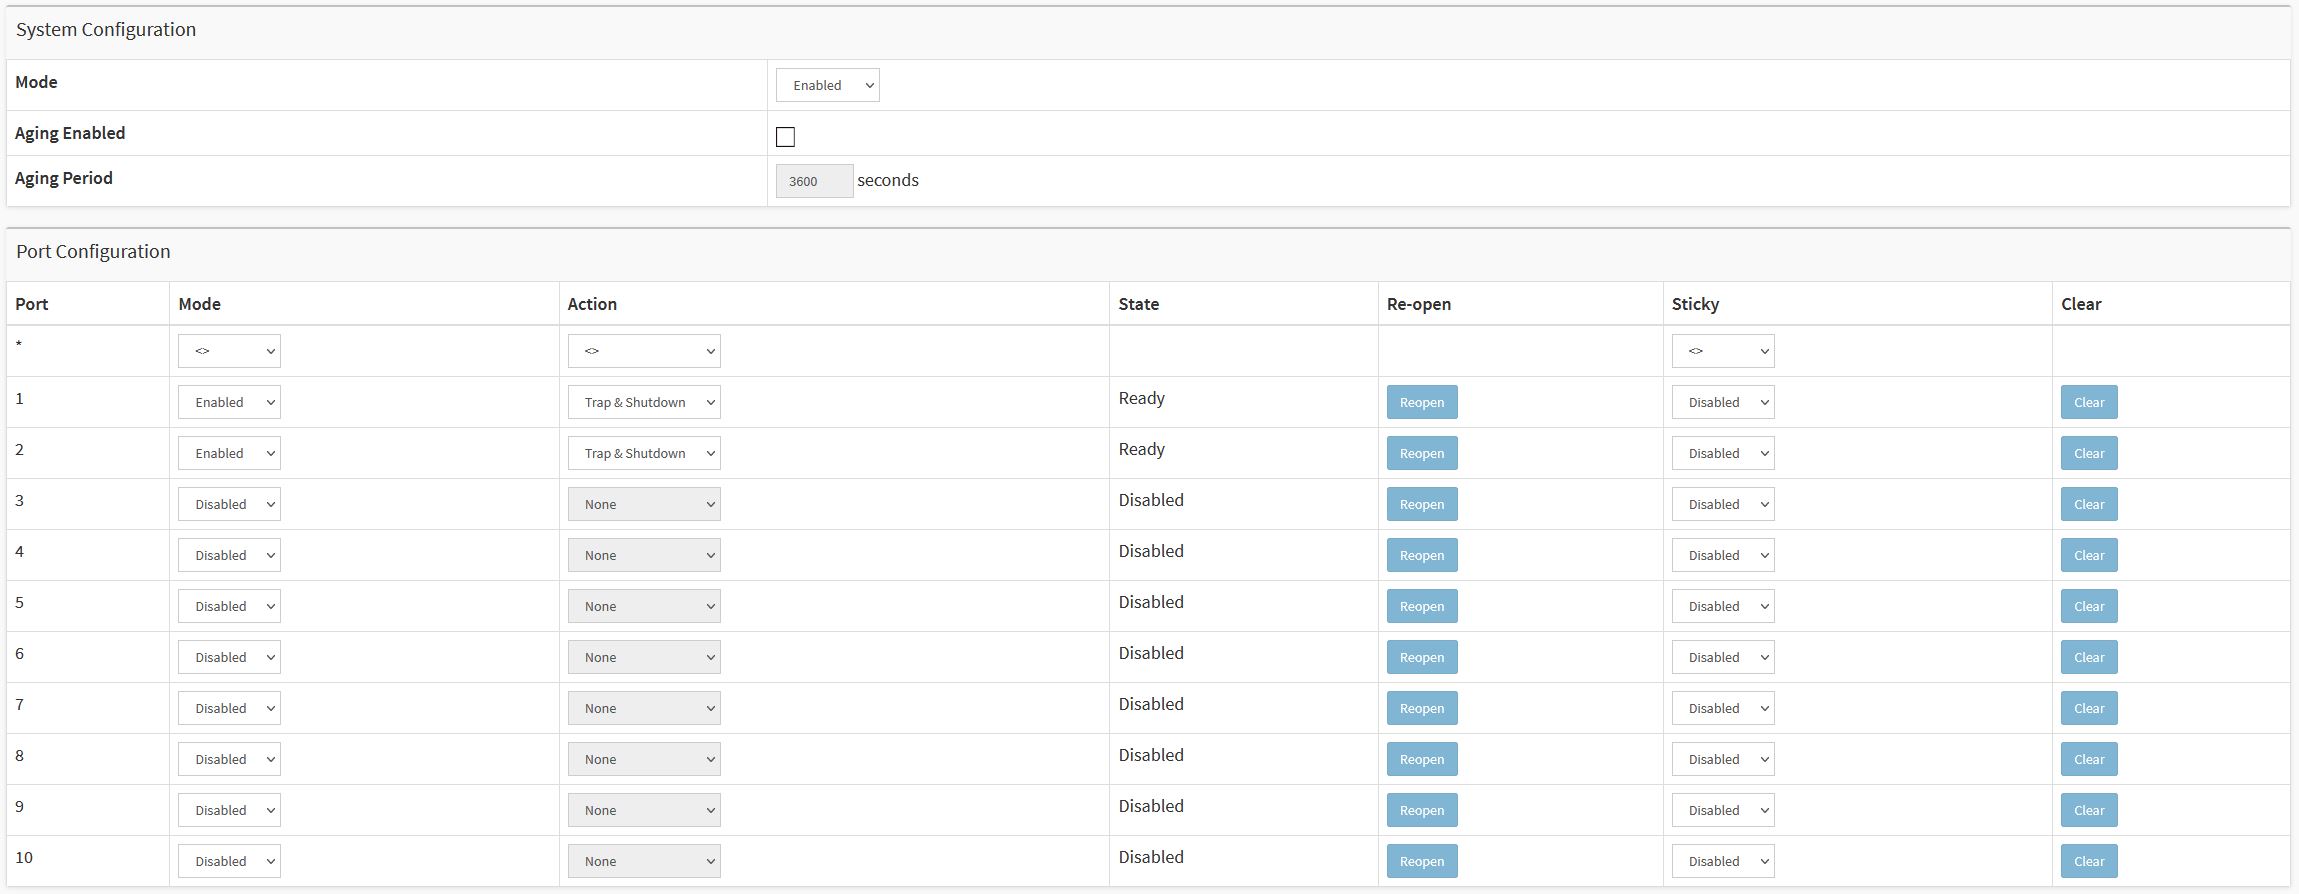
| Web interface configuration path |
|---|
| Advanced > Security > Configuration > Network > Limit Control |
| Command line configuration path |
|---|
| Configuration Mode > interface GigabitEthernet x/x > port-security maximum x |
Extended hardening
The instructions for extended hardening build on the hardening topics described in Default protection and Basic hardening. But while you can apply the default and basic hardening instructions directly on your Axis device, the extended hardening requires active participation by the entire vendor supply chain, the end-user organization, and the underlying IT- and/or network infrastructure.
Limit internet exposure
CSC #12: Network Infrastructure Management
It is not recommended to expose the Axis device as a public web server or public network access of any kind, allowing unknown clients to gain network access to the device.
Network vulnerability scanning
CSC #1: Inventory and Control of Enterprise Assets
CSC #12: Network Infrastructure Management
It is recommended to perform regular vulnerability assessments of the infrastructure the Axis device is part of as well as of the Axis device itself. These vulnerability assessments are usually performed by network security scanners.
The purpose of a vulnerability assessment is to provide a systematic review of potential security vulnerabilities and misconfigurations. Please make sure that the Axis device being tested is updated to the latest available firmware before starting the scan.
It is recommended to review the scanning report and filter out known false-positives for Axis devices stated here.
The report and remaining remarks that are left should be submitted in a helpdesk ticket to Axis support.
Trusted public key infrastructure (PKI)
CSC #3: Data Protection
CSC #12: Network Infrastructure Management
We recommend that you deploy web server and client certificates to your Axis devices that are trusted and signed by a public or private certificate authority (CA). A CA-signed certificate with a validated trust chain helps to remove browser certificate warnings when you connect over HTTPS. A CA-signed certificate also ensures the authenticity of the Axis device when you deploy a network access control (NAC) solution. This mitigates the risk of attacks from a computer impersonating an Axis device.
You can use AXIS Device Manager, which comes with a built-in CA service, to issue signed certificates to Axis devices.
IEEE 802.1x network access control
CSC #6: Access Control Management
CSC #13: Network Monitoring and Defense
Axis devices have support for IEEE 802.1x port-based network access control utilizing the EAP-TLS method. For optimal protection, authentication of Axis devices must utilize client certificates signed by a trusted Certificate Authority (CA) of choice. See the following guideline on how to configure an Axis network switch for IEEE 802.1x.
| Web interface configuration path |
|---|
| Advanced > Security > Configuration > AAA > RADIUS Advanced > Security > Configuration > Network > NAS |
SMTP monitoring
CSC #8: Audit Log Management
Axis network switches can be configured to send out alarm events through SMTP messages.
| Web interface configuration path |
|---|
| Advanced > SMTP |
SNMP monitoring
CSC #8: Audit Log Management
Axis devices support the following SNMP protocols:
SNMP v1: supported for legacy reasons only, should not be used.
SNMP v2c: may be used on a protected network segment.
SNMP v3: recommended for monitoring purposes.
| Web interface configuration path |
|---|
| Advanced > Security > Configuration > Switch > SNMP |
Remote syslog
CSC #8: Audit Log Management
Axis devices can be configured to send all log messages encrypted to a central syslog server. This simplifies audits and prevents log messages from being deleted in the Axis device either intentionally/maliciously or unintentionally. It also allows for extended retention time of device logs depending on company policies.
| Web interface configuration path |
|---|
| Advanced > System > Configuration > Log |