Introduction
This manual describes how to use AXIS Companion version 4.0 and later.
- Are you currently using AXIS Companion Classic?
To upgrade to the latest version, see Migrating from AXIS Companion Classic to AXIS Companion.
System recommendations
OS: Windows 10 64-bit
CPU: Intel Core i5
RAM: 4 GB
Graphics card: 256 MB onboard video memory
Graphics card driver: Always use the latest version
Network: 100 Mbps
Internet access is required during system setup and management (live and recorded video available offline)
Uninterruptible Power Supply (UPS)
Mobile devices: iOS 15 or Android 8.1
If you are using devices with firmware 5.50, see Using devices with firmware 5.50.
Get started
- Note
Internet access is required during the system setup.
When the installation is done:
All Axis devices in the system have the latest firmware.
All devices have a password.
Recording using the default settings is active.
You can use remote access.
Register a My Axis account
Register a My Axis account at axis.com/my-axis/login.
To make your My Axis account more secure, activate multi-factor authentication (MFA). MFA is a security system that adds another layer of verification to ensure the user’s identity.
- To activate MFA:
Go to axis.com/my-axis/login.
Log in with your My Axis credentials.
Go to and select Account settings.
Click Security settings
Click Handle your 2-factor authentication.
Enter your My Axis credentials.
Choose one of the authentication methods Authenticator App (TOTP) or Email and follow the on-screen instructions.
Install the hardware
Before you install the hardware:
Make sure you have internet access.
Make sure you use the same network for your computer and the devices your are going to install.
Hard reset any devices that were previously used in another system.
Use an AXIS S30 Series Recorder as recording device
Connect the AXIS S30 Series Recorder to your network through the LAN port.
Mount your devices and connect them to the recorder's PoE ports.
Connect the power supply to the recorder.
Wait a few minutes for the recorder and devices to boot up before proceeding.
Keep the recorder in a well ventilated environment and with plenty of empty space around the it to avoid overheating.
You can find more information about the recorder, such as power requirements and how many devices you can connect, in the documentation on the recorder’s support page on axis.com.
Use an AXIS Surveillance Card as recording device
Connect a PoE device, such as a PoE switch, to your network.
Insert an AXIS Surveillance Card into the devices you wish to record from.
Mount your devices and connect them to the PoE device.
Wait a few minutes for the devices to boot up before proceeding.
Install the desktop app
Go to axis.com/products/axis-companion and click Download to download AXIS Companion for Windows.
Open the setup file and follow the setup assistant.
Sign in with your My Axis account.
Create a site
A site is a single point of entry to a surveillance solution, for example all cameras in a store. You can keep track of several sites through a single My Axis account.
If you’ve used an earlier version of AXIS Companion, the sites you created won’t appear in the list of sites in AXIS Companion. You might also have devices that aren’t supported. See Migrating from AXIS Companion Classic to version 4 for more information.
Start the AXIS Companion desktop app.
Sign in with your My Axis account.
Click Create new site.
Name your site and enter your company name.
Click Next.
Select the devices you want to add to your site.
Click Next.
Select storage.
Click Next.
On the Ready to install page, Offline mode and Upgrade firmware are turned on by default. You can turn them off if you don’t want to access offline mode or upgrade your devices to the latest firmware version.
Click Install and wait while AXIS Companion configures the devices.
The configuration can take several minutes.
Install the mobile app
With AXIS Companion mobile app, you can access your devices and recordings from anywhere. You can also get notifications when events occur, or when someone calls from an intercom.
For Android
Click Download or scan the following QR Code®.
For iOS
Click Download or scan the following QR Code.
Open the AXIS Companion mobile app and log in with your Axis credentials.
If you don’t have a My Axis account, you can go to axis.com/my-axis to register a new account.
QR Code is a registered trademark of Denso Wave Incorporated in Japan and other countries.
Daily use
Access your devices
Sign in to AXIS Companion on a computer or a mobile device using your My Axis account.
Enter the site that contains your devices.
View live video
Go to
Select which camera you want to view.
View live video in a grid
Go to
Click , or right-click in the image and select Show split view.
To go back, right-click in the split view and select Exit split view.
View live video in a sequence
Go to
Click , or right-click in the image and select Show split view.
Right-click in the split view and select Show as sequence.
To go back, right-click in the sequence view and select Exit sequence view.
Play a recording
Go to .
Use the timeline and calendar to find the recording.
Select the camera in the timeline and move the playback marker to the desired time.
- Note
When you move the playback marker, the video image is updated continuously. This makes it easy for you to find a specific moment in the recording.
Click Play.
Save a recording
Go to > .
Select start and end times for a recording.
Select which devices to save recordings from.
To save to a USB drive on an AXIS S30 Series Recorder, select the Save to recorder USB checkbox.
- Note
The first partition of your USB device must use an exFAT or NTFS file system.
Save the recording.
- Change the location of your saved recordings:
Go to > Settings > File.
Change the location under Recordings.
Play a saved recording
To play a saved recording, open it with AXIS File Player.
When you save a recording, the AXIS File Player will be saved in the same folder. The AXIS File Player has a timeline showing what time the recording was made.
Validate a saved recording
You can validate a recording to confirm that the timestamp and images have not been manipulated after the recording was first saved. For this purpose, a digital signature will be included in the file when you save a recording. You can add a password to the digital signature for increased security.
- To protect your digital signature with a password when saving a recording:
Go to > Settings > File.
Under Video format, select Windows Media Format (.asf).
Select Show digital signature options when saving recordings.
Next time you save a recording, the Digital signature window appears, which allows you to select a password for the signature.
- Validate a recording:
Open the saved recording with AXIS File Player.
Click Tools and select Verify digital signature.
Enter the password, if a password was added to the signature, and click OK.
A window appears to inform whether or not the recording is valid.
Take a snapshot
- Take a snapshot from live view:
Go to
Click
- Take a snapshot from recordings:
Go to
Use the timeline and calendar to find the recording.
Select the camera in the timeline and move the playback marker to the desired time.
Click to start investigation mode.
Investigation mode allows you to step through the recorded video, frame by frame, to find the exact moment when an incident happened and take a snapshot from that moment.
To find the incident, click on the thumbnails to step 30, 15, 5 or 1 frames backward (top panel) or forward (bottom panel). You can also move the slider.
When satisfied, click to take a snapshot.
For most cameras the snapshot will contain the entire camera image, regardless of the zoom level. For cameras with a dewarped image, the snapshot will be the zoomed-in image.
- Change the location of your saved snapshots:
Go to > Settings > File.
Change the location under Snapshots.
Adjust the image settings
Go to > Cameras > Image.
Select the camera you want to adjust.
- You can control the image by adjusting settings like:
Appearance
Exposure
Overlays
Day & night
Privacy mask
Focus & zoom
View events
You can view a list of events that have been detected by your devices.
Click to see the list of events.
Click on a specific event in the list to see a recording of it.
Right-click on a specific event in the list and select Go to live view to go to the live view of the device that triggered it.
To see events in the list and get notifications when they occur, you need to set up event notifications.
To set up event notifications based on AXIS Companion built-in motion detection, see Configure video motion detection.
To set up event notifications based on other Axis analytics applications, see the How to articles on axis.com/products/axis-companion-4/support.
Example
A receptionist pushes a panic button. An operator is notified and views the event.
Configuration
Configure the video quality
You can configure the video quality to suit your image quality requirements and bandwidth usage. Video quality settings affect motion recording, continuous recording and the live view.
Go to > Cameras > Video quality.
Select the camera you want to configure.
Edit the Resolution and/or the Frame rate in the high or low profile.
Click Apply to save.
Configure video motion detection
When you set up AXIS Companion system, continuous recording is the recording method that is automatically configured. Continuous recording is most advantageous if you use it together with event notifications based on video motion detection.
- Send event notifications based on motion detection to your AXIS Companion desktop app:
Go to > Events > Video Motion Detection.
Set up a schedule.
Under Activation, select the devices you wish to get a notification from.
- If the motion detection is triggered too often, you can adjust the settings to ignore parts of the view or certain types of events.
Go to > Recordings settings > Video motion detection.
Select the camera you want to adjust.
Select which part of the camera view to include or exclude during motion detection.
Edit the predefined area to include during motion detection.
Select Exclude areas and edit the area to exclude from motion detection.
- Note
For some camera models you can only add rectangular shapes, and for others you can add polygons.
Expand Advanced to adjust the settings of the filters.
Small objects filter: Ignore small objects, such as animals.
Swaying objects filter: Ignore objects that only move within a short distance, such as trees or flags that move when it is windy.
- Note
The swaying objects filter is not available for all camera models.
Short-lived objects filter: Ignore objects that only appear briefly in the image, such as light beams from passing cars or fast-moving shadows.
To turn on event notifications in AXIS Companion mobile app, see Turn on notifications.
If you want to turn off continuous recording and only record when motion is detected, see Record only when motion is detected.
Record only when motion is detected
If you don’t want to use continuous recording as recording method in your AXIS Companion system, you can configure AXIS Companion to only record when motion is detected.
Go to > Cameras.
Turn off Continuous recording for your devices.
Turn on Motion detection for the device/s of your choice.
For more information about motion detection, see Configure video motion detection.
Set up notifications
You can configure AXIS Companion to send notifications to your desktop and mobile app.
To set up event notifications based on AXIS Companion built-in video motion detection, see Configure video motion detection.
To set up event notifications based on other Axis analytics applications, see the How to articles on axis.com/products/axis-companion-4/support.
To turn on event notifications in AXIS Companion mobile app, see Turn on notifications.
Use intercoms
Add intercoms to your video surveillance system to be able to answer calls from your desktop or mobile app, and to unlock doors.
To unlock a door, your intercom must be properly connected to the door’s electronic lock. The documentation for your intercom contains information about how to make this connection correctly. To find the documentation for your intercom, go to axis.com/products/axis-network-intercoms
Adjust the output gain
You can adjust the output gain for the intercom ringtone and calls.
Go to > Cameras > Intercom.
Select the intercom you want to adjust.
Adjust the number of dB under Output gain.
Click Apply.
Manage call timeout
You can decide how long an unanswered call should ring before it’s automatically declined.
Go to > > Cameras > Intercom.
Select the intercom you want to adjust.
Adjust the number of seconds under Calling timeout.
Click Apply.
Adjust unlock duration
You can decide how long a door should remain unlocked after you open it through AXIS Companion.
Go to > Cameras > Intercom.
Select the intercom you want to adjust.
Edit the number of seconds under Unlock duration.
Click Apply.
Use network speakers
Add speakers to your video surveillance system to improve the security on your premises by using event-triggered announcements and direct callouts.
- For information about how to adjust speaker volume and use event-triggering, see the user manual for your speaker. You can find the user manual on the product’s support page on axis.com or on help.axis.com.
- If you want to use multiple speakers, use AXIS Audio Manager Edge to group them in zones. You can find the user manual for AXIS Audio Manager Edge on the support page or on help.axis.com.
- For information about how to use Axis network speakers to play pre-recorded announcements in AXIS Companion, see the How to article on axis.com/products/axis-companion-4/support.
Send live announcements
In AXIS Companion, a push-to-talk function makes it possible to send live announcements to one or several speakers.
- Send an announcement to a speaker:
Go to and select the camera of your choice.
Select your speaker.
Press and hold the mic icon to activate the microphone.
When you have sent your announcement, release the mic icon.
If you want to send an announcement to multiple speakers, use AXIS Audio Manager Edge to group your speakers and add them to a zone before you send your announcement.
You can find the user manual for AXIS Audio Manager Edge on the product’s support page or on help.axis.com.
Use strobe sirens
Add strobe sirens to your video surveillance system to improve the security on your premises by using event-triggered signals and alarms.
- For information about how to set up a strobe sire, see the user manual for your strobe siren. You can find the user manual on the product’s support page on axis.com or on help.axis.com.
- For information about how to use AXIS D4100-E Network Strobe Siren in AXIS Companion, see the How to article on axis.com/products/axis-companion-4/support.
Add a user
Go to > Users.
Click Add....
Type an email address and select an access level.
Click OK.
- The user receives an email with instructions on how to get started. The final step is to accept the invitation. See Accept an invitation for more information.
- Note
If you add a user who doesn’t have a My Axis account, the user will be asked to create an account.
- The following access levels are available:
Administrator
Full accessOperator
Can access recordings and live view, but can’t make any changes to the siteViewer
Can only access live view
Accept an invitation
When you receive an invitation to a site, you must first accept the invitation before accessing the site.
Go to > Invitations.
Click Accept.
Click Close when you’re done.
Add a device to your site
Connect the device to the recorder’s PoE ports or to an external PoE switch.
Go to > Cameras > Overview, > Recorders or > Other devices.
Click Add devices.
Select the device you want to add to your site.
Click Next.
Enter a password.
Use this password to access the web interface of your device or offline mode in AXIS Companion mobile app.
Click Next.
On the Ready to install page, Offline mode and Upgrade firmware are turned on by default. You can turn them off if you don’t want to access offline mode or upgrade your devices to the latest firmware version.
Click Install and wait while AXIS Companion configures the device.
The configuration can take several minutes.
Remove a device from your site
Go to > Cameras or > Other devices.
To remove a recorder, see Remove a recorder from your site.
Click > Remove next to the device you want to remove.
Click OK.
If the device is connected to a recorder, you need to select if you want to remove the recordings from the recorder.
Remove a recorder from your site
Before you can remove a recorder, you need to change the storage option of the devices that are connected to it.
- Change the storage option:
Go to > Cameras > Storage.
Select the device you want to change.
Select No storage.
Click Apply.
- Remove the recorder:
Go to > Recorders.
On the row of the recorder you want to remove, click > Remove.
Click OK.
Replace a device in your site
If you need to replace a device that is connected to a recorder, you may want to save the recordings before removing and replacing the device. Once the device has been removed from the site, the recordings will no longer be available in the Recordings area in AXIS Companion.
- Save your recordings:
Go to > .
Select which device you want to save recordings from.
AXIS Companion can save up to 24 hours of recorded material at a time.
- Remove the device:
Go to > Cameras.
Click > Remove next to the device you want to remove.
In the dialog that appears, select Remove recordings from recorder.
If you do not select this option, the recorder will not free up the associated recording slot, and other devices will not be able to connect to the same slot.
To add a replacement device, see Add a device to your site.
Replace a recorder in your site
Before you can replace a recorder in your site, you need to remove the devices that are associated with it.
- Remove devices:
Go to > Cameras > Storage.
Select the device you want to change.
Select No storage.
Click Apply.
- Repeat for all of the devices that are connected to the recorder you would like to replace.
To remove the recorder, see Remove a recorder from your site.
- Add a new recorder to your site:
Follow the steps in Add a device to your site.
Go to > Cameras > Storage.
Select the device you want to edit.
Select the new recorder from the list.
Click Apply.
Activate offline mode
If you activate offline mode, you can run AXIS Companion with limited functionality even if the internet connection temporarily goes down. You will be able to access Live view and Recordings locally without internet connection, but not the Configuration menu to make changes to your site.
To activate offline mode:
Go to > Site.
Turn on Offline mode.
- The site must be online when you turn on offline mode. Each Windows user must turn on offline mode for their clients.
- Offline mode is not intended for permanent use. Connect your AXIS Companion system to the internet at least every three months to update the firmware and certificates of your devices.
- The computer that accesses the site in offline mode should be connected to the same subnet as the devices. You can’t use offline mode if your AXIS Companion client is connected to the internet.
- The mobile app will use the same password as was set for the device when the site was created.
- You will not be able to get a full system report without internet connection.
- For sites that will be used mostly offline, we recommend you to set them up with static IP or DHCP reservation.
Maintenance
Manage your system remotely
Remote access to a surveillance system can save a lot of time and money during maintenance and troubleshooting. With remote access, you will get an overview of the installations and can undertake simple maintenance steps right away, such as:
Restart devices
Upgrade devices
Manage user permissions
Get started with remote management
Only users with administrator rights have access to the sites.
Go to connect.axis.com
Log in to your My Axis account to see a list of your sites.
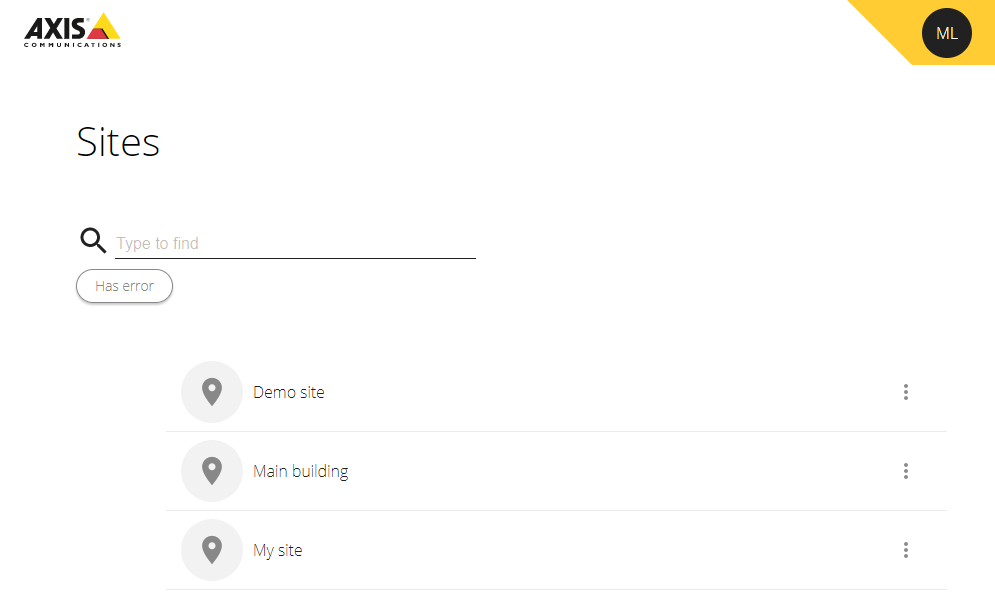
To find a site, type in the search field.
To only display sites that contain errors, click Has error.
To sign out, click the initials menu and Sign out.
Manage sites

- Invite a user to a site:
Click > Users.
Click Add a user to a site.
Type the e-mail address of the user and select a permission level
To read more about the different permissions, see Add a user.
Click Invite.
- Remove a user from a site:
Click > Users.
Click > Remove from site.
- Rename a site:
Click > Rename.
Type the new name and click Rename
- Remove a site:
Click > Remove.
You need to remove the devices in your site before you can remove it.
Click Delete to confirm.
Manage devices
When you click on a site, you will see a list of all of the included devices.
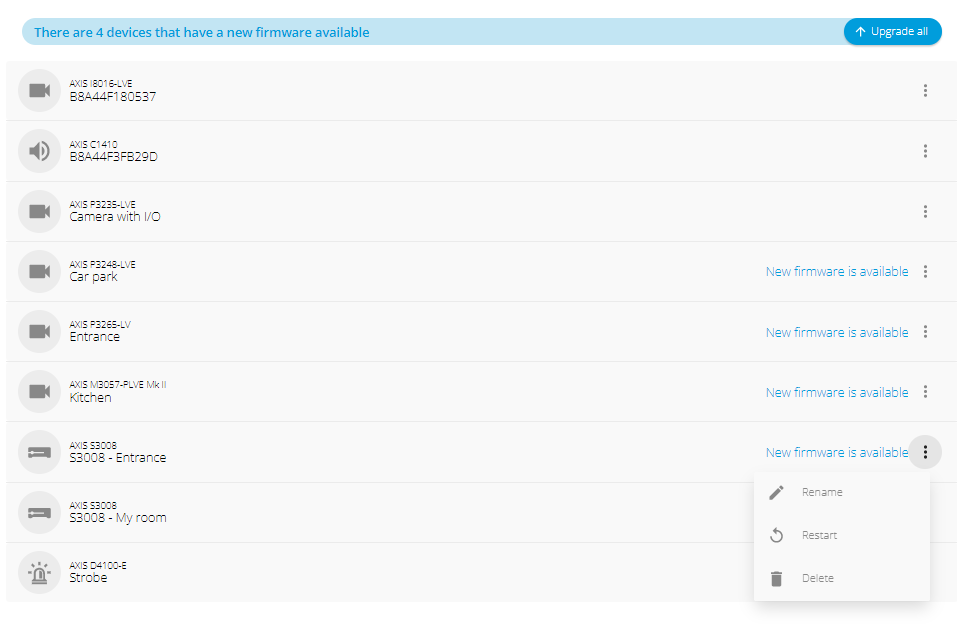
- Upgrade the firmware for a single device:
Click on the device to see its properties.
Click Upgrade.
- Upgrade the firmware for all devices:
Click Upgrade all.
The option is only visible when there are several available firmware updates.
A firmware upgrade can take several minutes.
- Rename a device:
Click > Rename.
Type the new name and click Rename
- Restart a device:
Click > Restart.
Click Restart to confirm.
- Delete a device:
Click > Delete.
Click Delete to confirm.
Upgrade firmware
Upgrade the firmware of your devices regularly to get the latest features and security updates.
Go to > Cameras > Overview.
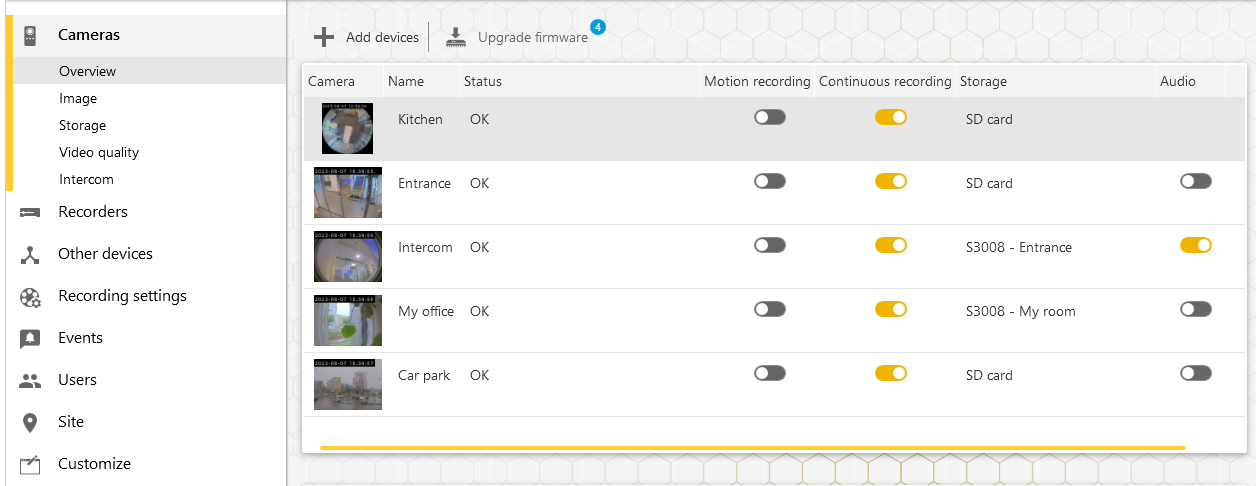
Click Upgrade firmware.
Select the devices that you want to upgrade.
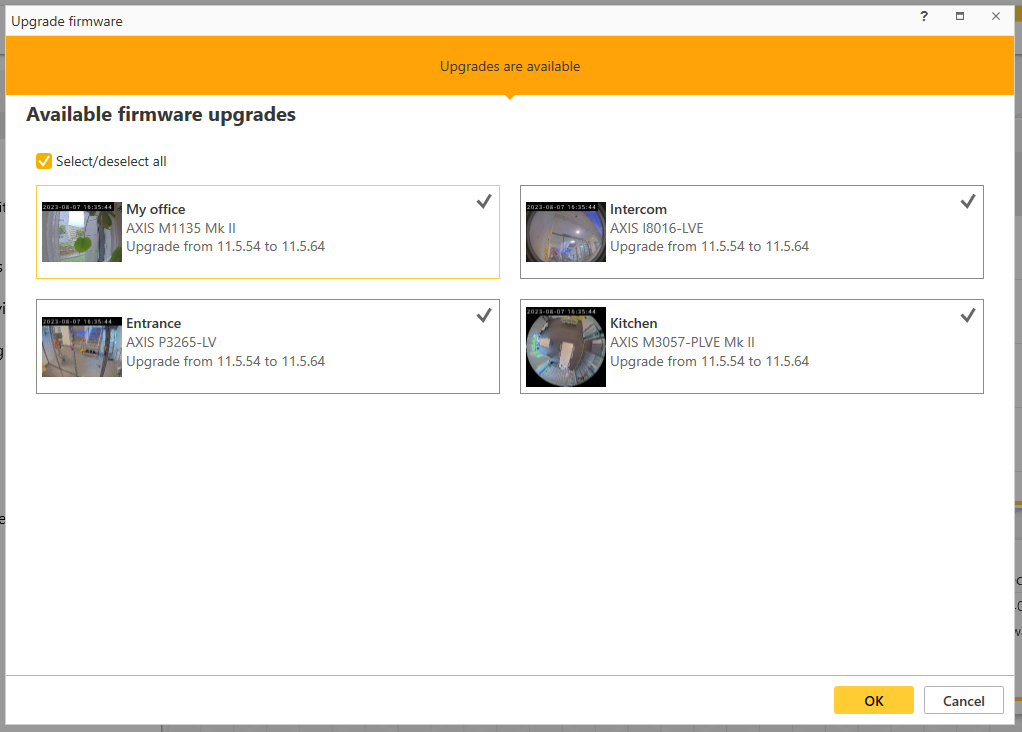
Click OK.
The upgrade can take several minutes.
Hard reset a device
- A hard reset will not affect your recordings.
- A hard reset will reset all the settings, including the IP address.
Select the device you want to hard reset and remove it from the site.
Disconnect the power from the device.
Press and hold the control button on the device, and then reconnect the power.
Keep the control button pressed for 15–30 seconds until the status LED indicator flashes amber.
Release the control button.
The process is complete when the status LED indicator turns green.
The product has now been reset to the factory default settings.
Add the device to the site again.
Hard reset a recorder
Move the recorder carefully while it’s switched on. Sudden moves or shocks may damage the hard drive.
- A hard reset will reset all the settings, including the IP address.
- A hard reset will not remove your recordings.
- A hard reset will not remove the encryption password.
Switch off the recorder:
Press the power button on the front of the recorder for 4-5 seconds until you hear a beep.
Wait until the recorder is switched off, then turn it over to access the control button.
Press and hold the control button. Press and release the power button to start the recorder. Release the control button after 15-30 seconds when the LED indicator flashes amber.
Carefully put the recorder back in its place.
The process is complete when the status LED indicator turns green. The product has been reset to the factory default settings. If no DHCP server is available on the network, the default IP address is
192.168.0.90Reset your devices connected to the recorder.
When you add your recorder to a site after a hard reset, you will be asked to type your encryption password to unlock the recorder, or to click Format disk to set a new password.
The mobile app
With AXIS Companion mobile app, you can access your devices and recordings from anywhere. You can also get notifications when suspicious events occur, or when someone calls from an intercom.
To download the mobile app to your Android or iOS device, see Install the mobile app.
Overview
The mobile app contains many of the features and settings that are available in the desktop app. Use these four tabs to access and make changes to your sites.
Video: Where you access the live view and recordings of your devices, switch sites if you have access to more than one, or create new sites.
Events: Where you find the list of events that have been detected by your devices. Click on a specific event to see a recording of it.
Devices: Where you access the settings of your devices. For example, you can upgrade the firmware, change the recording method and add or remove a device.
More...: Where you manage users and notifications, change the theme or get help if you run into issues.
Turn on notifications
You can get notifications to your mobile app when different events occur, for example when motion is detected, or when someone calls from an intercom.
- To turn on notifications
Turn on notifications for AXIS Companion mobile app in your mobile device’s notification settings.
Open AXIS Companion mobile app.
Go to More > > Notifications.
Select the notifications you want to turn on or off.
Add a device in the mobile app
Make sure your mobile is connected to the same network as your devices and your computer running the desktop app.
Go to Devices.
Click .
Select the devices you want to add.
Click Next.
Enter a password.
Use this password to access the webpages of the devices or offline mode in the mobile app.
Click Next and wait while AXIS Companion configures the device.
The configuration can take several minutes.
Create a site in the mobile app
Make sure your mobile is connected to the same network as your devices and your computer running the desktop app.
Log in to your My Axis account.
If you have sites associated with your My Axis account: Click on the site name in the top left corner.
If you don’t have sites associated with your My Axis account: Click Welcome in the top left corner.
Click .
Click Next.
Name your site and click Next.
Add your company name and click Next.
Select the devices you want to add to your site and click Next.
Enter a password for your devices.
Use this password to access the webpages of your devices or to access offline mode in the mobile app.
Click Next.
Verify that the site details and devices you have added are correct and click Next.
Wait while AXIS Companion configures the devices.
The configuration can take several minutes.
The TV app
Show video on an external display
- What you need:
AXIS Companion app installed on your mobile device.
AXIS Companion TV app installed from the app store on your Apple TV or Android TV device.
Your cameras, mobile app and TV app must all be connected to the same local network.
AppleTV 4 and Nvidia Shield with Android 6 or later.
- This is how you do it:
Open AXIS Companion mobile app and log in.
Go to Devices > and select your external display.
- Note
It may take a few seconds before the icon appears.
Select the cameras you want to show on your external display.
Tap and wait for the configuration to complete.
You can view a single camera at a time or create a split view with up to 16 cameras.
When AXIS Companion TV app opens, read the instructions on the screen about how to navigate in the app.
Troubleshooting
AXIS Companion software is designed to be used with new devices, or with devices where previously modified settings have been restored. If you add devices to AXIS Companion that have been used in previous systems, make sure to hard reset them before you add them to your site. Modifications of device settings that are not available in AXIS Companion can in some cases affect your system and impact the performance.
Furthermore, always make sure that your AXIS Companion client and Axis devices are updated with the latest software and firmware updates.
- Visit axis.com/products/axis-companion for information such as:
Datasheet
Compatible products
Support and resources
Get notifications on the status of Axis services
If you’re experiencing general problems in AXIS Companion, you can check the status of the Axis services to rule out any incidents or scheduled maintenance.
Go to https://status.axis.com/.
Expand AXIS Companion to view the status of the different functions.
To subscribe and get notifications on the status of Axis services:
On https://status.axis.com/, click SUBSCRIBE TO UPDATES.
Enter your email address.
Click SUBSCRIBE VIA EMAIL.
Select the individual components you’re interested in.
Click Save.
Open the email from Axis status and click Confirm subscription.
Technical issues, clues and solutions
| Site creation | |
|---|---|
No devices are detected | Check that your devices have power and are connected to the same subnet as your computer. |
The devices are not supported | Older Axis devices with a firmware that can’t be updated to 5.50 or later are not supported. |
Communication errors | AXIS Companion couldn’t contact the device. Possible reasons:
|
| Login | |
|---|---|
The username or password is incorrect | The username and password combination is not valid. |
The site is not available |
|
| Live view | |
|---|---|
There is no video |
|
The video is lagging |
|
No contact | The device can’t be accessed on the network. Check that your devices have power and internet connection. |
Unable to retrieve stream | Make sure that you don’t request too many streams from the cameras. See the troubleshooting section in the user manual of each individual camera at help.axis.com. |
| Configuration workspace | |
|---|---|
Communication error | The connection to the device is temporarily lost. If you click on the link that appears, AXIS Companion tries to repair the connection. Make sure that the device is available on the network with valid network settings. |
Configuration error | The device doesn't have the expected settings or is configured inaccurately. If you click the link, AXIS Companion tries to repair the error. If the attempt fails, hard reset the device and add it to the site again. |
No contact | The device is no longer available on the network. Check that the device/recorder has power and access to the internet. |
Storage error | The device can't contact the recorder. Make sure IPv6 is enabled for your devices (AXIS Companion uses IPv6 for communication). |
| Storage and recordings | |
|---|---|
Storage error | There are issues with the recording media, for example a missing SD card, faulty disk or incorrect configuration.
|
Can’t access the recorder | The recorder is offline. Make sure it has power and internet connection. |
| Intercoms | |
|---|---|
Intercom calls are not coming through | Check that your client (computer or mobile phone) has internet connection. |
Can’t unlock the door | Make sure the intercom is correctly wired and configured. See the user manual for your intercom for more information. You can find the user manual at help.axis.com. |
| The mobile app | |
|---|---|
There are no notifications | Make sure you have turned on notifications in your mobile phone and in the app. See Turn on notifications for more information. |
I can’t reach my site remotely |
|
Save a system report
In AXIS Companion, go to > Save system report.
When you register a new case at Axis Helpdesk, attach the system report.
Using devices with firmware 5.50
AXIS Companion supports Axis devices with firmware 5.50 or higher. However, the 5.50 firmware is no longer supported by Axis and can’t be upgraded. When using Axis products with 5.50 firmware, it is important to consider how various settings and situations can affect performance. An increasing number of connected clients, including audio, could impact performance. Devices running on 5.50 firmware in an AXIS Companion system can show symptoms such as lagging video or long response time from the camera.
AXIS Companion is a packaged solution. When a device is installed and added to a site, it is configured automatically for best performance. Therefore, it is highly recommended to use the default settings, i.e. continuous recording, not video motion detection.
If you still experience loss of performance, try the following to reduce the load on the device:
In AXIS Companion, go to > Cameras > Video quality.
Select the camera you want to configure..
Lower the camera resolution of the live and recorded video.
Lower the frame rate (FPS) of the live and recorded video.
Migrating from AXIS Companion Classic to AXIS Companion
Requirements
If you are already using AXIS Companion Classic and want to upgrade to the latest version, read through the table below to confirm that your devices meet the requirements.
| AXIS Companion | AXIS Companion Classic | |
|---|---|---|
| Supported products | AXIS Companion IP cameras. AXIS Companion solutions that include an AXIS S30 Series Recorder support Axis cameras and encoders with firmware 5.50 or higher. AXIS Companion solutions that don’t include an AXIS S30 Series Recorder support Axis cameras and encoders with firmware 8.40 and higher. For more information, see Using devices with firmware 5.50. AXIS Companion Eye mini L, AXIS Companion Bullet mini LE and AXIS Companion Dome mini LE are only supported if they are connected to an AXIS Companion Recorder. | AXIS Companion IP cameras. Axis network cameras and encoders with firmware 5.50 and higher. |
| Storage media | AXIS Surveillance Card AXIS Companion Recorder AXIS S30 Recorder Series No third-party NAS support | Axis SD card AXIS Companion Recorder AXIS S30 Recorder Series1 Selected third-party NAS devices |
| Multi-user support | Yes | No |
| Alert notifications | Yes | No |
| Remote system management | Yes | No |
| Internet access | Required during system setup and management. Live and recorded video available offline. | Not required. |
1 For information about limitations, see the technical paper ‘Disclaimer - AXIS S3008 and AXIS Companion Classic’ on axis.com/products/axis-companion-classic/support
Upgrade to AXIS Companion
- Any device that was used in AXIS Companion Classic must be hard reset or restored before it can be used in AXIS Companion.
- A hard reset or restore of a device will not erase any recordings.
The installation wizard will detect if any devices need to be hard reset or restored, and assist you. If a device need to be restored, the wizard will take you to the device webpage, where you log in with the username ACCAdmin and the site password that you used in AXIS Companion Classic.