About AXIS Companion Switch
AXIS Companion Switch delivers network and power for up to 4 cameras. The switch is used to scale up an AXIS Companion system together with storage on SD cards.
AXIS Companion Switch is pre-configured and does not need to be set up separately.
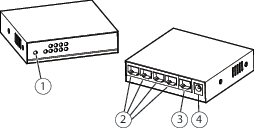
- LEDs (frontpanel)
- Port 1-4 (PoE)
- Port NET (non-PoE)
- Power Connector
How much power can AXIS Companion Switch supply to the cameras?
AXIS Companion Switch can supply up to 4 cameras with PoE. The total amount of power available is 60 W. Each network port supports up to 30 W.
Depending on the power consumption of your cameras you can connect the following combinations:
4 x 15 W
2 x 30 W
1 x 30 W + 2 x 15 W
The AXIS Companion solution
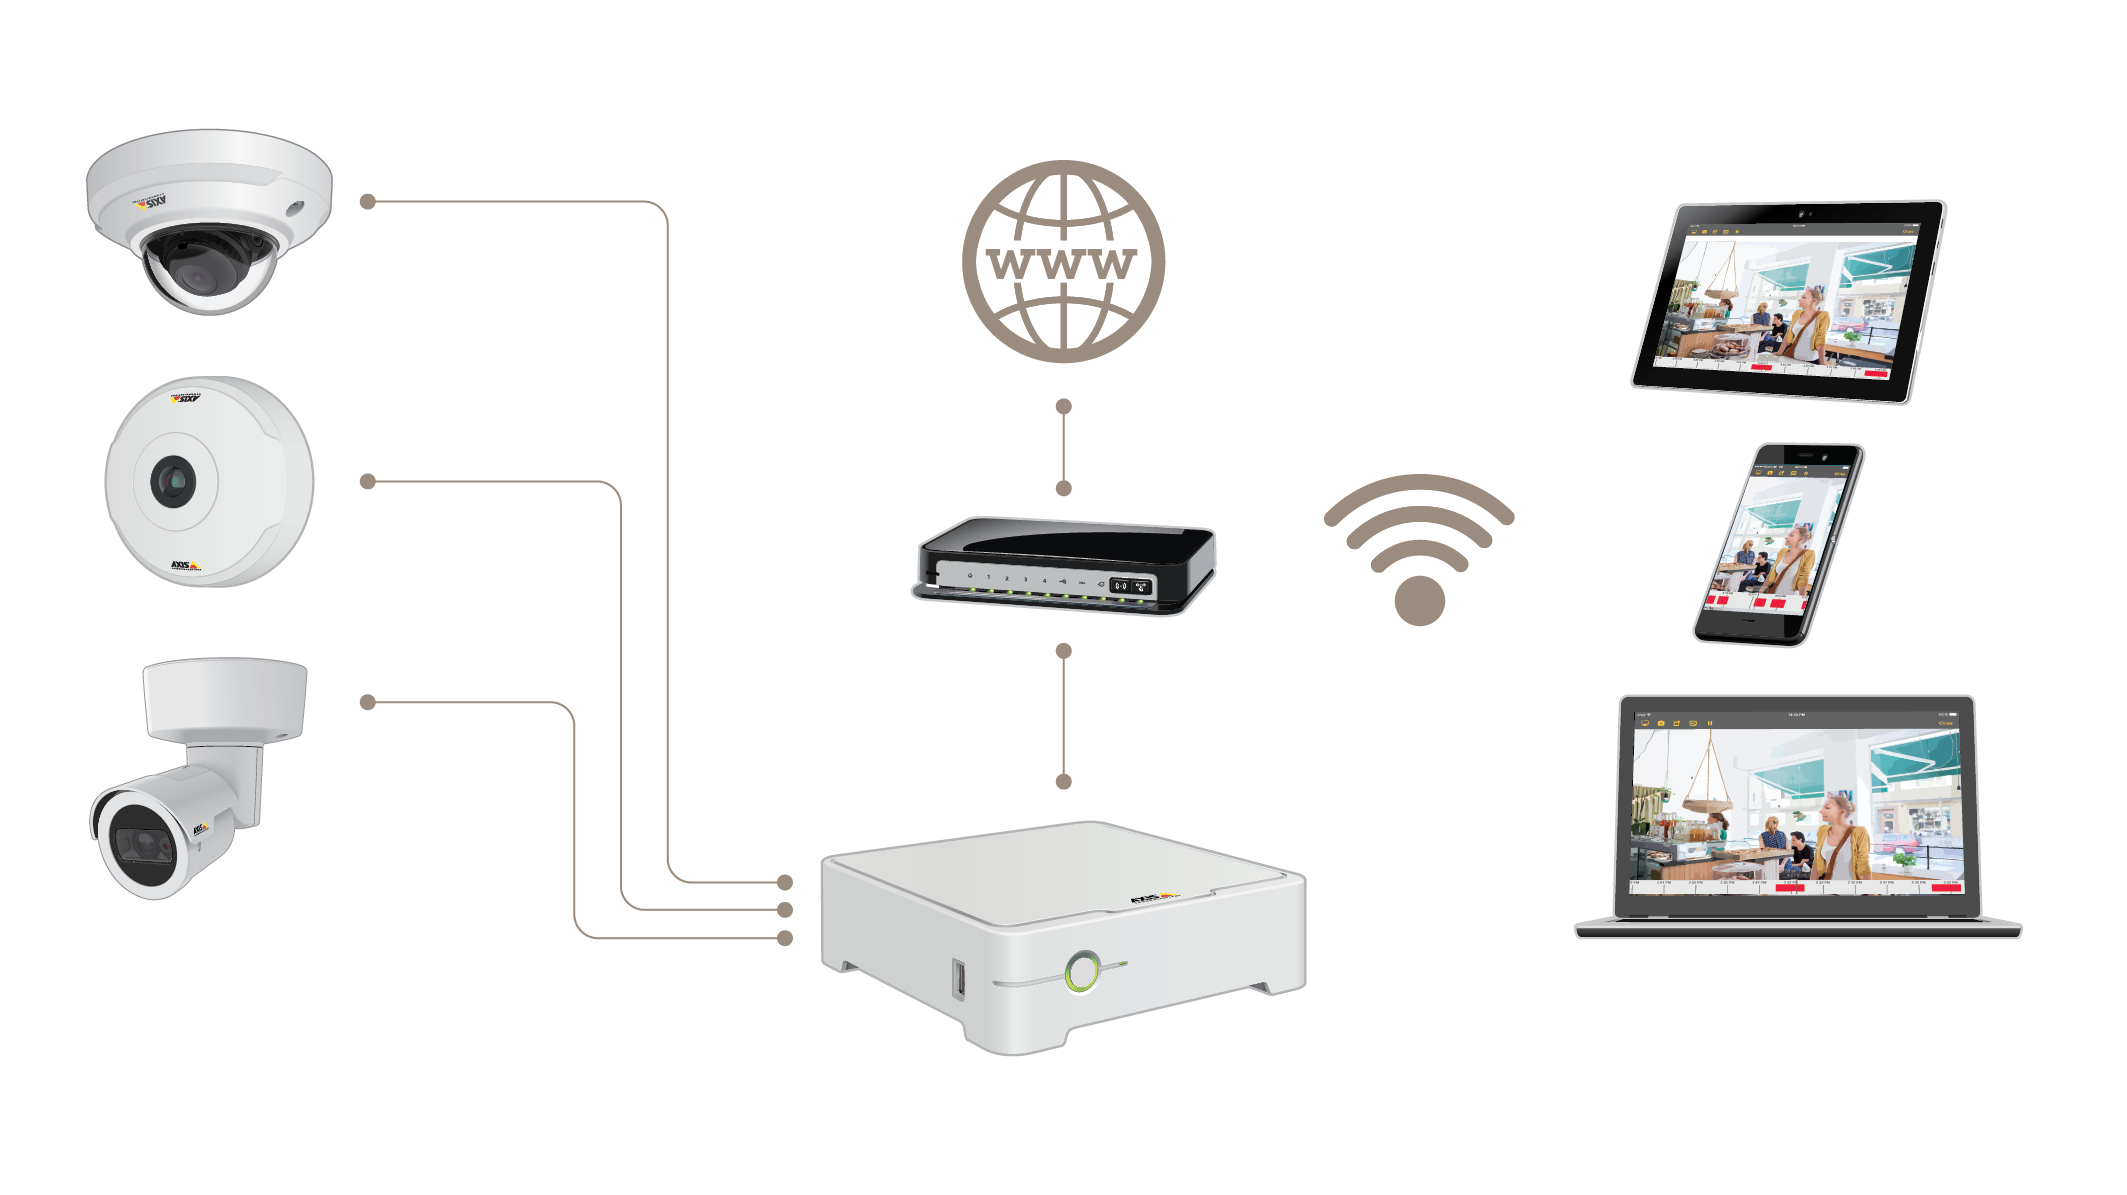
AXIS Companion is a complete end-to-end surveillance solution designed to meet the requirements of small systems with basic surveillance requirements.
An AXIS Companion solution can consist of:
AXIS Companion cameras, Axis IP cameras and encoders with firmware 8.40 or higher.
AXIS Companion recorders.
Axis system accessories, such as memory cards and switches.
AXIS Companion software for Windows computers as well as mobile devices and TV streaming devices (iOS and Android).
Learn more about AXIS Companion
For video tutorials and web apps, visit axis.com/products/axis-companion/how-it-works
Get started
- Note
Internet access is required during the system setup.
When the installation is done:
All Axis devices in the system have the latest AXIS OS.
All devices have a password.
Recording using the default settings is active.
You can use remote access.
Register a My Axis account
Register a My Axis account at axis.com/my-axis/login.
Choose one of the multi-factor authentication (MFA) methods Authenticator App (TOTP) or Email and follow the on-screen instructions. MFA is a security system that adds another layer of verification to ensure the user’s identity.
Install the hardware

Install your camera hardware.
Connect the recorder to your network via the LAN port.
- Note
If you have no recorder, then you need a camera with an SD card if you want to be able to record video.
Connect the cameras to the recorder’s integrated PoE switch or an external PoE switch.
Connect the computer to the same network as the recorder.
Connect the power supply to the recorder.
- Important
You must first connect the power cord to the recorder, and then connect the power cord to the power outlet.
Wait a few minutes for the recorder and cameras to boot up before proceeding.
Keep the recorder in a well ventilated environment and with plenty of empty space around the recorder to avoid overheating.
Install AXIS Camera Station Edge
Go to axis.com/products/axis-camera-station-edge and click Download.
Open the setup file and follow the setup assistant.
Sign in with your My Axis account.
Create a site
Start AXIS Camera Station Edge.
Sign in with your My Axis account.
Click Create new site and give the site a name.
Click Next.
Select the devices you want to add to your site.
Click Next.
Select storage.
Click Next.
Click Install and wait while AXIS Camera Station Edge configures the devices. The configuration can take several minutes.
When the installation is done:
All Axis devices in the system have the latest AXIS OS.
All devices have a password that meets the minimum security requirements.
Recording using the default settings is active.
You can use remote access.
Install the mobile app
It is not possible to install the AXIS Companion 360 camera with the app. You have to install the camera with the AXIS Companion Switch 4CH Windows client. Also, client dewarping is currently not supported by the AXIS Companion Switch 4CH mobile app.
For Android
Click Download or scan the following QR Code®.
For iOS
Click Download or scan the following QR Code.
Open the AXIS Camera Station Edge mobile app and log in with your Axis credentials.
If you don’t have a My Axis account, you can go to axis.com/my-axis to register a new account.
QR Code is a registered trademark of Denso Wave Incorporated in Japan and other countries.
Daily use
Access your devices
Sign in to AXIS Companion Switch 4CH on a computer or a mobile device using your My Axis account.
To access your devices in the Web app for AXIS Camera Station, go to My Systems. Before you can access your devices in My Systems, you must add them to the connected services. Read the My Systems user manual on axis.com for more information.
Enter the site that contains your devices.
View live video
Go to .
Select the camera you want to view.
To view live and recorded video in the Web app for AXIS Camera Station, go to My Systems. Before you can access your devices in My Systems, you must add them to the connected services.
Play a recording
Go to .
Select a camera or a view.
Use the timeline and calendar to find the recording.
Scrub to the desired time and click Play. When you select a view with multiple cameras, all cameras scrub simultaneously.
To change the playback speed, hover over the play button and scroll the mouse wheel.
Save a recording
Go to > .
Select which device to save a recording from.
Select start and end times for the recording.
Save the recording to the preselected location.
To save to a USB drive on an AXIS S30 or S40 Recorder Series, select the Save to recorder USB checkbox.
To change where recordings are saved, go to > Settings > File and click Browse under Recordings.
Play a saved recording
To play a saved recording, open it with AXIS File Player.
When you save a recording, AXIS File Player is saved in the same folder. AXIS File Player has a timeline showing what time the recording was made.
Validate a saved recording
You can validate a recording to confirm that the timestamp and images have not been manipulated after the recording was first saved. For this purpose, a digital signature will be included in the file when you save a recording. You can add a password to the digital signature for increased security.
- To protect your digital signature with a password when saving a recording:
Go to > Settings > File.
Under Video format, select Windows Media Format (.asf).
Select Show digital signature options when saving recordings.
Next time you save a recording, the Digital signature window appears, which allows you to select a password for the signature.
- Validate a recording:
Open the saved recording with AXIS File Player.
Click Tools and select Verify digital signature.
Enter the password, if a password was added to the signature, and click OK.
A window appears to inform whether or not the recording is valid.
Take a snapshot
- Take a snapshot from live view:
Go to
Click
- Take a snapshot from recordings:
Go to
Use the timeline and calendar to find the recording.
Select the camera in the timeline and move the playback marker to the desired time.
Click to start investigation mode.
Investigation mode lets you step through the recorded video, frame by frame, to find the exact moment when an incident happened and take a snapshot from that moment.
To find the incident, click on the thumbnails to step backward (top panel) or forward (bottom panel) by 1, 5, 15, or 30 frames. You can also move the slider.
When satisfied, click to take a snapshot.
For most cameras the snapshot contains the entire camera image, regardless of the zoom level. For cameras with a dewarped image, the snapshot is the zoomed-in image.
- Change the location of your saved snapshots:
Go to > Settings > File.
Change the location under Snapshots.
Adjust the image settings
Go to > Cameras > Image.
Select the camera you want to adjust.
- You can control the image by adjusting settings like:
Appearance
Exposure
Overlays
Day & night
Privacy mask
Focus & zoom
Configure the video quality
You can configure the video quality to suit your image quality requirements and bandwidth usage. Video quality settings affect motion recording, continuous recording, and the live view.
Go to > Cameras > Video quality.
Select the camera you want to configure.
Edit the Resolution or Frame rate, or both, in the high or low profile.
Click Apply to save.
Configure Video Motion Detection
For cameras without object analytics, we recommend using continuous recording with event notifications based on video motion detection.
- Send event notifications based on motion detection to your AXIS Companion Switch 4CH desktop app:
Go to > Events > Video Motion Detection.
Set up a schedule.
Under Activation, select the devices you want to get a notification from.
- If the motion detection is triggered too often, you can adjust the settings to ignore parts of the view or certain types of events.
Go to > Recording settings > Video Motion Detection.
Select the camera you want to adjust.
Select which part of the camera view to include or exclude during motion detection.
Edit the predefined area to include during motion detection.
Select Exclude areas and edit the area to exclude from motion detection.
- Note
For some camera models you can only add rectangular shapes, and for others you can add polygons.
Expand Advanced to adjust the settings of the filters.
Small objects filter: Ignore small objects, such as animals.
Swaying objects filter: Ignore objects that only move within a short distance, such as trees or flags that move when it is windy.
- Note
The swaying objects filter isn’t available for all camera models.
Short-lived objects filter: Ignore objects that only appear briefly in the image, such as light beams from passing cars or fast-moving shadows.
To turn on event notifications in the AXIS Companion Switch 4CH mobile app, see .
If you want to turn off continuous recording and only record when motion is detected, see .
Set up notifications
You can make AXIS Companion send a notification to your mobile app when certain types of motion occur in a camera view.
- The motion triggers are based on the following ACAPs:
AXIS Video Motion Detection
AXIS Fence Guard
- Worflow:
Make sure the ACAP is activated in your device.
In AXIS Companion, go to > Events and select an ACAP.
Configure a schedule for when you want to receive notifications.
Under Activation, select the cameras you want notifications from.
Receiving notifications on your mobile device:
Push notifications are sent to your mobile app if you are logged in to your MyAxis account on your mobile.
When you install the AXIS Companion 4 mobile app, you must accept when prompted with a question if you want to receive notifications. If you want to deactivate the notifications later on, go to the settings of your mobile device, select the AXIS Companion 4 app, and disable the notifications.
- To turn notifications on or off in the mobile app:
Go to > Notifications.
Turn Motion detection on or off.
When a notification is sent, it will appear as a popup message on your mobile device. Tap the message to open the playback of the ongoing event.
Add a user
Go to > Users.
Click Add...
Type an email address and select an access level.
Click OK.
- The user receives an email with instructions on how to get started. The final step is to accept the invitation.
- Note
If you add a user who doesn’t have a My Axis account, the user is asked to create one.
- The following access levels are available:
Administrator
Full access.Operator
Can access recordings and live view, but can’t make any changes to the site.Viewer
Can only access live view.
Activate offline mode
If you activate offline mode, you can use AXIS Companion Switch 4CH without an internet connection, although some features are limited. You’ll have access to Live view and Recordings, but not the Configuration menu to make changes to your site.
Offline mode is tied to the Windows user who activated it, not your online user account. During activation, an operator user is created on the devices in the site, and the user credentials are encrypted and stored on disk for that Windows user. When you use offline mode, AXIS Companion Switch 4CH reads this file to get credentials to the devices.
To activate offline mode:
Go to > Site.
Turn on Offline mode.
- The site must be online when you turn on offline mode. Each Windows user must turn on offline mode for their own client.
- Offline mode is not intended for permanent use. Connect your AXIS Companion Switch 4CH system to the internet at least every three months to update the firmware and certificates of your devices.
- The computer that accesses the site in offline mode should be connected to the same subnet as the devices. You can’t use offline mode if your AXIS Companion Switch 4CH client is connected to the internet.
- The mobile app will use the same password as was set for the device when the site was created.
- You can't get a full system report without an internet connection.
- For sites that will be used mostly offline, we recommend setting them up with a static IP or DHCP reservation.
Show video on an external display
- What you need:
AXIS Companion Switch 4CH app installed on your mobile device.
AXIS Companion Switch 4CH TV app installed from the app store on your Apple TV or Android TV device.
Your cameras, mobile app and TV app must all be connected to the same local network.
AppleTV 4 and Nvidia Shield with Android 6 or later.
- This is how you do it:
Open AXIS Companion Switch 4CH mobile app and log in.
Go to Devices > and select your external display.
- Note
It may take a few seconds before the icon appears.
Select the cameras you want to show on your external display.
Tap and wait for the configuration to complete.
You can view a single camera at a time or create a split view with up to 16 cameras.
When AXIS Companion Switch 4CH TV app opens, read the instructions on the screen about how to navigate in the app.
Monitor a narrow space
Use corridor format to better utilize the full field of view in a long and narrow space, for example a staircase, hallway, road, or tunnel.
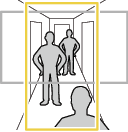
Adjust the camera or its lens to a vertical field of view.
In AXIS Companion, go to > Cameras.
On the row of the camera you want to adjust, click > Image settings.
On the Appearance tab, select a suitable angle for Orientation.
Click Close.
Add intercoms
Add intercoms to your video surveillance system to answer calls from your desktop or mobile app and to unlock doors.
To unlock a door, your intercom must be properly connected to the door's electronic lock. The documentation for your intercom contains information about how to make this connection correctly. To find the documentation for your intercom, go to axis.com/products/axis-network-intercoms.
Connect your desktop app to a door station
In the AXIS Companion desktop app, go to > Cameras.
Click Add devices and add the door station.
You can now answer the door station with your AXIS Companion desktop app.
Connect your mobile app to a door station
Start the AXIS Companion 4 mobile app.
Log in to the same MyAxis account as you used for the desktop app.
You can now answer the door station with your AXIS Companion 4 mobile app.
- Give other users access to the door station:
From the AXIS Companion desktop app, go to > Users.
Invite the user to the site.
- Turn off calls from the door station:
In the AXIS Companion 4 mobile app, go to User.
Go to Notifications and turn off Door station calls.
Add a device to your site
Connect the Axis device to your network using a PoE port on your recorder or an external PoE switch.
Go to > Cameras > Overview.
Click Add devices.
Select the device you want to add to your site.
Click Next.
Set a password depending on the device’s current state:
Device state Password requirement New or factory reset device Create a user account and set a password. The password must be at least 15 characters long. Device running an older AXIS OS version (for example AXIS OS 6.50 with only HTTP enabled) The device appears as ready to add. During the setup wizard, you'll be asked to set a password that meets the 15-character requirement. Device with a password already set Enter the existing password to unlock the device. If it's already at least 15 characters long, you don't need to change it. Click Next.
Set tilt orientation, by specifying how the camera is mounted, ceiling, wall or desk.
Click Install and wait while AXIS Companion Switch 4CH configures the device. The configuration can take several minutes.
Remove a device from your site
Go to > Cameras or > Other devices.
Click > Remove next to the device you want to remove.
Click OK.
If the device is connected to a recorder, you need to choose whether to remove the recordings from the recorder.
AXIS Companion Switch 4CH resets the device to factory settings when you remove it from the site.
Troubleshooting
SD card slot
![]() Moving parts. Risk of injury. Keep your body parts away from the product when it’s in operation. Disconnect from power supply before installing or performing maintenance on the product.
Moving parts. Risk of injury. Keep your body parts away from the product when it’s in operation. Disconnect from power supply before installing or performing maintenance on the product.
![]() Hot surface. Risk of injury. Don’t touch the product when it’s in operation. Disconnect from power supply and allow the surfaces to cool before performing maintenance on the product.
Hot surface. Risk of injury. Don’t touch the product when it’s in operation. Disconnect from power supply and allow the surfaces to cool before performing maintenance on the product.
- Risk of damage to SD card. Don’t use sharp tools, metal objects, or excessive force when inserting or removing the SD card. Use your fingers to insert and remove the card.
- Risk of data loss and corrupted recordings. Unmount the SD card from the device’s web interface before removing it. Don’t remove the SD card while the product is running.
This device supports SD/SDHC/SDXC cards.
This device supports microSD/microSDHC/microSDXC cards.
This device supports microSD/microSDHC/microSDXC cards (not included). For information about limitations and updates, see the device’s release notes.
For SD card recommendations, see axis.com.
For SD card recommendations, see axis.com/products/axis-companion.
![]()
![]()
![]() SD, SDHC, and SDXC Logos are trademarks of SD-3C LLC. SD, SDHC and SDXC are trademarks or registered trademarks of SD-3C, LLC in the United States, other countries or both.
SD, SDHC, and SDXC Logos are trademarks of SD-3C LLC. SD, SDHC and SDXC are trademarks or registered trademarks of SD-3C, LLC in the United States, other countries or both.
![]()
![]()
![]() microSD, microSDHC, and microSDXC Logos are trademarks of SD-3C LLC. microSD, microSDHC, microSDXC are trademarks or registered trademarks of SD-3C, LLC in the United States, other countries or both.
microSD, microSDHC, and microSDXC Logos are trademarks of SD-3C LLC. microSD, microSDHC, microSDXC are trademarks or registered trademarks of SD-3C, LLC in the United States, other countries or both.
Buttons
Control button
- The control button is used for:
Enabling the Focus Assistant. Press and very quickly release the Control button.
Calibrating the speaker test. Press and release the control button and a test tone is played.
Resetting the product to factory default settings. See .
Ensuring the camera is level. Press the button for not more than two seconds to start the leveling assistant and press again to stop. The status LED and buzzer signal (see ) assist leveling of the camera. The camera is level when the buzzer beeps continuously.
Ensuring the camera is level. Press the button for not more than two seconds to start the leveling assistant and press again to stop. The buzzer signal (see Buzzer signal for leveling assistant) assist leveling of the camera. The camera is level when the buzzer beeps continuously.
Resetting the product to factory default settings. See Hard reset a device or Hard reset a recorder
Connecting to an AXIS Video Hosting System service. To connect, press and hold the button for about 3 seconds until the status LED flashes green.
Connecting to a one-click cloud connection (O3C) service over the internet. To connect, press and release the button, then wait for the status LED to flash green three times.
LED indicators
| LED | Color | Indication |
| PWR | Green (lit) | Power on |
| Port NET (network) | Green (lit) | 10/100Mbps established |
| Port NET (network) | Green (blink) | Sending or receiving data |
| Port 1-4 (PoE) | Orange (lit) | PoE on |
| Port 1-4 (network) | Green (lit) | 10/100Mbps established |
| Port 1-4 (network) | Green (blink) | Sending or receiving data |
Technical issues, clues and solutions
| Issue | Solution |
I have no live view. | Go to Fix common issues. |
My recordings are not available. | Go to Fix common issues. |
I cannot connect to my cameras. | Go to Fix common issues. |
I receive error notification: “No contact”. | Go to Fix common issues. |
My sites do not appear in my mobile app. | Make sure you have version 4 of the AXIS Companion mobile app. |
My video stream is lagging. | Make sure that your graphics card is updated with the latest drivers. |
Fix common issues
Before you restart, configure or reset your devices, we recommend that you to save a system report.
See Contact Axis support.
Check that your cameras and recorder have power.
Check that you are connected to the internet.
Check that the network is working.
Check that the cameras are connected to the same network as the computer, unless you are remote.
- Still not working?
Make sure that your cameras, recorder and AXIS Companion desktop app have the latest firmware and software updates.
See Upgrade AXIS OS.
Restart the AXIS Companion desktop app.
Restart you cameras and recorder.
- Still not working?
Make a hard reset on the cameras and the recorder, to completely put them back to factory default settings.
See Hard reset a device.
Add the reset cameras to your site again.
- Still not working?
Update your graphics card with the latest drivers.
- Still not working?
Save a system report and contact Axis technical support.
See Contact Axis support.
Upgrade AXIS OS
New device software updates bring you to the latest and improved set of features, functions, and security enhancements.
Go to the leader device’s web interface.
Go to Maintenance > AXIS OS upgrade and click Upgrade.
Follow the instructions on the screen.
Set the camera to factory default
In AXIS Companion, go to
 and Cameras.
Click
 and then select Factory default.
Follow the Factory default wizard to complete the task.
If you cannot access the device and this setting in the AXIS Companion Windows client, try this task: Hard reset a device
Hard reset a device
- A hard reset won’t affect your recordings.
- A hard reset will reset all the settings, including the IP address.
Select the device you want to hard reset and remove it from the site.
Disconnect the power from the device.
Press and hold the control button on the device, and then reconnect the power.
Keep the control button pressed for 15–30 seconds until the status LED indicator flashes amber.
Release the control button.
The process is complete when the status LED indicator turns green.
The product has now been reset to the factory default settings.
Add the device to the site again.
Hard reset a recorder
Move the recorder carefully while it’s switched on. Sudden moves or shocks may damage the hard drive.
- A hard reset will reset all the settings, including the IP address.
- A hard reset will not remove your recordings.
Switch off the recorder:
Press the power button on the front of the recorder for 4-5 seconds until you hear a beep.
Wait until the recorder is switched off, then turn it over to access the control button.
Press and hold the control button. Press and release the power button to start the recorder. Release the control button after 15-30 seconds when the LED indicator flashes amber.
Carefully put the recorder back in its place.
The process is complete when the status LED indicator turns green. The product has been reset to the factory default settings. If no DHCP server is available on the network, the device IP address will default to one of the following:
Devices with AXIS OS 12.0 and later: Obtained from the link-local address subnet (169.254.0.0/16)
Devices with AXIS OS 11.11 and earlier: 192.168.0.90/24
Reset your devices connected to the recorder.
See Hard reset a device.
If your hard drive is encrypted, it must be mounted manually after the recorder is reset:
Go to the device’s web interface.
Go to System > Storage and click Mount.
Enter the encryption password used when encrypting the hard drive.
Contact Axis support
If you've tried troubleshooting without success or can't find a solution to your problem, contact Axis support for assistance.
- Save a system report:
In AXIS Companion Switch 4CH, go to > Save system report.
When you register a new case at Axis Helpdesk, attach the system report.