About
AXIS Device Manager Extend solution provides system administrators with an interface for discovering, configuring, and operating Axis devices on their organization’s networks.
The AXIS Device Manager Extend desktop app
The desktop app is a software utility program that can be used as an on-demand, or always available user interface for managing the system. It can be run on a dedicated machine together with a locally installed edge host, or separately from the edge host on a remotely connected laptop. The client presents the user with the overall status of the system and readily available management actions.
The edge host
The edge host component in AXIS Device Manager Extend is an always available, on-premise management service that is responsible for maintaining local devices, such as cameras. The AXIS Device Manager Extend edge host also acts as a link to the Axis remote management service, where the same API functionality supports remote administration of sites via the Axis service platform.
About organizations
The organization is a virtual representation of all of the devices, users, and sites in your Axis cloud service. It hosts all devices and user accounts in a hierarchy that regulates access and promotes maximum security. The hierarchy supports flexible user and device management for organizations of any size, from small businesses to large corporations.
To create an organization, you need a My Axis account. You can register a My Axis account at axis.com/my-axis/login
When you create a new organization, you become its owner. The organization connects your system to the users of Axis cloud service. As an organization owner, you can:
Invite users to the organization. See Add users to your organization.
Assign different roles to users.
Build an organizational structure that fits your needs. You can structure the organization into folders and sub-folders. Typically, a folder represents a physical site or the location of a system within an organization.
Manage licenses for your systems within your organization.
Solution overview
- Axis
- IAM (My Axis)
- Organization data
- Local client
- Edge host
- Devices
- VMS
- TURN
- Signaling
- Remote client
- Remote Access WebRTC Servers
- Site 1
| Connection | URL and IP | Port | Protocol | Comment |
| A | prod.adm.connect.axis.com, cep.connect.axis.com (52.224.128.152, 40.127.155.231, 75.2.119.140, 99.83.133.42) | 443, 8443 | HTTPS | Required |
| B | HTTP Discovery (from client to edge hosts) Data transfer (between client and edge hosts) Multicast Discovery (from client to edge hosts) Multicast Discovery (from edge hosts to client) | 37080 37443 6801 6801 | HTTP HTTPS UDP UDP | Needed to provision the site. Optional after provision. |
| C | Data transfer (between edge host and devices) Unicast discovery Multicast discovery HTTP discovery | 80 / custom port, 443 1900 1900, 5353 80,443 | HTTP, HTTPS SSDP, Bonjour | Required |
| D | signaling.prod.webrtc.connect.axis.com *.turn.prod.webrtc.connect.axis.com | 443 443, 5349 | HTTPS HTTPS, DTLS (UDP and TCP) | Based on WebRTC standard Optional and set to off by default |
| E | Peer to Peer (P2P) | 49152–65535 | DTLS (UDP and TCP) |
- Axis
- IAM (My Axis)
- Organization data
- Local client
- Edge host
- Devices
- VMS
- TURN
- Signaling
- Remote client
- Remote Access WebRTC Servers
- Site 1
- Site 2
- Site 3
| Connection | URL and IP | Port | Protocol | Comment |
| A | prod.adm.connect.axis.com, cep.connect.axis.com (52.224.128.152, 40.127.155.231, 75.2.119.140, 99.83.133.42) | 443, 8443 | HTTPS | Required |
| B | HTTP Discovery (from client to edge hosts) Data transfer (between client and edge hosts) Multicast Discovery (from client to edge hosts) Multicast Discovery (from edge hosts to client) | 37080 37443 6801 6801 | HTTP HTTPS UDP UDP | Needed to provision the site. Optional after provision. |
| C | Data transfer (between edge host and devices) Unicast discovery Multicast discovery HTTP discovery | 80 / custom port, 443 1900 1900, 5353 80,443 | HTTP, HTTPS SSDP, Bonjour | Required |
| D | signaling.prod.webrtc.connect.axis.com *.turn.prod.webrtc.connect.axis.com | 443 443, 5349 | HTTPS HTTPS, DTLS (UDP and TCP) | Based on WebRTC standard Optional and set to off by default |
| E | Peer to Peer (P2P) | 49152–65535 | DTLS (UDP and TCP) |
An additional requirement is a Public DNS such as Google DNS: 8.8.8.8 / 8.8.4.4 or Cloudflare DNS: 1.1.1.1
Both A and C connections are needed to support full functionality of the AXIS Device Manager Extend system.
We are in ongoing development of the application, and we therefore advise you to allow firewall access to outgoing network connections for the AXIS Device Manager Extend desktop app and any edge host.
Prerequisites
Compatible operating systems:
Windows 10 Pro and Enterprise
Windows 11 Pro and Enterprise
Windows Server 2016, 2019 and 2022 (x64-based system)
System Administrator privilege required for installation and configuration changes.
Minimum system recommendation:
CPU: Intel Core i5
RAM: 4 GB
Network: 100 Mbps
Internet connectivity
The AXIS Device Manager Extend application requires internet connectivity to be provisioned with certificates identifying it as belonging to the organization created and associated with the My Axis account used in the installation. However, to benefit from certain features such as warranty information and multisite support you need an internet connection. In addition, the client and/or edge host only automatically updates in the online mode.
Synchronized time and date
Ensure all the system components are synchronized, otherwise certificate authentication between the edge host and the client or back end could fail. It is recommended that all host machines are synchronized to a common Network Time Server to avoid any potential issues.
Open network ports:
For secure connections from the AXIS Device Manager Extend desktop app to the edge host, edge host discovery and Axis Remote Service.
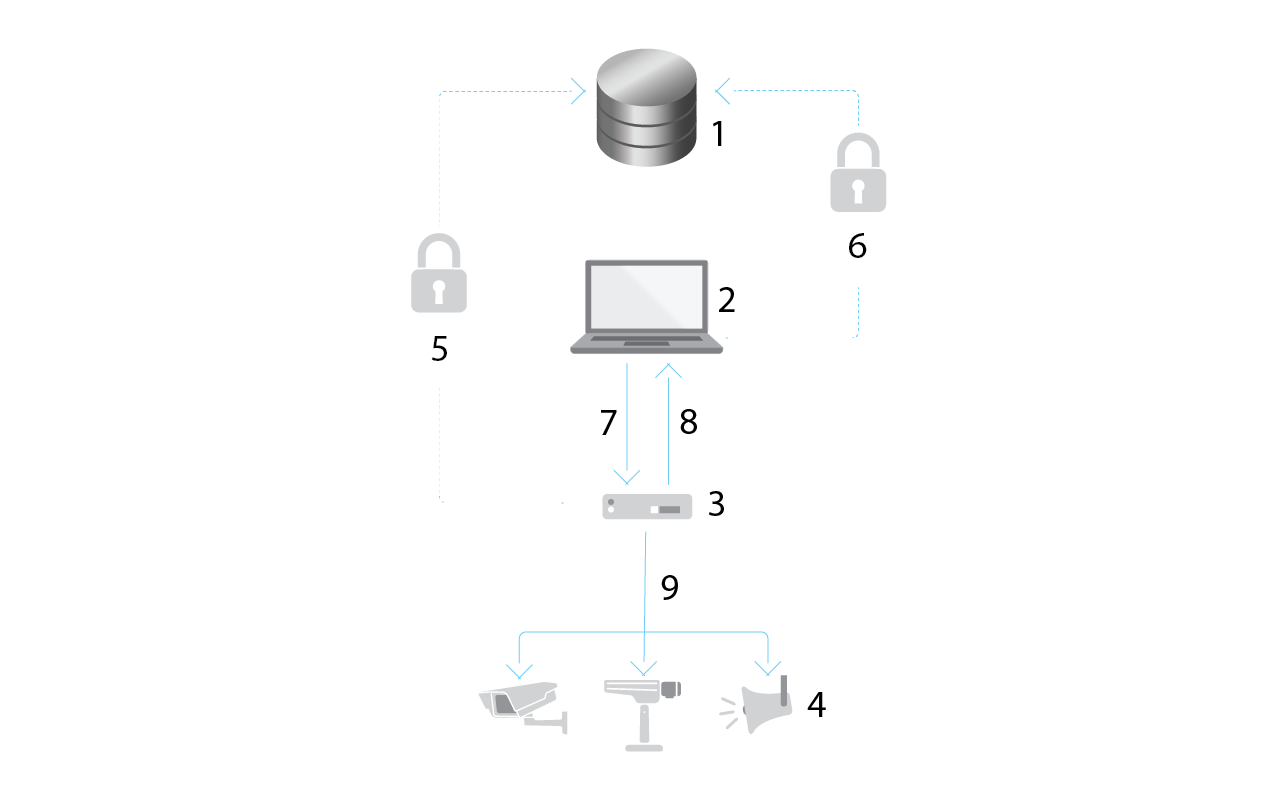
- Axis Service Platform
- AXIS Device Manager Extend desktop app
- Edge host
- Devices
- HTTPS (port 443)
- HTTPS (port 443)
- HTTPS (port 37443), UDP Multicast discovery (port 6801), HTTP discovery (port 37080)
- UDP Multicast discovery (port 6801)
- HTTPS and HTTP (port 443 and 80), Multicast discovery —SSDP (port 1900) — Bonjour (port 5353), Unicast discovery (port 1900), HTTP discovery (port 80 and 443)
Outgoing network access
We are in ongoing development of the application, and we therefore advise you to allow firewall access to outgoing network connections for the AXIS Device Manager Extend desktop app and any edge host.
Get started
Register a My Axis account
Register a My Axis account at axis.com/my-axis/login.
Choose one of the multi-factor authentication (MFA) methods Authenticator App (TOTP) or Email and follow the on-screen instructions. MFA is a security system that adds another layer of verification to ensure the user’s identity.
Install the client and activate your account
Go to the product page on axis.com and download the Axis Device Management client
Locate where you downloaded the application and click to install.
Select client and click Install.
Sign in to your My Axis account.
Confirm your e-mail address to complete the activation.
Create or join an existing organization.
Create organization
In order to add devices to your system, you need to be part of an organization. That is how you maintain and protect your devices in a secure way on one or more sites. If you’re not already a member of an organization, a setup assistant will pop up and guide you through the process.
To create an organization:
Sign in with your My Axis account.
Follow the instructions of the setup assistant
To create additional organizations:
Go to the drop-down menu with your organization’s name.
Select + Create new organization
Follow the instructions of the setup assistant.
Install the edge host
Go to the product page on axis.com and download the edge host (Axis Device Management Server)..
Choose a server where you want to install the edge host. We recommend you install the edge host on a server as close to your devices as possible.
Run the installer on the server.
Claim the edge host
To create a secure connection to your devices from the Axis Device Management client, you must first claim an edge host to your organization.
Click an edge host with the status Unclaimed
Click Add new edge host if there is no edge host in the list
Type the IP address of where the edge host is located
Type the name of your edge host
Add an optional description (recommended)
Click Claim edge host
Manage devices
Add discovered devices to your edge host
Go to Edge hosts.
Select a claimed edge host in the list you want to add devices to.
Go to Devices > Discovered.
Select the devices you would like to add, or select all of the devices by checking the box at the top of the selection column.
Click Add devices to edge host .
The devices are now listed in the Managed tab, and their status can be reviewed in Edge host overview.
Add devices from IP addresses
Add devices that are not automatically discovered from subnets, individual IP addresses or an IP range.
Add devices from IP range
Go to an edge host claimed by your organization.
Go to Settings > Device discovery.
Click Add by IP
Select Manual entry
Type the IP range
Click Add IP addresses
Go to Devices > Discovered
Select the devices you would like to add, or select all of the devices by checking the box at the top of the selection column.
Click Add devices.
Add devices from a file
Go to a edge host claimed by your organization.
Go to Settings > Device discovery.
Click Add by IP
Select Import from file.
Select the comma separated (.CSV) file with the IP addresses
Click Import
Go to Devices > Discovered devices
Select the devices you would like to add, or select all of the devices by checking the box at the top of the selection column.
Click Add devices .
The file should have:
A header for the column of IP addresses.
A single column.
A maximum of 25,600 IP addresses.
Remove devices
Click Edge host
Select an edge host.
Go to Devices
Select the devices you would like to remove, or select all of the devices by checking the box at the top of the selection column.
Click the Remove devices from edge host icon in the action menu.
Click Remove.
The removed devices can be found in Devices >Discovered.
Log in to your devices
Click Edge hosts
Select an edge host.
Go to Devices > Managed
Select the devices you want to access, or select all of the devices by checking the box at the top of the selection column.
Click Log in to automatically log in to multiple devices.
Type the username and password.
Click Log in
If the username and password are correct, the Status will show Reachable
Configuration
Activating remote access
If your firewall settings block outbound connections, you may have to enter a proxy connection to access the site remotely.
Select the edge host you want to activate remote access to.
Go to Settings >Edge hosts connections.
Activate Allow remote access to edge host.
If you need to enter a proxy address to access the internet, type an address under Proxy address.
You will be notified once the connection is active.
To support the connection to edge hosts on other networks, you may have to add the following configuration to your corporate network firewall's "allow list": Endpoint Port Protocol signaling.prod.webrtc.connect.axis.com 443 HTTPS *.turn.prod.webrtc.connect.axis.com 443 HTTPS webRTC (Turn and P2P) 5349, 49152 - 65535 DTLS (UDP and TCP)
Remove a site
Before you remove an edge host from your organization, you need to Remove devices belonging to the edge host. The devices can then be found in Devices > Discovered.
Click Edge hosts.
Select the edge host with the arrow keys or hover over it with the mouse pointer.
Click ... and select Remove edge host from the drop-down menu.
Check I’m aware of the risks.
Click Remove.
Add users to your organization
Select the organization where you would like configure user settings.
Go to the App selector .
Select Users
Click Invite users.
Follow the on-screen instructions of the setup assistant.
If you’ve selected Operator or Viewer, select which folders the users will have access to. Note that Admin roles have access to all of the folders in the organization.
The user will receive an invitation email that they can use to sign in to My Systems. If the user doesn’t have a My Axis account, the user must use that email to sign up in order to access the organization. Invites can be revoked while acceptance is pending.
About user roles
User roles determines how much access a user has to the systems in you organization. Available features vary depending on the role of the user.
Admin
Administrators have access to the entire system. That includes managing users, devices, licenses, videos and other content.
They can also onboard devices using AXIS Camera Station Pro. Administrators can manage AXIS Camera Station Pro Server Monitoring in My Systems.
Operator
Operators can monitor live video feeds, control devices, and access recordings for playback. They get an overview of the users of the organization and their respective roles. Operators can also manage AXIS Camera Station Pro Server Monitoring in My Systems.
Viewer
Viewers can monitor live video feeds, but can’t control devices or access recordings. They get an overview of the users of the organization and their respective roles.
Elevate user role
Select the organization where you would like configure user settings.
Go to the App selector .
Select Users
Click on the user you’d like to elevate and click on Roles and access.
Follow the on-screen instructions of the setup assistant.
The role changes immediately once selected. For security reasons, invites are limited to the viewer role.
Remove users
Select the organization where you would like configure user settings.
Go to the App selector .
Select Users
Hover the mouse pointer over the user you would like to remove to show a new options menu: ...
Click ... and select Remove user in the drop down menu.
- Remove multiple users
Select the users you’d like to remove.
Click on the trash can in the action menu.
Click Remove.
AXIS OS management
With Axis Device Management client, you can manage the operating system of multiple devices in each organization.
For a list of AXIS OS updates that are available for every device in your organization grouped by model, go to Home > AXIS OS inventory. For a list of AXIS OS updates that are available on a specific edge host, select the edge host and go to AXIS OS inventory.
Manage AXIS OS versions based on model
To manage AXIS OS by model across you organization:
Go to Home > AXIS OS versions
Click on the recommended AXIS OS version link. That will open up the AXIS OS upgrade options.
Click on the Upgrade to drop-down menu to see what is available. The latest AXIS OS version will be preselected.
Click on Upgrade.
Manage AXIS OS on an edge host.
To manage AXIS OS on some or all of the devices added to an edge host:
Go to Edge hosts
Click on the edge host you want to access.
Go to Devices
Select all or just the devices you’d like to manage.
Click the AXIS OS icon in the action menu
Check all or some of the models in the list.
If you’d like to change the AXIS OS version, click on the suggested version to see what is available for each device. The latest AXIS OS version will be preselected.
Click Upgrade.
View ongoing and completed AXIS OS upgrades
To view ongoing software upgrades of devices connected to a specific edge host:
Click Edge hosts
Click on the edge host you want to access.
Go to Log
- To see ongoing software upgrades:
Go to Log > Ongoing tasks
Policies
Policies manage your devices automatically. Create policies to maintain cyber security across your site. You can also set a policy to automatically install and update apps on your devices.
Create and apply a security policy
In this example use case, we create and apply a basic security policy to a select number of devices connected to an edge host.
Create a basic security policy:
Go to Edge hosts
Click on the edge host you want to access.
Go to Devices
Click on + icon next to Policies
Select Basic security and click Continue
Name your policy
Select the settings that fits your security needs. For the recommended security level, keep the default settings.
To change the root password for selected devices, click Device root password and type the new root password.
Click Create .
Apply the policy:
Select the devices you would like the policy to be applied to.
Click the Policy options icon in the action menu.
Select the security policy and click Save.
Create and apply an app policy
In this example use case, we create and apply an app policy to a select number of devices connected to an edge host.
Go to Edge hosts
Click on the edge host you want to access.
Go to Devices
Click on + icon next to Policies
Select Apps and click Continue
Name your policy
Select the apps you want to be installed and updated on your devices.
Select the update window in the drop-down menu.
Click Create .
Apply the policy:
Select the devices you would like the policy to be applied to.
Click the Policy options icon in the action menu.
Select the app policy you want to apply.
Click Save.
The selected apps will be automatically reinstalled if removed.
Edit a policy
- To edit an existing policy:
Go to Edge hosts
Click on the edge host you want to access.
Go to Devices
Click ... next to the policy you want to edit and select Edit policy from the drop-down menu.
Edit the policy settings to suit your needs.
Click Save
Delete a policy
- To delete an existing policy:
Go to Edge hosts
Click on the edge host you want to access.
Go to Devices
Click ... next to the policy you want to edit and select Delete policy from the drop-down menu.
Click Delete
Any devices with that policy applied to them will keep the policy settings, but the settings will no longer be persistent.
Manage licenses
License your product
To license your product, go to My Systems > Licenses. To learn more about licenses for Axis products and services, see the My Systems user manual.
Troubleshooting
How to configure firewall settings
The Axis Device Management client requires access to the axis.com domain and subdomains.
For the edge host to communicate with the Axis services, add the following IP addresses and ports to the allow list of the organization's firewall:
40.127.155.231 (EU), port 443
52.224.128.152 and 40.127.155.231 (US), port 443
75.2.119.140, port 443 and 8443
99.83.133.42, port 443 and 8443
The following domain names can be used as an alternative (resolved to the IPs above):
prod.adm.connect.axis.com, port 443
cep.connect.axis.com, port 443 and 8443
You also need to allow DNS traffic for your DNS server IP and the default port 53
For more information about port configuration, check out the White Paper for AXIS Device Manager Extend: Typical system setups.