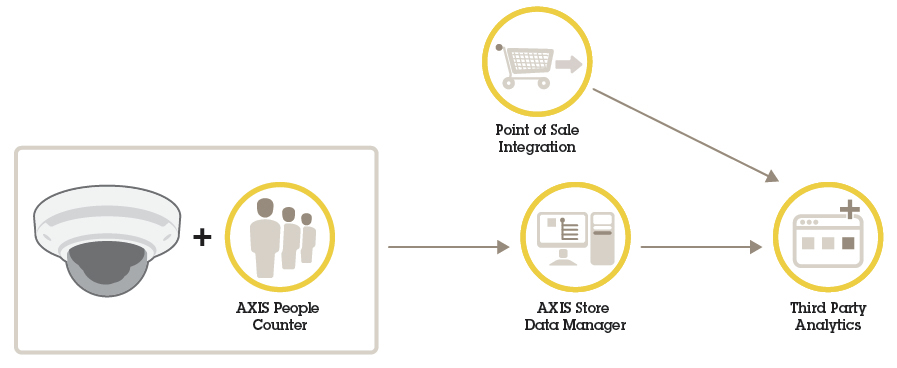
Solution overview
AXIS Store Data Manager
This manual covers the locally installed version of AXIS Store Data Manager. To find out more about the hosted online solution, go to the manual for AXIS Store Reporter that includes AXIS Store Data Manager.
AXIS Store Data Manager is a data hub that collects and arranges statistical data. To interpret the statistical data, use the tool in combination with AXIS Store Reporter or a third-party reporting tool.
Who’s it for?
AXIS Store Data Manager is typically for the integrator, who manages the cameras and sets up the system. The tool can be used for a single company as well as for several companies.
Installation
System requirements
AXIS Store Data Manager uses open source web server software.
Supported operating systems
Microsoft Windows 7 or later
Ubuntu 8.04 or higher (Ubuntu 16.04 and later does not include PHP5, and MySQL5)
Debian 5.0 or higher (Debian 9 (Stretch) does not include PHP5 and MySQL5)
Supported web browser clients
Firefox®
ChromeTM
Internet Explorer® 9.0 or higher (or equivalent browser)
Required software packages
Before you can use the locally installed AXIS Store Data Manager, you need to install the software packages Apache, PHP and MySQL. See Install the required software packages.
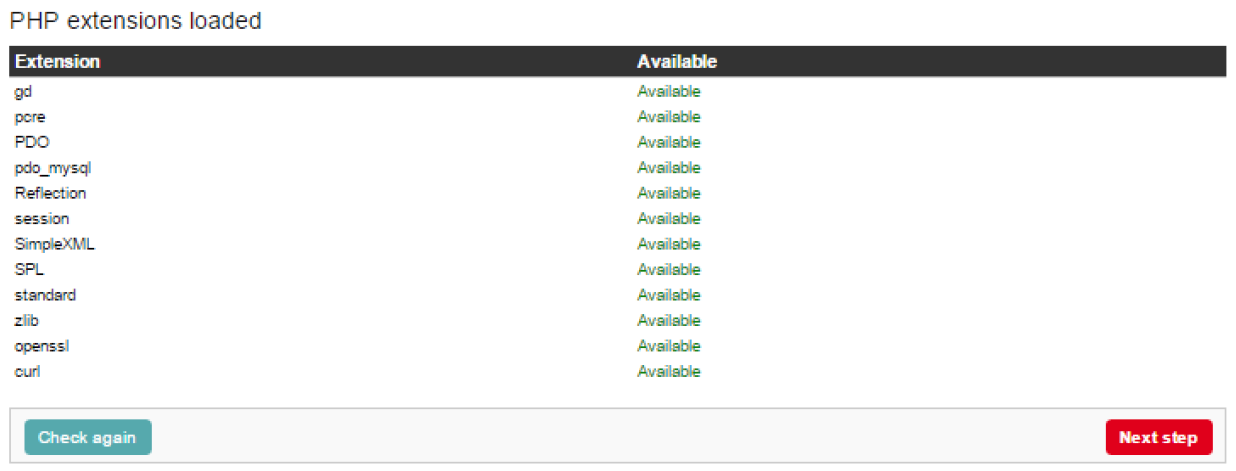
PHP 5.4 to 5.6. PHP must have the following extensions installed and enabled.
gd
pcre
PDO
pdo_mysql
Reflection
session
SimpleXML
SPL
standard
zlib
OpenSSL
curl
MySQL 5.6 or 5.7
Apache 2.4
The extensions are included as default in most new PHP installations. AXIS Store Data Manager automatically checks that the extensions are working during installation.
Install the required software packages
The software packages Apache, PHP and MySQL can be installed with, for example, the web development environment Wampserver. You can download it here:
- They need to be configured in the following way:
You must select the compatible PHP version. In WampServer, you open the menu from the tray icon and select PHP > Version > 5.6.40.
In the
php.inifile, PHP must be allowed to use short open tags. In WampServer, you open the menu from the tray icon and select PHP > PHP Settings > Short open tag.You must disable MySQL Strict Mode. In WampServer, you open the menu from the tray icon and select MySQL> MySQL settings > sql-mode > sql-mode > none.
Server recommendations for AXIS Store Data Manager
| Number of cameras or channels | CPU | Memory | HDD | HDD speed | Network |
| Linux | |||||
| 10 | Intel i5 or equivalent | 1 GB | 300 GB | 7.2 K RPM | 1 Mbps |
| 50 | Intel i5 or equivalent | 2 GB | 300 GB | 7.2 K RPM | 1 Mbps |
| 150 | Intel i5 or equivalent | 4 GB | 300 GB | 7.2 K RPM | 1 Mbps |
| 500 | Intel i7 or equivalent | 8 GB | 300 GB | 7.2 K RPM | 1 Mbps |
| 1000 | Intel Xeon 1.8 GHz, 4 physical cores or equivalent | 8 GB | 300 GB, SAS 6 Gbps | 7.2 K RPM | 1 Mbps |
| 3000 | Intel Xeon 2.0 GHz, 4 physical cores or equivalent | 16 GB | 300 GB, SAS 6 Gbps | 10K RPM or SSD | 10 Mbps |
| 5000 | Intel Xeon 2.2 GHz, 4 physical cores or equivalent | 16 GB | 300 GB, SAS 6 Gbps | 10K RPM or SSD | 10 Mbps |
| Windows | |||||
| 10 | Intel i5 or equivalent | 2 GB | 300 GB | 7.2 K RPM | 1 Mbps |
| 50 | Intel i5 or equivalent | 4 GB | 300 GB | 7.2 K RPM | 1 Mbps |
| 150 | Intel i7 or equivalent | 8 GB | 300 GB | 7.2 K RPM | 1 Mbps |
| 500 | Intel i7 or equivalent | 8 GB | 300 GB | 7.2 K RPM | 1 Mbps |
| 1000 | Intel Xeon 1.8 GHz, 4 physical cores | 8 GB | 300 GB, SAS 6 Gbps | 7.2 K RPM | 1 Mbps |
| 3000 | – | – | – | – | – |
| 5000 | – | – | – | – | – |
Install AXIS Store Data Manager on a computer
The installation and initial setup is divided into two procedures:
Renew your license
- This instruction is valid in the following scenarios:
You have a local installation.
You have purchased additional licenses.
You have already activated the 10-base license in your local AXIS Store Data Manager.
Log in to AXIS Store Data Manager.
Go to Server configuration > Edit license.
a. If your computer is online, click Refresh activation code.
b. If your computer is offline, copy Registration code and Installation ID.
Paste Registration code and Installation ID.
Click Submit.
Copy the activation code and go back to AXIS Store Data Manager.
Paste the activation code in the Activation code field in AXIS Store Data Manager.
Install AXIS Store Data Manager
If there’s a previous version of AXIS Store Data Manager installed on the computer that you want to upgrade, make sure to do a backup of the database before you continue with the installation wizard.
In this installation, we have used the web development environment WampServer to install the software packages.
Go to the download link provided with your license document.
Download the installation file
datamanager-1.x.x-win.exe.You might receive a warning about running the installation file. Click More info to continue with the installation.
To continue, follow the on-screen instructions in the setup wizard.
When the wizard asks if it should create an alias for AXIS Store Data Manager into the web directory for the WampServer, we recommend to click OK.
This means users can connect to AXIS Store Data Manager through the url http://localhost/datamanager
Make sure you restart all WampServer services via the tray icon, once the installation wizard is complete.
Make sure the web server user has write permissions to the following folders and files:
DataManager/public/and all subfoldersDataManager/cache/DataManager/data/and all subfoldersDataManager/application/config.iniDataManager/application/license.ini
To continue with the installation, go to Settings when connecting for the first time.
Settings when connecting for the first time
Go to http://localhost/datamanager/installation/
If the browser is not running on the server machine, replace [localhost] with the address of the server.
If the installation of the web server is correctly done you will now see the start page of the installation of AXIS Store Data Manager.
Select language.
Check system requirements.
Make sure to fix the errors marked with red before continuing with the installation. To check the fix, click Check again.
Read the license agreement.
Activate the license.
If the browser has Internet connection, the license automatically activates. Enter the license key (provided with the license document) in the Registration code field and click Register.
If the browser doesn’t have Internet connection, an Installation ID will be generated that is unique for your computer and registration code. To receive an activation code, you need follow the link from a computer that is online. Enter the activation code in the Activation code field and click Register.
Configure the database access. The web server access the database with these credentials.
The hostname, username, password and database name are predefined.
If you have already created a database, enter the correct username and password.
If you haven’t already created a database manually, select Create new database.
Create user and company. The user logs in to AXIS Store Data Manager with these credentials.
The user is automatically a multi-company user with the highest privileges available.
To prevent anyone else from running the installation wizard again, remove the following from the computer:
the folder
datamanager/public/installationthe file
datamanager/application/InstallationBootstrap.php
Connect cameras to AXIS Store Data Manager
In the camera’s webpage, Connect cameras to folders.
, add the cameras to the stores, and add details for each store.
Why do I need to create folders?
Create folders according to your company structure. It’s helpful to sort the cameras in a structured way to keep track of them when doing maintenance or troubleshooting. The folder setup does not affect how the statistics show up in AXIS Store Reporter.
- Recommendations
Create one folder per store. You can also have one folder per country or region.
Create the folder structure based on the company’s organizational or geographical setup.
Name the folders and the cameras according to the naming conventions used in your organization.
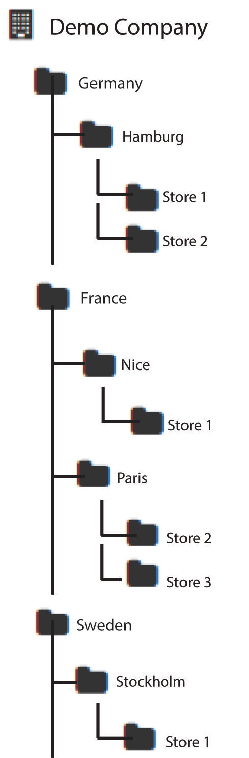
Example
Let’s say you have six stores in three different countries. Here’s an example how to set up your folders.
Create folders
In AXIS Store Data Manager, go to Sources.
Set up a folder structure for your company.
Enter names for the folders and the cameras.
Set the folder connection details
- The folder connection identifier and password are used to authenticate the camera to send the statistical data to the corresponding folder.
- We recommend that you set the identifier and the password to something that corresponds to the store.
In AXIS Store Data Manager, go to Sources.
Select the folder in the list.
Click Edit folder connection settings.
Select Enable connections to this folder.
Enter a name in the Folder connection identifier field.
Enter a password in the Folder connection password field and confirm the password.
Get notified about communication problems
You can get an email warning if a camera stops reporting to the application, which is often caused by network connection problems, or if the camera stops sending data to the server.
Hours without count data allowed: Enter the number of hours allowed to pass without any data sent from the camera.
Remember that the Hours without count data allowed should be set at least as long as your longest closing time.
Hours without communication allowed: Enter the number of hours allowed to pass without communication.
Email for warnings: If you want warnings sent as emails, type the address.
If you don’t type an email address, you get the warning as a notification on the AXIS Data Manager webpage.
Click Submit.
Examples of SMTP settings
With gmail
- Email host
- smtp.gmail.com
- Mail host port
- 465
- Send main from email
- [field ignored by Google]
- Authentication protocol
- Login
- Mail authentication username
- [your email]
- Mail authentication password
- [your email password]
- Transport encryption
- SSL
With outlook.com
- Email host
- smtp.live.com
- Mail host port
- 25
- Send main from email
- [your email, same as Mail authentication username]
- Authentication protocol
- Login
- Mail authentication username
- [your email]
- Mail authentication password
- [your email password]
- Transport encryption
- TLS
Connect cameras to folders
To perform this task, the application must be installed on the camera.
In AXIS Store Data Manager, go to Sources and get the Folder connection identifier and the Folder connection password for the folder you want to connect to.
In the camera's web interface, go to Settings > Apps and open the application’s web interface.
Enter the web address for AXIS Store Data Manager, for example
https://[subdomain].asdm.axis.com/datamanagerwhere[subdomain]is replaced by a unique name.- Note
Check if the outbound traffic on your internal network is restricted. Outbound communication should be allowed on the ports 80 and 443 for AXIS People Counter and 443 for AXIS P8815-2 3D Counter
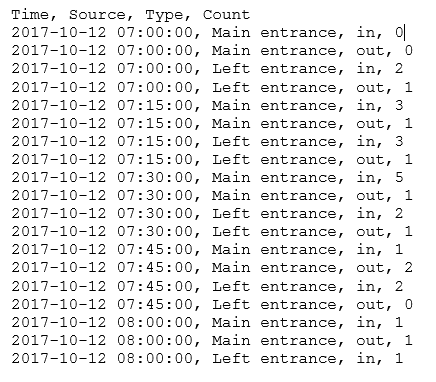
Export statistical data
Go to Exports > Create CSV export.
Enter a Name.
Select Company.
Select a fixed time or a dynamic Time interval, see Dynamic time interval.
Select Application.
Select Time resolution.
Select one or multiple cameras.
If you want to verify your settings, click Preview, otherwise click Create CSV export.
To find the exported data, click List stored exports.
By clicking the icons to the left in the list, you can:
view the data in a separate tab
edit the data
copy the url so that you can reach the data from a third-party reporting tool
Example
Each export gets a permanent url with the following syntax:
https://[SI-company name].asdm.axis.com/datamanager/api/?method=export.GetExport&id=[Unique API-key]To insert the raw statistics in a third-party reporting tool, you can fetch the information from the permanent link on a regular basis, for example through a script.
Dynamic time interval
A dynamic time interval is specified by a number and a letter. The letter is the time unit (days = d, weeks = w, years = y) and the number is the amount of time from today’s date.
If you want to export data from the current week, enter “0w”.
If you want to export data from the previous week, enter “-1w” .
If you want data from a specific interval, enter the time interval in the form “start:stop”, for example:
Data for the previous four weeks: -4w:0w
Data for the previous year: -1y:0y
Each time you view the report, the data is updated according to today’s date.
User and administration settings
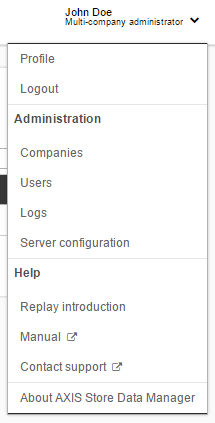
You can reach these settings through the User and administration menu.
Company settings
If you are a multi-company user, AXIS Store Data Manager lets you manage data from several companies.
- Add a company
Go to User and administration menu > Companies > Add company.
Enter the company’s information and click Submit.
- Add or edit a company logo
Go to User and administration menu > Companies > Browse companies.
Click

The logo shows up in the footer of the webpage.
- Edit a company
Go to User and administration menu > Companies > Browse companies.
Click

- Inactivate a company
Go to User and administration menu > Companies > Browse companies.
Click

The company moves to the list of inactive companies.
- Activate a company
Go to User and administration menu > Companies > Browse inactive companies.
Click

The company moves to the list of active companies.
User settings
The user that was created during the installation of AXIS Store Data Manager is a multi-company user and can add, delete, and manage its own company as well as other companies. The multi-company user has a different view than a single-company user.
- Add a user
Go to User and administration menu > Users > Add user.
Enter the user’s information.
Select Multi-company user if the user should be able to add, delete, and manage its own company as well as other companies.
Click Submit.
- Change a user password
Go to User and administration menu > Users > Browse users.
Click

Create a new password or reset the password. If you reset the password, the next time the user tries to log in to AXIS Store Data Manager, she will be prompted to create a new password.
- Edit a user
Go to User and administration menu > Users > Browse users.
Click
- Inactivate a user
Go to User and administration menu > Users > Browse users.
Click
The user moves to the list of inactive users.
- Activate a user
Go to User and administration menu > Users > Browse users.
Click
The user moves to the list of active users.
Log settings
AXIS Store Data Manager has a set of predefined logs for tracking and troubleshooting purposes.
- View a log
- For a list of all logs, go to User and administration menu > Logs > Browse logs and click

- You can also go to User and administration menu > Logs > [log name].
Clear a log
To clear a log from all messages, go to User and administration menu > Logs > Browse logs.
- Important
If you clear a log, the messages are deleted.
Click
Server settings
- Change the server settings
Go to User and administration menu > Server configuration > Edit configuration.
- Add server logotypes
Go to User and administration menu > Server configuration > Logo.
Upload the login or footer logo according the size stated on the webpage. If a company uploads a logo in the company settings, that will override the server logo.
- Check the license
Go to User and administration menu > Server configuration > License.
Check the registration code, the installation id, and activation code for that registration code.
Check that the License check list shows OK for all items.
The most common problem is that the InstallationID is not okay. This can happen if you’ve added or removed a network card from your server. If that’s the case, try to set your network configuration back to the original form.
- Change the license
Go to User and administration menu > Server configuration > Edit license.
Change Registration code, Installation ID, and Activation code.
Click Refresh activation code.
Troubleshooting
| Issue | Action |
Error message from WampServer when installing the required software packages: “The Program can't start because MSVCR110.dll is missing from your computer. Try reinstalling the program to fix this problem”. “The Program can't start because VCRUNTIME140.dll is missing from your computer. Try reinstalling the program to fix this problem”. | The MSVC runtime libraries VC9, VC10, VC11 are required for Wampserver 2.4, 2.5 and 3.0, even if you use only Apache and PHP versions with VC11. Runtimes VC13, VC14 is required for PHP 7 and Apache 2.4.17 To resolve any issues related to missing MSVC libraries, download all the MSVC library files here: http://wampserver.aviatechno.net/files/vcpackages/all_vc_redist_x86_x64.zip To check if the required VC packages are installed properly, you can use the program Checks VC++ packages. Download the program here: http://wampserver.aviatechno.net/files/tools/check_vcredist.exe |
WampServer icon does not go online or turn green after completing installation. | Make sure that port 80 is not being used by another application. Check this by selecting WampServer icon > Apache > Test Port 80. |