Get started
The standard workflow to configure an AXIS Camera Station Pro recording server is:
Initial Windows® setup: After installing your device, you are guided through a few steps to set up the region, language, keyboard layout, an administrator account and its password.
Initial Axis recorder setup: After the initial Windows® setup, AXIS Recorder Toolbox is opened and you are guided through a few steps to set up basic and necessary settings, for example, computer name, date and time, and network. See Initial Axis recorder setup.
Configure Windows®. We recommend to:
Update Windows® to the latest version. See Update Windows®.
Create a standard user account. See Create a user account.
Update AXIS Camera Station Pro to the latest version.
If your system is online: open the AXIS Recorder Toolbox app and click Update AXIS Camera Station Pro.
If your system is offline: go to axis.com and download the latest version.
Start the AXIS Camera Station Pro client.
Install your device
Before installation
Prepare additional accessories used for installation: monitor, mouse, keyboard and network cable.
Understand the usage of different user accounts.
The following table lists the user accounts that can be used for installation, configuration and operation of your Axis system.
| User account | Description | Note |
| MyAxis | Used to download the latest software, access the license system, Axis Secure Remote Access, and System Health Monitoring. | Registered from my.axis.com. |
| Windows® | ||
| Windows® administrator | Administrator privileges in Windows®. We recommend you do not use it as AXIS Camera Station Pro administrator. | Created during initial Windows® setup. |
| Windows® user with AXIS Camera Station Pro administrator privileges | A Windows® user granted with administrator privileges in AXIS Camera Station Pro to be used by system integrator or system administrator for configuration or troubleshooting. | Created in Windows® settings. |
| Windows® user with AXIS Camera Station Pro operator or viewer privileges | A Windows® user granted with operator or viewer privileges in AXIS Camera Station Pro. | Created in Windows® settings. |
| Device | ||
| Device administrator | Used by the administrator to access the camera from the video management system or device webpage. | Created from the device webpage or when you add the device to AXIS Camera Station Pro. |
Installation
For instructions on how to install the product, see the installation guide included in the box or on the product’s support page on axis.com.
Configure your device
Initial Axis recorder setup
After you have configured Windows®, AXIS Recorder Toolbox is opened automatically and you are guided through the first-time configuration setup assistant. In this setup assistant, you can configure several basic and necessary settings before you manage your device in AXIS Recorder Toolbox.
Select Light or Dark theme and click Next (if it’s available for your product).
Change the computer name if you want and click Next.
Under Date and time, configure the following settings and click Next.
Select a time zone.
To set up an NTP server, select NTP server and enter the NTP server address.
To set manually, select Manual and select a date and time.
Under Network settings, configure the following settings and click Next.
Use automatic IP settings (DHCP) and Use automatic DNS settings are turned on by default.
If your device is connected to a network with a DHCP server, the assigned IP address, subnet mask, gateway, and preferred DNS are automatically displayed.
If your device is not connected to a network or there is no DHCP server available, enter the IP address, subnet mask, gateway, and preferred DNS manually depending on the network requirements.
Click Finish. If you have changed the computer name, AXIS Recorder Toolbox will prompt you to restart the device.
Configure AXIS Camera Station Pro
Before you start:
Configure your network depending on your installation. See Network configuration.
Configure your server ports if needed. See Server port configuration.
Consider security issues. See Security considerations.
After necessary configurations, you can start to work with AXIS Camera Station Pro:
Start the video management system
Double-click the AXIS Camera Station Pro client icon to start the client. When you start the client for the first time, it attempts to log in to the AXIS Camera Station Pro server installed on the same computer as the client.
You can connect to multiple AXIS Camera Station Pro servers in different ways.
Add devices
The first time you start AXIS Camera Station S1216 Mk II Tower Recording Server, the Add devices page opens and searches the network for devices to add.
Select the devices you want to add from the list. If you can’t find a device, click Manual search or type to filter.
Click Add.
Click Close to skip configuration and continue later. To continue with the configuration now:
Choose Quick configuration or Site Designer configuration. See for more information.
Select Add image overlay for date, time, and text to add overlays to any Axis cameras that don’t already have one.
Click Next.
Select your Recording method preference.
Click Next.
Choose your Retention time and Recording storage, and click Finish to apply the configuration.
Configure recording method
Go to Configuration > Recording and events > Recording method.
Select a camera.
Turn on Motion detection, or Continuous, or both.
Click Apply.
View live video
Open a Live view tab.
Select a camera to view its live video.
View recordings
Open a Recordings tab.
Select the camera you want to view recordings from.
Add bookmarks
Go to the recording.
In the timeline, zoom in and out and move the timeline to put the marker at your desired position.
Click
 .
.Enter the bookmark name and description. Use keywords to make the bookmark easy to find.
Select Prevent recording deletion to lock the recording.
- Note
To unlock the recording, clear Prevent recording deletion or delete the bookmark.
Click OK to save the bookmark.
Export recordings
Open a Recordings tab.
Select the camera you want to export recordings from.
Click
 to display the selection markers.
Drag the markers to include the recordings that you want to export.
Click
 to open the Export tab.
Click Export...
Play and verify recordings in AXIS File Player
Go to the folder with the exported recordings.
Double-click AXIS File Player.
Click
 to show the recording’s notes.
To verify the digital signature:
Go to Tools > Verify digital signature.
Select Validate with password and enter your password.
Click Verify to see the verification results.
- Note
- A digital signature is different from signed video. Signed video lets you trace a recording back to the camera it came from, so you can verify it wasn't tampered with. See Signed video and the camera’s user manual for more information.
- If stored files don’t have any connection with an AXIS Camera Station database (non-indexed files), you need to convert them to make them playable in AXIS File Player. Contact Axis Technical support for help converting your files.
Network configuration
Configure proxy or firewall settings before using AXIS Camera Station S1216 Mk II Tower Recording Server if the client, server, and connected network devices are on different networks.
Client proxy settings
If a proxy server is between the client and the server, configure the proxy settings in Windows on the client computer. Contact Axis support for more information.
Server proxy settings
If the proxy server is between the network device and the server, you must configure the proxy settings in Windows on the server. Contact Axis support for more information.
NAT and Firewall
When a NAT or firewall separates the client and the server, configure it to ensure that the HTTP port, TCP port, and streaming port specified in AXIS Camera Station S1216 Mk II Tower Recording Server Service Control can pass through. Contact your network administrator for help.
Server port configuration
The AXIS Camera Station S1216 Mk II Tower Recording Server server uses ports 55752 (HTTP), 55754 (TCP), 55756 (mobile communication), and 55757 (mobile streaming) for communication between the server and the client. You can change the ports in AXIS Camera Station Service Control if required.
Security considerations
To prevent unauthorized access to cameras and recordings:
Use strong passwords for all network devices (cameras, video encoders, and auxiliary devices).
Install the AXIS Camera Station S1216 Mk II Tower Recording Server server, cameras, video encoders, and auxiliary devices on a secure network, separate from the office network. You can install the AXIS Camera Station S1216 Mk II Tower Recording Server client on a computer on another network, for example, a network with internet access.
Make sure all users have strong passwords.
License a system online
To use automatic licensing, you must register your system and connect it to an organization.
Go to Configuration > Licenses > Management.
Make sure Automatic licensing is on.
Click Register....
Sign in using your My Axis account and follow the onscreen instructions.
Click Go to AXIS License Manager to manage your licenses. Read the My Systems user manual on help.axis.com for more information.
License a system that's offline
To license your system manually:
Go to Configuration > Licenses > Management.
Turn off Automatic licensing.
Click Export system file... and save the file to your computer.
- Note
You must have an internet connection to access AXIS License Manager. If your client computer doesn’t have internet, copy the system file to a computer that does.
Open AXIS License Manager.
In AXIS License Manager:
Select the correct organization, or create one if you haven’t already. Read the My Systems user manual on help.axis.com for more information.
Go to System setup.
Click Upload system file.
Click Upload system file and select your system file.
Click Upload system file.
Click Download license file.
Go back to the AXIS Camera Station S1216 Mk II Tower Recording Server client.
Click Import license file... and select your license file.
Click Go to AXIS License Manager to manage your licenses.
Manage local Windows® user accounts
Create a user account
To help keep your personal data and information more secure, we recommend that you add a password for each local account.
Once you create a password for a local account, don't forget it. There’s no way to recover a lost password for local accounts.
Go to Settings > Accounts > Other users > Add other user and click Add account.
Click I don’t have this person’s sign-in information.
Click Add a user without a Microsoft account.
Enter a user name, password and password hint.
Click Next and follow the instructions.
Create an administrator account
Go to Settings > Accounts > Other people.
Go to the account you want to change and click Change account type.
Go to Account type and select Administrator.
Click OK.
Restart your device and sign in with the new administrator account.
Create a local user group
Go to Computer Management.
Go to Local Users and Groups > Group.
Right-click Group and select New Group.
Enter a group name and a description.
Add group members:
Click Add.
Click Advanced.
Find the user account(s) you want to add to the group and click OK.
Click OK again.
Click Create.
Delete a user account
When you delete an account you remove the user account from the login screen. You also remove all files, settings and program data stored on the user account.
Go to Settings > Accounts > Other people.
Go to the account you want to remove and click Remove.
Change a user account's password
Log in with an administrator account.
Go to User Accounts > User Accounts > Manage another account in sequence.
You’ll see a list with all user accounts on the device.
Select the user account whose password you would like to change.
Click Change the password.
Enter the new password and click Change password.
Create a password reset disk for a user account
We recommend to create a password reset disk on a USB flash drive. With this, you can reset the password. Without a password reset disk, you can’t reset the password.
If you’re using Windows® 10, or later, you can add security questions to your local account in case you forget your password, so you don't need to create a password reset disk. To do this, got to Start and click Settings > Sign-in options > Update your security questions.
Sign in to your device with a local user account. You can’t create a password reset disk for a connected account.
Plug an empty USB flash drive into your device.
From the Windows® search field, go to Create a password reset disk.
In the Forgotten Password setup assistant, click Next.
Select your USB flash drive and click Next.
Type your current password and click Next.
Follow the onscreen instructions.
Remove the USB flash drive and keep it in a safe placet. You don't have to create a new disk when you change your password even if you change it several times.
Manage AXIS Camera Station Pro user accounts
User permissions
Go to Configuration > Security > User permissions to see the users and groups in AXIS Camera Station S1216 Mk II Tower Recording Server.
Administrators of the computer that runs the AXIS Camera Station S1216 Mk II Tower Recording Server server are automatically granted administrator privileges in AXIS Camera Station S1216 Mk II Tower Recording Server. You can’t change or remove the Administrators group's privileges.
Before you can add a user or group, make sure they’re registered on the local computer or have a Windows® Active Directory user account. To add users or groups, see Add users or groups.
When a user belongs to a group, they receivet the highest role permission assigned to them individually or to the group. For example, a user with access to camera X who also belongs to a group with access to cameras Y and Z has access to all three cameras.
| Indicates the entry is a single user. | |
| Indicates the entry is a group. | |
Name | Username as it appears in the local computer or Active Directory. |
Domain | The domain that the user or group belongs to. |
Role | The access role assigned to the user or group. Possible values: Administrator, Operator, and Viewer. |
Details | Detailed user information as it appears on the local computer or in Active Directory. |
Server | The server that the user or group belongs to. |
Add users or groups
Microsoft Windows® and Active Directory users and groups can access AXIS Camera Station S1216 Mk II Tower Recording Server. To add a user to AXIS Camera Station S1216 Mk II Tower Recording Server, you must add users or a group to Windows®.
To add a user in Windows® 10 and 11:
Press the Windows key + X and select Computer Management.
In the Computer Management window, navigate to Local Users and Groups > Users.
Right-click Users and select New User.
In the popup dialog, enter the new user’s details and clear User must change password at next login.
Click Create.
If you use an Active Directory domain, consult your network administrator.
Add users or groups
Go to Configuration > Security > User permissions.
Click Add. The available users and groups appear in the list.
Under Scope, select where to search for users and groups.
Under Show, select to show users or groups. The search results may not appear if there are too many users or groups. Use the filter to narrow the results.
Select the users or groups and click Add.
| Scope | |
|---|---|
Server | Select to search for users or groups on the local computer. |
Domain | Select to search for Active Directory users or groups. |
Selected server | When connected to multiple AXIS Camera Station S1216 Mk II Tower Recording Server servers, select a server to search for users or groups on that server. |
Configure a user or group
Select a user or group in the list.
Under Role, select Administrator, Operator, or Viewer.
If you selected Operator or Viewer, you can configure the user or group privileges. See User or group privileges.
Click Save.
Remove a user or group
Select the user or group.
Click Remove.
In the pop-up dialog, click OK to remove the user or group.
User or group privileges
There are three roles you can assign to a user or group. For how to define the role for a user or group, see Add users or groups.
- Administrator
- Full access to the entire system, including access to live and recorded video of all cameras, all I/O ports, and views. This role is required to access system configuration.
- Operator
- Select cameras, views, and I/O ports to get access to live and recorded video. An operator has full access to all functionality of AXIS Camera Station S1216 Mk II Tower Recording Server except system configuration.
- Viewer
- Access to live video of selected cameras, I/O ports, and views. A viewer doesn’t have access to recorded video or system configuration.
Cameras
The following access privileges are available for users or groups with the Operator or Viewer role.
Access | Allow access to the camera and all camera features. |
Video | Allow access to live video from the camera. |
Audio listen | Allow access to listen from the camera. |
Audio speak | Allow access to speak to the camera. |
Manual Recording | Allow starting and stopping recordings manually. |
Mechanical PTZ | Allow access to mechanical PTZ controls. Available only for cameras with mechanical PTZ. |
PTZ priority | Set the PTZ priority. A lower number means a higher priority. No assigned priority is set to |
Views
The following access privileges are available for users or groups with the Operator or Viewer role. You can select multiple views and set the access privileges.
Access | Allow access to the views in AXIS Camera Station S1216 Mk II Tower Recording Server. |
Edit | Allows editing of views in AXIS Camera Station S1216 Mk II Tower Recording Server. |
I/O
The following access privileges are available for users or groups with the Operator or Viewer role.
Access | Allow full access to the I/O port. |
Read | Allows viewing the state of the I/O port without changing it. |
Write | Allows changing the state of the I/O port. |
System
You can’t configure grayed-out access privileges in the list. A check mark means the user or group has this privilege by default.
The following access privileges are available for users or groups with the Operator role. Take snapshots is also available for the Viewer role.
Take snapshots | Allows taking snapshots in live view and recording mode. |
Export recordings | Allow exporting recordings. |
Generate incident report | Allow generating incident reports. |
Prevent access to recordings older than | Prevent access to recordings older than the specified number of minutes. Users can’t find these recordings when they search. |
Access alarms, tasks, and logs | Get alarm notifications and allow access to the Alarms and tasks bar and Logs tab. |
Access data search | Allow searching for data to track what happened at the time of an event. |
Add categories to events | Allow adding categories to events in the Recordings tab. |
Remove categories from event | Allow removing categories from events in the Recordings tab. |
Access control
The following access privileges are available for users or groups with the Operator role. Access Management is also available for the Viewer role.
Access control configuration | Allow configuration of doors and zones, identification profiles, card formats, and PIN, encrypted communication, and multi-server. |
Access management | Allow access management and access to the Active Directory settings. |
The following access privileges are available for users or groups with the Viewer role.
System health monitoring
The following access privileges are available for users or groups with the Operator role. Access to system health monitoring is also available for the Viewer role.
Configuration of system health monitoring | Allows configuration of system health monitoring. |
Access to system health monitoring | Allows access to system health monitoring. |
Manage your device
Update Secure Boot certificates
Microsoft is retiring the 2011 Secure Boot certificates in June 2026 and replacing them with new 2023 certificates. To keep your recorder safe, install the 2023 certificates before then.
Installing the 2023 certificates requires Windows 10 LTSC (Long-Term Servicing Channel) or Windows 11 LTSC. If your device is within warranty but is running Windows 10 SAC (Semi-Annual Channel) instead of an LTSC version, contact Axis Technical Support. They can tell you if you can upgrade to an LTSC version before you update the BIOS or change any certificates.
After June 2026, devices without the 2023 certificates will keep working as normal, but won't receive new security protections for the early boot process, including Windows Boot Manager updates and revocation lists for new vulnerabilities.
Check your certificate status
To verify that the 2023 certificates are installed and that the Windows bootloader has been updated, use one of the following methods:
- Method 1:
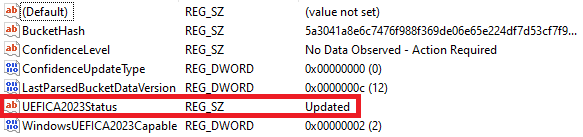
Open Registry Editor.
Go to
HKEY_LOCAL_MACHINE\SYSTEM\CurrentControlSet\Control\SecureBoot\Servicing.Check the UEFICA2023Status value. If the value says Updated, the 2023 certificate is installed.
- Method 2:
Open Windows Security.
Go to Device security.
Under Secure boot, check the status message. If the certificate is up to date, the card shows: “Secure Boot is on and all required certificate updates have been applied. No further certificate changes are needed.”

Windows Security only shows certificate status if your device has the April 14, 2026 cumulative update or later installed. If you don't see a certificate status message, install the latest Windows update or use Method 1 instead.
Recommended actions
A BIOS update stores the 2023 certificates permanently in the firmware. This is the most reliable method, and we recommend it even if you've already installed the certificates through Windows Update.
If you only install the certificates through Windows Update and then reset the BIOS Secure Boot keys to factory defaults, the certificates will be lost and the device won't start with Secure Boot turned on. Update the BIOS to make the certificates permanent before you reset Secure Boot keys.
Update certificate through the BIOS
For AXIS S12 and S93 series, get the BIOS update from Dell instead of Axis.com. See Update the BIOS.
Update certificate through Windows Update
If a BIOS update isn't available yet for your model, you can get the 2023 certificates through Windows Update instead.
Certificates installed this way are stored in the current Secure Boot database, not in the firmware. If you reset the BIOS Secure Boot keys to factory defaults, you'll lose the certificates and the device may not be able to start with Secure Boot turned on. Install a BIOS update as soon as one is available for your model, even if you've already used this method.
- To use this path:
Make sure your device runs Windows 10 LTSC or Windows 11 LTSC.
Install all Windows updates released April 14, 2026 or later.
Go to Windows Security > Device security > Secure Boot to check your certificate status.
If the certificate doesn't update after installing the latest updates, check the UEFICA2023Status registry value. If your device remains ineligible for the automatic update, update the BIOS or contact Axis Technical Support.
Don't manually revoke the 2011 certificate until you've confirmed that all recovery media, boot environments, and drivers in your environment are signed with the 2023 certificate. Revoking the 2011 certificate too early will leave your device unable to start with Secure Boot turned on.
Check the current BIOS version
To check the current BIOS:
Power on the device and repeatedly press F2 until the Axis logo appears.
The version number is shown as first entry under Overview.
Update the BIOS
Go to Dell support.
In the Service tag field, enter the last 7 characters of your device's serial number. For example, HW030ABC1234.
Go to Drivers & Downloads and search for “BIOS”.
If no newer version appears for your OEM product name (for example, "OEMR XL R760xs"), search again using the generic Dell platform name instead of the serial number (for example, "R760xs").
Download and install the latest BIOS version released after April 2026.
Update Windows®
Windows® periodically checks for updates. When an update is available, your device automatically downloads the update but you've to install it manually.
Recording will be interrupted during a scheduled system restart.
To manually check for updates:
Go to Settings > Windows Update.
Click Check for updates.
Configure Windows® update settings
It is possible to change how and when Windows® do its updates to suit your needs.
All ongoing recordings stop during a scheduled system restart.
Open the Run app.
Go to Windows System > Run, or
Type
gpedit.mscand click OK. The Local Group Policy Editor opens.Go to Computer Configuration > Administrative Templates > Windows Components > Windows Update.
Configure the settings as required, see example.
Example
To automatically download and install updates without any user interaction and have the device restart, if necessary, at out of office hours, use the following configuration:
Open Always automatically restart at the scheduled time and select:
Enabled
The restart timer will give users this much time to save their work (minutes): 15.
Click OK.
Open Configure Automatic Updates and select:
Enabled
Configure Automatic updates: Auto download and schedule the install
Schedule Install day: Every Sunday
Schedule Install time: 00:00
Click OK.
Open Allow Automatic Updates immediate installation and select:
Enabled
Click OK.
Add a hard drive
Prepare the device:
Shut down the system and disconnect the power cord.
Place the device on its side with the two thumb screws on the back facing upward.
Unscrew the two thumb screws on the back of the chassis.
Slide the cover off by gently pulling the handle on the side panel, then lift it off.
Unsnap the three hinges to remove the front panel.
Attach the hard drive:
Lift the hard drive bracket upward to remove it.
Unscrew the four blue rubber mounting screws from the primary hard drive bracket.
Attach the four mounting screws to the sides of the new hard drive. Don't use the middle hole on each side.
Insert the hard drive into the bracket with the SATA connectors facing outward, then push it gently until you hear a click.
Reattach the bracket to the chassis, starting with the front-facing side.
Connect the free SATA cables to the hard drive (both data and power).
Close and restart:
Reattach the front panel.
Reattach the side panel and tighten the thumb screws
Reconnect the power cord and start the system.
Next steps:
If you want to use RAID, continue with Create RAID volume.
If you don’t want to use RAID, skip to Add a new recording storage.
Create RAID volume
Make sure that the disks to be used in the RAID volume are detected.
Turn on your device and instantly press F12 until the Axis logo appears.
In the UEFI boot menu, select Device Configuration and press Enter.
In the Intel® Rapid Storage Technology menu, make sure that the disks are correctly displayed under Non-RAID Physical Disks.
- Note
Only RAID 0 and RAID 1 are available on devices that have physical space for just an additional single drive.
In the Intel Rapid Storage Technology menu, select Create RAID Volume and press Enter.
Type a name for the volume.
Choose the RAID level.
Select RAID Level and press Enter.
In the popup dialog, select the RAID level you want to use and press enter.
Include the disks to be used in the volume.
Select a disk and press enter.
Select X to include this disk in the volume.
Repeat until you have selected all the disks you want to use.
Leave Stripe Size and Capacity to the default values, unless specified.
Select Create Volume and press enter.
In the Intel Rapid Storage Technology menu, the newly created RAID volume appears under RAID Volumes.
Press Esc and then press Y to save and exit to the UEFI menu.
Press CTRL + ALT+ DELETE to restart your device.
Add a new recording storage
Create and format a new hard disk partition in Windows:
Right-click the Start menu and select Disk Management.
Click OK if the Initialize Disk popup appears. If it doesn’t, right-click on the new hard drive and select Initialize Disk.
Right-click on an unallocated region on the newly initiailized disk and select New Simple Volume.
Follow the wizard to set the volume size, assign a drive letter, and format the partition.
Complete the wizard to create the new simple volume.
Add a new recording storage in AXIS Camera Station Pro:
Open AXIS Camera Station Pro.
Go to Storage > Management.
Click Add...
Select the newly added drive and click OK.
Go to Storage > Selection.
Select which devices you want to transfer recording data to the new drive.
In the Store to drop-down list, select the new drive and click Apply.
For more information about storage management, see AXIS Camera Station Pro – User manual.
Product overview
- Power button/power LED
- Universal audio jack
- USB 2.0 ports
- USB 3.2 gen 2x2 USB-C port
- USB 3.2 gen 2x1 port
- DisplayPorts™
- USB 3.2 gen 2x1 USB-C port
- USB 3.2 gen 1x1 ports
- USB 2.0 ports
- 1 GbE Ethernet port
- Power connector
Troubleshooting
Perform a system recovery
Internal recovery
If the device has had a system failure, perform an internal recovery to restore the system.
Open Windows Settings.
Select System.
In the menu, select Recovery.
Under Recovery options select Reset this PC.
Select Keep my files or Remove everything.
Keep my files will keep all your personal files and user data, as well as all Axis installed software.
Remove everything will remove all your personal files and user data, but will keep all Axis installed software (factory default).
Follow the onscreen instructions.
- Note
Before selecting Reset, you can view a list of apps that will be removed in the process. Axis apps will be restored after the recovery, but if you've installed other apps, they won't be restored.
- Important
After a successful recovery, it’s important that you log in to Windows with an Administrator account to finalize the recovery process.
External recovery
If the device has had a complete system failure, you must use a recovery image to recreate the Windows® system. To download the AXIS Network Video Recovery Kit, contact AXIS Technical Support and supply the serial number of your device.
The AXIS Network Video Recorder Recovery Kit comes in two variants:
- sb11 — for devices still using the 2011 certificate.
- sb23 — for devices that have moved to the 2023 certificate.
Check your certificate status before you download the Recovery Kit, and select the matching variant. If you select the wrong variant, the installation won't produce a bootable result, and you'll need to start over with the correct image. This won't damage your device.
If your device already has the 2023 certificate installed, the sb11 variant is still safe to use, as long as the 2011 certificate hasn't been manually revoked. Once it's revoked, only sb23 will work.
Download the AXIS Network Video Recovery Kit and an ISO to USB writing tool of your choice.
Insert a USB drive into your computer.
Use a USB drive with a minimum of 16 GB.
The USB drive will be formatted, and all existing data will be erased.
Run the ISO to USB writing tool and follow the onscreen instructions.
Writing data to the USB drive takes approximately 10 to 15 minutes. Don’t remove the USB drive until the process is complete.
After the ISO to USB tool is complete, remove the USB drive from your computer and plug it into your device.
Start your device. When you see the Axis splash screen, press F12 to open the boot menu.
Select your USB drive and press Enter. The system boots into the AXIS Network Video Recorder Recovery Kit.
Click Start and follow the onscreen instructions.
The recovery takes roughly 10 to 15 minutes to complete.
Troubleshoot AXIS Camera Station Pro
For information about how to troubleshoot AXIS Camera Station Pro, go to the AXIS Camera Station Pro user manual.
Need more help?
Useful links
Contact support
If you need more help, go to axis.com/support.