Solution overview
AXIS P8815-2 3D People Counter
AXIS P8815-2 3D People Counter provides software and dedicated hardware in one device. The 3D people counting application is embedded in the device. This means that you don’t need a dedicated computer to run the application. AXIS P8815-2 3D People Counter is intended for indoor use in, for example, retail environments like stores or shopping malls, or other locations where you want to count people or keep track of how many people are inside the premises.
What’s the difference between AXIS People Counter and AXIS P8815-2 3D People Counter?
The applications have two different algorithms for counting people which makes them suitable for different environments:
AXIS People Counter recognizes objects that move in the field of view and identifies them as people based on their overall size and movement. AXIS People Counter is suitable for most scenarios, covering single as well as double door entrances.
AXIS P8815-2 3D People Counter calculates the depth within the counting area in order to measure the height and the size of the object. AXIS P8815-2 3D People Counter is suitable for crowded scenarios and scenes with challenging light conditions like strong sunlight, glares and shadows.
Mount the camera
For instructions on how to install the device, see the installation guide and the installation video.

In addition to the instructions in the installation guide, there are some important steps to follow for the application to behave in the expected way:
The device must be mounted straight above the point where people pass.
Make sure the device is facing straight down, in line with the ceiling. It’s important that both the ceiling and the floor are level.
Make sure there is sufficient white light on site.
Make sure there are no objects interfering in the device’s view. For example, do not install the device too close to a door or a large sign hanging from the ceiling.
Loitering people or large objects that sway slightly could interfere with the counting.
Find the device on the network
For more information about how to find and assign IP addresses, go to How to assign an IP address and access your device.
Access the device
Open a browser and enter the IP address or host name of the Axis device.
If you do not know the IP address, use AXIS IP Utility or AXIS Device Manager to find the device on the network.
Enter the username and password. If you access the device for the first time, you must set the root password. See Set a new password for the root account.
The live view page opens in your browser.
Secure passwords
Use HTTPS (which is enabled by default) to set your password or other sensitive configurations over the network. HTTPS enables secure and encrypted network connections, thereby protecting sensitive data, such as passwords.
The device password is the primary protection for your data and services. Axis devices do not impose a password policy as they may be used in various types of installations.
To protect your data we strongly recommend that you:
Use a password with at least 8 characters, preferably created by a password generator.
Don’t expose the password.
Change the password at a recurring interval, at least once a year.
Set a new password for the root account
The default administrator username is root. If the password for root is lost, reset the device to factory default settings. See
Type a password. Follow the instructions about secure passwords. See Secure passwords.
Retype the password to confirm the spelling.
Click Create login. The password has now been configured.
Install the application on the camera
- The license is only valid for one camera. You can’t activate the license on another camera without a new registration key.
- To install applications on the camera you need administrator rights.
Install the camera on your network..
Go to the camera’s web interface in your browser, see the user manual for the camera.
Go to Setup > Applications .
If there are other applications installed on the camera, remove them.
Upload the application file (.eap) to the camera.
Click the link under Applications > AXIS 3D People Counter > Settings.
Activate the license. If you’re online, enter the license code. The application automatically activates the license.
Calibrate the counter. See How to calibrate the counter
How to activate the license when you’re offline
- To activate the license when you’re offline, you need a license key. If you don’t have a license key on the computer, do the following:
Go to License key registration. You need the license code and the Axis device serial number.
Save the license key file on the computer and select the file when the application asks for it.
How to access the application settings
- To access the application’s webpage:
In the camera’s webpage, go to Setup > Application > AXIS 3D People Counter and click the AXIS 3D People Counter settings link.
In a browser, type
[deviceIP]/stereo.
Additional settings
Set the date and time
The date and time settings are important for your camera to keep the correct time for a longer period of time, and for the statistics to be attributed to the correct time. You set the date and time in the camera’s web interface.
Create a user account
You can create user accounts with different privileges, so that unauthorized staff can view statistics but not change any settings of the counter.
- To create a user account:
Go to Device settings > Accounts.
Click +.
- Users with the Viewer role can only access the Statistics pages and the Advanced > About page.
About the counting zone
The counting zone is the area where the counter detects people.
The counting zone is indicated by a transparent rectangle in the middle of the image. It should be aligned with the door threshold. A perspective box is created on top of the counting zone with the approximate height of a person. For each of the four sides of the perspective box, you set the counting direction.
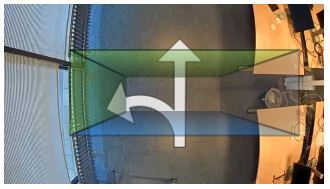
- Blue to green
- When a person moves from blue to green, it gets counted as someone going in. Arrows indicate the direction.
- Green to blue
- When a person moves from green to blue, it gets counted as someone going out.
For a person to be counted, they must move from blue to green or from green to blue. The feet must pass through the transparent rectangle in the middle.
To ensure the accuracy of the counter, you must calibrate and set up AXIS 3D People Counter before use. The setup is done in two steps:
First, you need to calibrate the counter to be able to analyze the incoming data. You perform the initial calibration when you first connect to the application. See How to calibrate the counter.
Second, you must adjust the counting zone to fit the scene. You do this in the settings page. See Set up the counter.
How to calibrate the counter
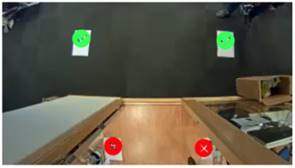
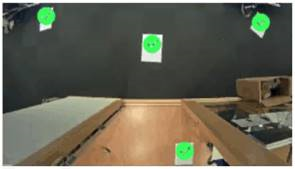
During calibration, you must use the four paper markers included with the camera. Each marker is unique.
The markers are available here. If you print them yourself, use paper size A3/11x17 in (ledger/tabloid). Make sure the marker doesn’t fill the page, as there must be a wide white margin on all sides for the calibration to work.
If there are any applications running on the camera, they are paused during the calibration.
Place one marker in each corner of the area visible through the camera. It doesn’t matter which marker you place where.
- Important
- Each marker is unique. Make sure to use different markers in each corner.
- The markers must be visible to the camera throughout the calibration process.
- If you need to fasten the markers to the floor, use transparent adhesive. If you use colored adhesive it can interfere with the calibration process.
In the application, you get to the initial calibration after the registration page. If you want to recalibrate the counter, go to Maintenance > Calibration.
Click Calibrate. The following happens:
The application gathers data.
The application processes the data. This usually takes 1 to 5 minutes.
If the calibration is successful, is shown on top of each marker in the image. If is shown on top of a marker, it means the calibration failed because the markers are placed too close together. You need to move the markers and calibrate again.
When the calibration is done, click Go to live view.
- Reasons for a failed calibration:
the markers are placed too close together
one or more markers are obscured
there are duplicate markers
Set up the counter
Measure the camera’s mounting height. This is the distance from the floor to the bottom of the camera’s lens.
See Mount the camera.
In the application’s web interface, go to Settings > General.
In the Name field, type the name of the camera or location.
This can be for example “Axis_Main_entrance_T_building”. All cameras need to have unique names.
Enter the camera’s mounting height in the Mounting height (cm) field.
Click Submit.
Go to Settings > Counting area.
Set Top direction, Bottom direction, Right direction, and Left direction to In, Out, or None, depending on the direction of the people passing by in live view. When you select Out, that side turns blue, and when you select In, that side turns green and is also indicated with an arrow.
- Note
The camera’s mounting height affects both the width adjustment and the alignment of the counting area.
Align the counting area with the door threshold with the Counting area offset slider.
To adjust the width of the counting area, use the Counting area width slider.
There are two types of schedules: automatic and manual. The automatic schedule turns off the application when there is insufficient lighting. This schedule is used by default. With a manual schedule, you can decide yourself at what times to turn the application on and off for each day of the week.
You can update the schedule settings under Settings > Advanced > Schedule.
Anonymize people
This setting is only available if you have logged in as an administrator.
If you want to prevent people from being identified in the live view or recordings, you can turn on privacy mode. Privacy mode blocks all video streams and images and turns the live view into a black image.
- To turn on privacy mode:
Go to Setup > Counter > Privacy.
Turn on Privacy mode.
Validate the system
Before you validate the system, make sure you have mounted the camera according to the recommendations. See Mount the camera.
When you have installed and set up all cameras in the building, we recommend that you validate the accuracy and fine-tune the system. This is likely to increase the accuracy or identify any problems with the counters.
To get an overview, go to Statistics and look at the counting data for a couple of days back. If the difference between number of persons going in and out is <5% it’s a good first indication that the system is configured correctly.
- The validation only works if
there is only a single point of entry to the building, or
all points of entry to the building are covered by a counter and the statistics are aggregated, manually or with the help of AXIS Store Reporter, across all counters.
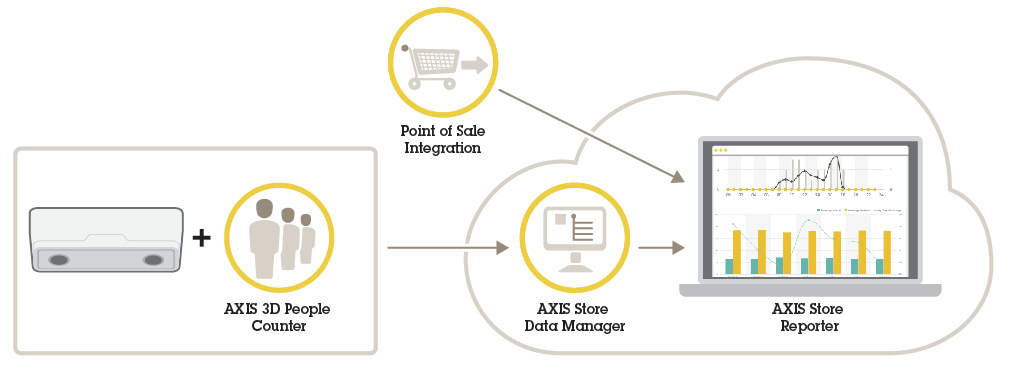
Statistics
There are several ways to use the statistics from the counter:
In the application’s web interface, view real-time counting data in the built-in graphs.
View built-in graphs in day, week, and month views in the Statistics pages. The data is updated in real time.
Data is available on the device for up to 90 days and updated every minute. The data is stored in one-minute bins representing the in and out counts for that minute.
Download data through an open API. See VAPIX® Library
Send data automatically to a remote HTTPS destination through the data push functionality. See .
Use AXIS Store Data Manager, a software package that acts as a central point to store and manage data collected from all devices. See Connect the device to a folder in AXIS Store Data Manager.
Use AXIS Store Reporter, a statistical web-based solution, for managing and monitoring historical data.
Download statistics to your computer, see Download statistics.
Connect the device to a folder in AXIS Store Data Manager
In AXIS Store Data Manager, go to Sources and get the Folder connection identifier and the Folder connection password for the folder you want to connect to.
In the application’s web interface, go to Setup > Counter.
Under Device, enter a name for the device, so you know which device the report comes from.
Go to Setup > Reporting.
To allow sending reports to AXIS Store Data Manager, turn on Report to ASDM.
In the URL field, enter the address to the server.
Enter the folder connection identifier and password for AXIS Store Data Manager in the Folder identifier fields.
Click Test connection.
If the connection is successful, it’s indicated by a white check mark.
Click Save.
Download statistics
Go to Statistics > In and out or Statistics > Occupancy.
Click Export data.
A comma-delimited (.csv) file with all statistics data from the device is saved locally.
Troubleshooting
| Issue | Action |
| The software doesn’t count. | Make sure the instructions for how to install the device has been followed, see . |
| I still can’t get the software to count. | If you have followed the advice above and still can’t get the software to work, contact your Axis reseller. |
| The software counts shadows on the walls. | 1. Make sure the counting area only doesn’t include parts of the walls. 2. Go to Advanced > Troubleshooting and turn on Eliminate shadows. |
| I have a wide area covered by multiple devices, and the software doesn’t send reports. | Make sure the date and time of the devices are synchronized. |
| The software warns me that the FPS is low. | 1. Make sure no other applications run on the device at the same time. 2. Make sure there is only one video stream from the device running at a time. |
Restart the application
If the counting is inaccurate or the web interface unusually slow, you can try restarting the running services or restart the device.
To restart the device, go to Device Settings > Device view > System > Maintenance and click Restart.
Generate a log report
If you have any trouble with your device you can generate a log report.
Go to Device settings > Device view > System > Maintenance > Logs
Click View the system log.
The log report opens in a new tab in the browser.
Manage your license
Go to Maintenance > Registration.
To register a license, click on the Registration page.
Common examples
Example
Open all statistics that are stored in the camera with a one minute resolution, using a browser.
Request (CSV)http://<servername>/stereo/people-counter/export.csv?export-method=on&date=YYYYMMDD&resolution=60&method=openSee List download statistics for more information.
Example
Download statistics that occurred on the 10th of January of 2017.
Request (JSON)http://<servername>/stereo/people-counter/export.json?resolution=day&date=20170110&method=download
See List download statistics for more information.
API specification
Request real-time data
Returns JSON file with real time counting data.
- Format:
- JSON
- Method:
- GET
http://<servername>/stereo/people-counter/counts.json{
"in": 0,
"name": "Untitled AXIS 3D People Counter",
"out": 0,
"serial": "ACCC8E235294",
"timestamp": "20180115121710"
}| Value | Description |
|---|---|
in | Number of people passing in until now today. |
name | The name of the application, chosen by the client. |
out | Number of people passing out until now. |
serial | The Mac address for the camera. |
timestamp | Time in the camera in the format YYYYMMDDhhmmss. |
List download statistics
Returns statistics stored in the camera in JSON or plain text comma separated format (CSV)
- Format:
- CSV or JSON
- Method:
- GET
http://<servername>/stereo/people-counter/export.csv?resolution=<resolution>&date=<date>&method=<method>http://<servername>/stereo/people-counter/export.json?resolution=<resolution>&date=<date>&method=<method>| Parameter | Description |
|---|---|
| <date> | a date of the form YYYYMMDD |
a date interval of the form YYYYMMDD-YYYYMMDD | |
comma separated dates of the form YYYYMMDD,[..],YYYYMMDD | |
all (default) for all available data | |
| <resolution> | minute for data in 1 minute bins |
hour for data in 1 hour bins | |
day for data in 1 day bins | |
60 for data in 1 minute bins | |
3600 for data in 1 hour bins | |
86400 for data in 1 day bins | |
| <method> | select open to list the statistics in a web browser |
select download to download the JSON or CSV file |
Return
Returns statistics stored in the camera in JSON or plain text comma separated format (CSV). The first line of the CSV file contains a description of each element, and the following lines contain the corresponding data for the chosen time interval and resolution: Interval Start, Interval Start (Unixtime), In, Out
List frame rate
Returns the current internal frame rate
- Format:
- JSON
- Method:
- GET
http://<servername>/stereo/fps.json{
"fps": real time fps,
"fps_100": average FPS for the last 100 frames,
"fps_1000": average FPS for the last 1000 frames,
"fps_5": average FPS for the last 5 frames,
"fps_50": average FPS for the last 50 frames,
"frames": frame counter.
}I/O interface
Get the latest I/O signals as false or true.
- Format:
- JSON
- Method:
- GET
http://<servername>/stereo/io.json"True" or "False"List parameters
Get all parameters currently set.
- Format:
- JSON
- Method:
- GET
http://<servername>/stereo/params.jsonReturn
A JSON object of all the parameters currently set.