Solution overview
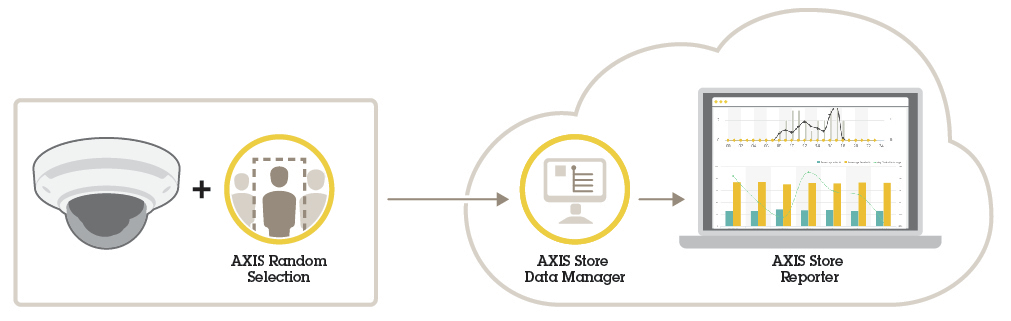
AXIS Random Selector
AXIS Random Selector is an analytic application that can be installed on a network camera. The application detects when someone is leaving the premises and randomly determines if that person should be scheduled for inspection or not.
The selection of individuals to be inspected is done at random, eliminating any bias in delicate situations which in turn reduces employee discomfort. If an individual is selected for inspection, the application triggers an alarm to notify the person responsible for the inspection.
AXIS Random Selector includes AXIS People Counter functionality.
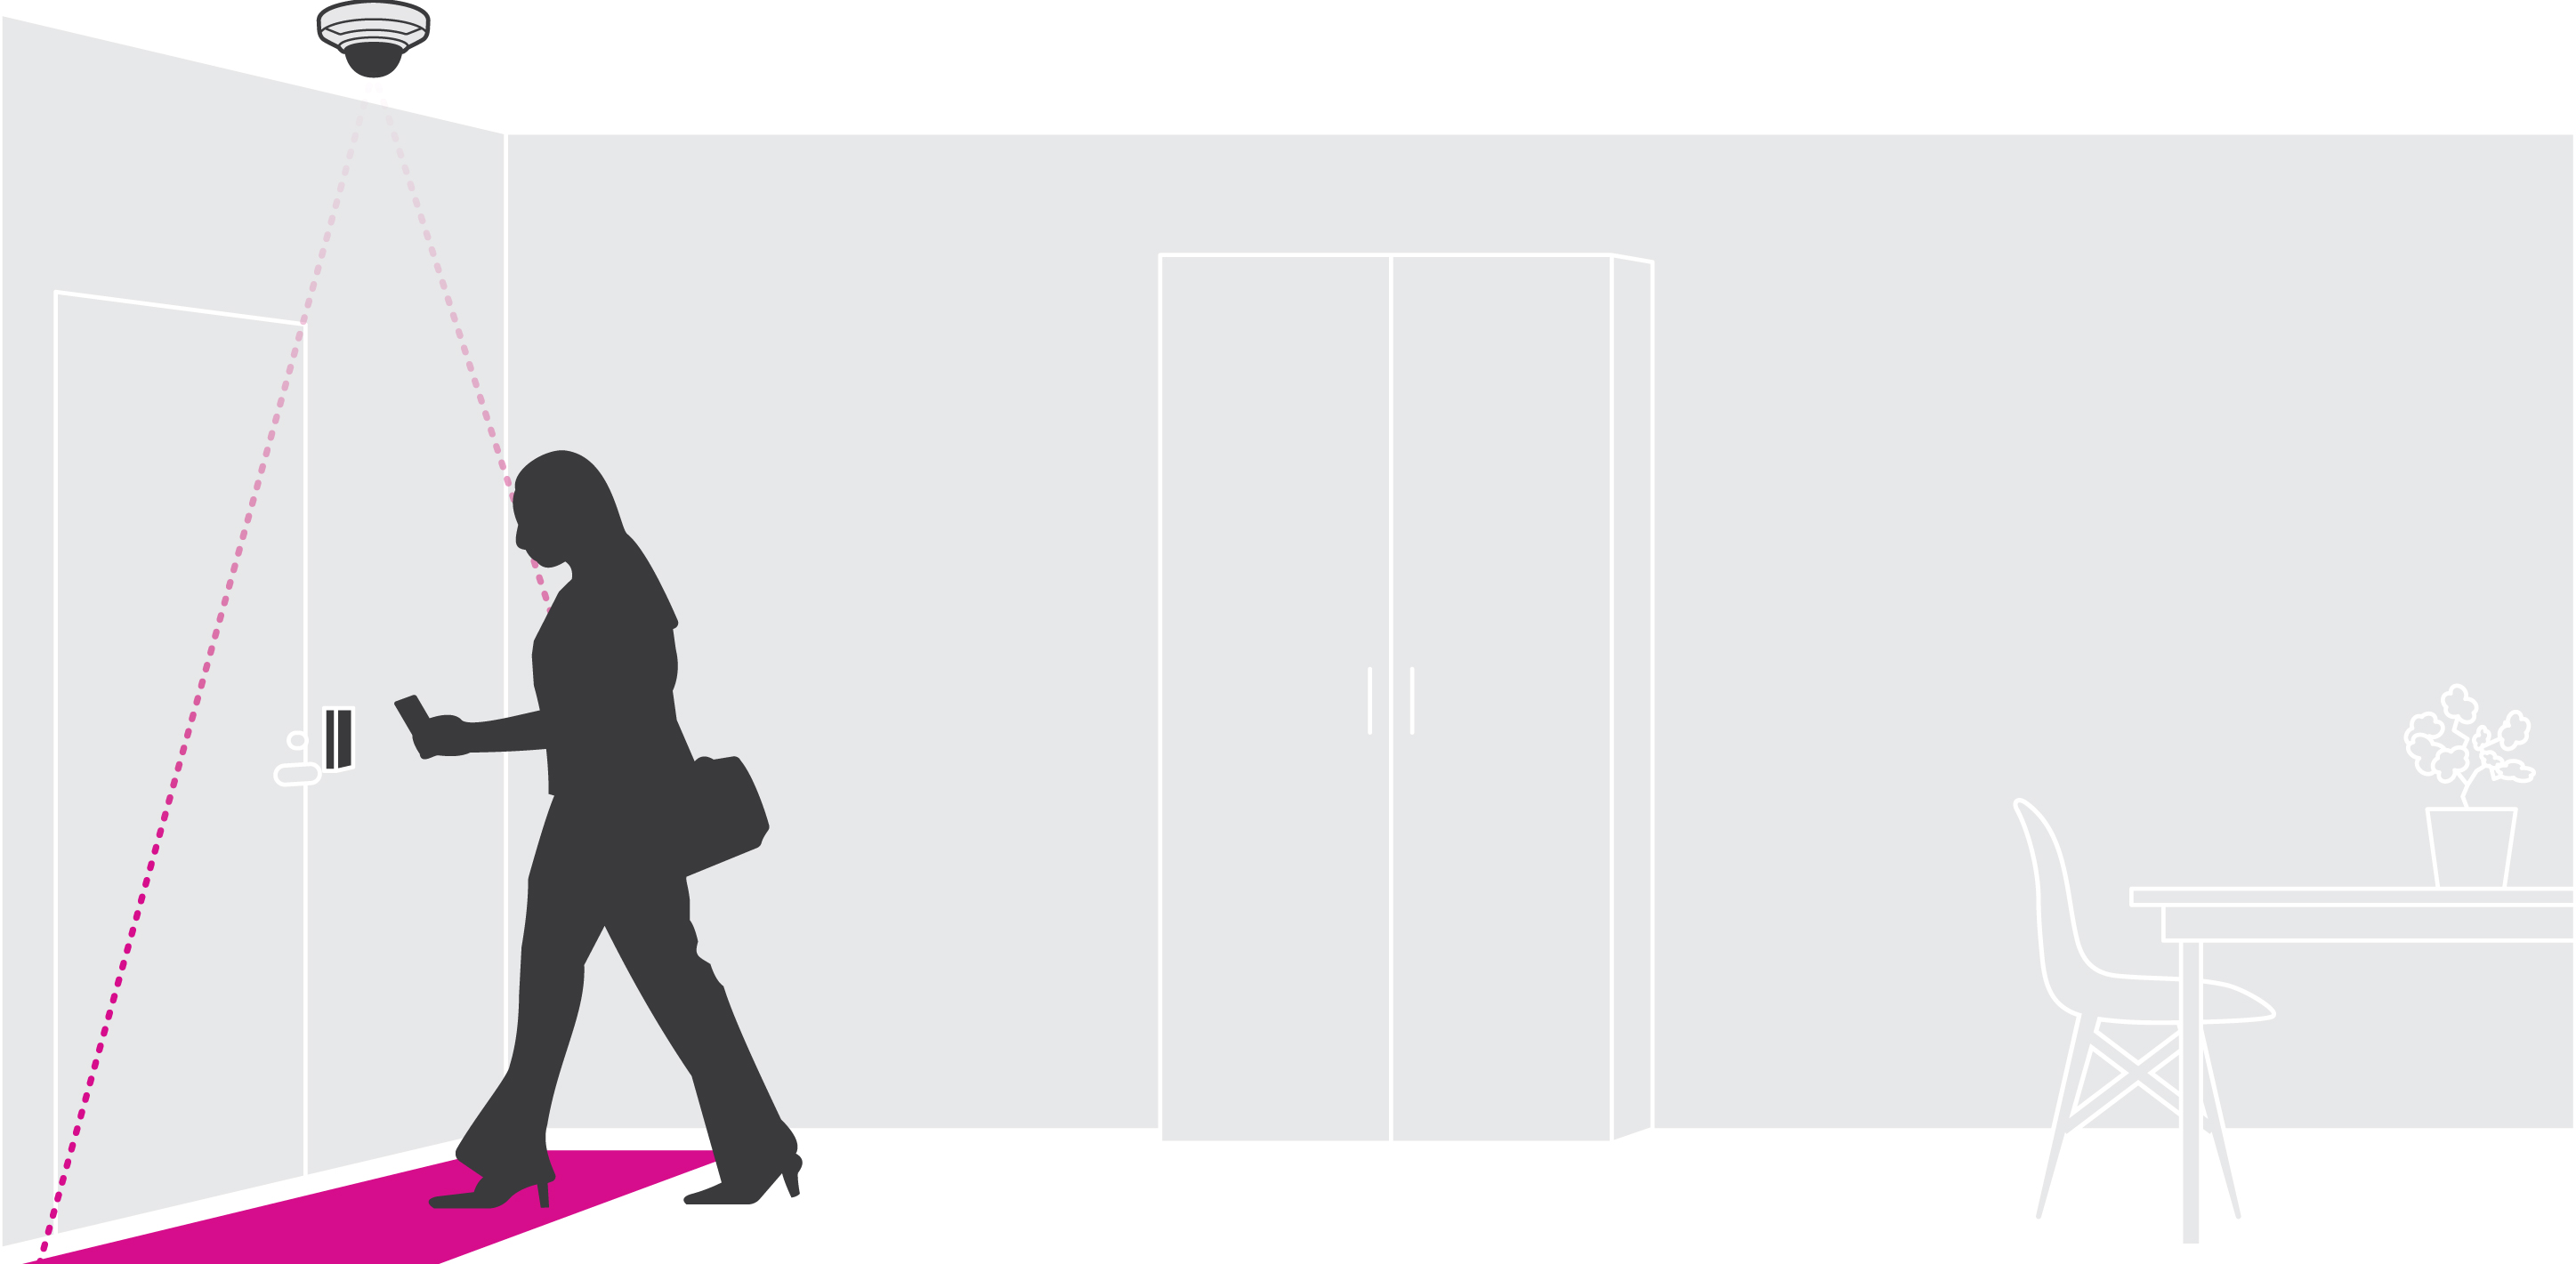
Mount the camera
The application is designed for scenarios where it counts objects with the characteristics of an adult person. The exact height limitation of the object depends on camera model, camera lens, and the selected counter sensitivity.
In addition to the instructions in the camera’s Installation Guide, there are some important steps to follow for the application to behave in the expected way:
We recommend that you install the camera at a minimum height of 270 cm (8.9 ft).
As a rule-of-thumb, the camera covers an area as wide as the camera’s mounting height. For details about a specific camera model, contact Axis support.
After installation, the covered area can be increased depending on the camera’s zoom setting.
If the camera is mounted high enough, you can get a coverage width of 8 meters. You can cover even wider entrances by using multiple counters.
The camera must be mounted straight above the point where people pass.
Make sure the camera is facing straight down, in line with the ceiling.
If you install the application before you install the camera, you can use the counting area indicated in the live view to position the camera. The counting area should go from left to right, perpendicular to the path where people cross.
Make sure there is sufficient white light or IR illumination on site.
Make sure that there are no continuously moving objects in the counting area. For example, do not install the camera above an escalator.
Make sure there are no moving objects interfering in the counting area. For example, do not install the camera too close to a door.
Avoid getting very strong light, like sunlight, and sharp shadows in the camera view.
Find the device on the network
For more information about how to find and assign IP addresses, go to How to assign an IP address and access your device.
Access the device
Open a browser and enter the IP address or host name of the Axis device.
If you do not know the IP address, use AXIS IP Utility or AXIS Device Manager to find the device on the network.
Enter the username and password. If you access the device for the first time, you must set the root password. See Set a new password for the root account.
The live view page opens in your browser.
Secure passwords
Use HTTPS (which is enabled by default) to set your password or other sensitive configurations over the network. HTTPS enables secure and encrypted network connections, thereby protecting sensitive data, such as passwords.
The device password is the primary protection for your data and services. Axis devices do not impose a password policy as they may be used in various types of installations.
To protect your data we strongly recommend that you:
Use a password with at least 8 characters, preferably created by a password generator.
Don’t expose the password.
Change the password at a recurring interval, at least once a year.
Set a new password for the root account
The default administrator username is root. If the password for root is lost, reset the device to factory default settings. See
Type a password. Follow the instructions about secure passwords. See Secure passwords.
Retype the password to confirm the spelling.
Click Create login. The password has now been configured.
Install the application on the camera
- The license is only valid for one camera. You can’t activate the license on another camera without a new registration key.
- To install applications on the camera you need administrator rights.
Install the camera on your network..
Go to the camera’s web interface in your browser, see the user manual for the camera.
Go to Apps.
Upload the application file (.eap) to the camera.
Activate the license. If you’re online, enter the license code. The application automatically activates the license.
How to activate the license when you’re offline
- To activate the license when you’re offline, you need a license key. If you don’t have a license key on the computer, do the following:
Go to License key registration. You need the license code and the Axis device serial number.
Save the license key file on the computer and select the file when the application asks for it.
Access the application settings
In the camera’s web interface, go to Apps, start the application and click Open.
Additional settings
Set the date and time
The date and time settings are important for your camera to keep the correct time for a longer period of time, and for the statistics to be attributed to the correct time. You set the date and time in the camera’s web interface.
In the camera’s web interface, go to System > Date and time.
For more information about date and time settings, click
 .
.
Create a user account
You can create user accounts with different privileges, so that unauthorized staff can view statistics but not change any settings of the counter.
You create user accounts in the camera’s web interface.
In the camera’s web interface, go to System > Users.
For more information about user accounts, click
.
Set up the counter
In the application’s web interface, go to Settings > General.
Make sure Status is on.
In the Name field, type the name of the camera or location.
This can be for example “Axis_Main_entrance_T_building”. All cameras need to have unique names.
Set Calibration mode. Do one of the following:
If the application is calibrated for your camera, select Height setting. Type the mounting height in the Visual height field.
If the application is not calibrated, select Manual setting and click Setup. Place a person underneath the camera and adjust the size of the yellow box so that it covers just one person.
If you need to zoom in, do one of the following:
Turn on Digital zoom and click Setup.
If the camera has optical zoom, you need to go to the camera’s web interface to adjust the zoom.
Set Direction in to Up or Down, depending on the direction of the people passing by in live view.
To adjust the counting area, go to Adjust the counting area.
Adjust the counting area
The camera model and the mounting height both limit how much you can adjust the counting area.
In the live view image, the counting area is indicated by two blue lines and a red area. A person needs to pass through the red area to be counted.
Use the curvature settings to change the shape so that it is natural for people to pass through the counting area. Keep the curvature as close to a straight angle as possible.
Go to Settings > Counting zone.
To move the entire counting area up or down, use the Line offset slider. How much you can move it depends on the counting area size.
To adjust the height of the counting area, use the Counting zone height slider.
To adjust the width of the counting area, use the Counting zone width slider. How much you can adjust it depends on the camera’s mounting height.
To use a curved counting area, select Curved line and then adjust the radius with the Radius slider.
To change the direction of the curvature, click the Radius icon.
Click Submit to save the settings when you are done.
You might need to fine-tune the counter for the best possible performance, see Validate the system.
Neighbor counters for wide entrances
You can only use this feature with cameras of the same model.
If you need to cover a wide entrance with several counters you can set up multiple cameras, also called Neighbor counters. To calculate how many cameras are needed to cover the entire width of the entrance, contact Axis support.
The primary camera overrides the following settings on the secondary cameras:
Visual height
Counter sensitivity
Digital zoom
Network & time
Line offset
Counting zone height
Counting schedule
Configure neighbor counters
Mount the cameras side by side following the measurements indicated by the Axis support.
Go to the primary camera application web interface and select Settings > Advanced > Neighbor counters.
Select Enable as primary.
If you have a secondary camera that you want to connect to:
Go to the secondary camera.
Go to Advanced > Neighbor counters.
Select Display connection key
Click Copy connection key.
Return to the primary camera.
Paste the text under Connection key.
- Note
If you don’t have a secondary camera, you can leave the Connection key field empty.
- Note
If the cameras are configured to send data to AXIS Store Data Manager, make sure that only the primary camera is connected. The primary camera automatically uploads the data from all the secondary cameras as one single unit.
Click Submit.
When you have connected all cameras, go to Calibrate secondary position.
Place an object, for example a sheet of paper, at the exact mid-point between the two cameras. It’s very important that you place the object exactly in the middle of the two cameras since the object is used as a reference point to calibrate the cameras.
Drag the view of the secondary camera over the primary camera view. Try to avoid vertical offset.
- Primary camera view
- Secondary camera view
- Reference object
Once the calibration is done, go to Live view in the primary camera to view all of the secondary cameras.
If you can’t see the video stream from the secondary cameras in the primary camera, make sure that there are no other connections to the secondary cameras running.
How to trigger an event
Go to Settings > AXIS Random Selector.
Move the slider to set the frequency of random inspections, for example one out of a hundred people.
Go to the camera’s webpage to access the event system.
In the event setup, use the trigger Applications.
You can select if the people should be inspected on their way in to the building or on their way out, or in both directions.
Follow the built-in instructions to set up the event in the camera.
Set up a schedule
The application automatically disables the counting functionality when it gets dark. If you want to limit the counting further, you can set up a schedule.
Go to Settings > Counting schedule.
To adjust start and stop times, move any of the sliders. To set individual schedules for each day of the week, select Per day schedule and then move the corresponding sliders.
Turn off the application on a specific day of the week
Clear the checkbox next to the slider.
Anonymize people
You can configure the application so that people can no longer be identified from the camera.
Anonymize soft
This feature blocks all video streams and images from the camera. The live view still shows a blurred image which means you can still see what is going on but you can't identify people.
Go to Maintenance > Anonymize.
Click Anonymize soft.
To go back to normal mode, click Reset anonymization. Only users with an administrator account can do this.
Copy the application settings to another camera
Use the copy functionality if you want to copy the application settings to, for example, other cameras in the same store with the same mounting height. Camera-specific settings, such as the application license and camera name, are not included.
To copy the application settings, go to Maintenance > Parameter backups.
Click Copy. The computer saves the file in your browser’s default folder for downloads.
Validate the system
Before you validate the system, make sure you have mounted the camera according to the recommendations. See Mount the camera.
When you have installed and set up all cameras in the building, we recommend that you validate the accuracy and fine-tune the system. This is likely to increase the accuracy or identify any problems with the counters.
To get an overview, go to Statistics and look at the counting data for a couple of days back. If the difference between number of persons going in and out is <5% it’s a good first indication that the system is configured correctly.
If the difference is greater than that, follow the instructions inValidate the counter.
Validate the counter
Go to Live view.
Click Test accuracy.
To hide the automatic counter, click Hide.
Click Start and manually count 100 or more passages by pressing the up and down arrows on your keyboard. You can also click In and Out.
If you need to start over, click Reset.
Click Result when you are done.
Check the accuracy table. Under normal circumstances, the total accuracy percentage should be 95 % or higher.
If you’re not satisfied with the accuracy of the counter, see Fine-tune the counter.
Fine-tune the counter
Make sure the camera is mounted according to the instructions in Mount the camera.
Go to Settings > General.
Go to the Counter sensitivity slider, or click Setup if the counter is running in manual mode, and do one of the following:
If the counter is counting too many compared to the control figure, decrease the counter sensitivity with about 20 units or increase the size of the yellow box slightly.
If the counter is counting too few compared to the control figure, increase the counter sensitivity with about 20 units or decrease the size of the yellow box slightly.
Validate the accuracy again, see Validate the counter.
Statistics
There are several ways to use the statistics from the counter:
In the application’s web interface, view real-time counting data in the built-in graphs.
View built-in graphs in day and week view from the statistics page. The data is updated in real time.
Data is available on the camera for up to 90 days and updated every 15 minutes. The data is stored in 15-minute bins representing the in and out counts for the 15-minute periods.
Download data through an open API. See VAPIX® Library.
Use AXIS Store Data Manager, a software package that acts as a central point to store and manage data collected from all devices. See Connect a camera to a folder in AXIS Store Data Manager.
Use AXIS Store Reporter, a statistical web-based solution, for managing and monitoring historical data.
Download statistics to your computer, see Download statistics.
Connect a camera to a folder in AXIS Store Data Manager
To perform this task, the application must be installed on the camera.
In AXIS Store Data Manager, go to Sources and get the Folder connection identifier and the Folder connection password for the folder you want to connect to.
In the camera’s web interface, go to Settings > Apps and open the application’s web interface.
In the application’s web interface, go to Settings > Reporting.
To enable pushing data to a server, select Enabled.
Enter the web address for AXIS Store Data Manager, for example
https://[subdomain].asdm.axis.com/datamanagerwhere[subdomain]is replaced by a unique name.Enter the Folder connection identifier and Folder connection password.
To test the connection, click Run test.
Click Submit.
Download statistics
Go to Statistics > Download statistics.
Select the file format:
If you select .xml, .csv or .json format you can also select the time interval.
File format .cnt is a proprietary, binary format, available for compatibility reasons.
Select date in the calendar. The data is presented in a new tab in your browser.
If you want to save the data as a local file on the computer, right-click and select Save as. The browser saves the file in the default download folder.
- If you want to download all available data, click Download all next to the file format.
Troubleshooting
| Issue | Action |
| The software doesn’t upload to AXIS Store Data Manager. | The most common reason is network communication problems. Run the connection test under Settings > Reporting to get information about the root cause for the problem. |
| The software doesn’t count. | Make sure the instructions for how to mount the camera has been followed, see Mount the camera. |
| The software doesn’t count correctly. | Make sure people pass the entire counting zone, crossing both blue lines. They should not turn left or right before they have passed both lines. |
| There’s no video stream in live view. | Make sure no one else is watching the video or that you have a video stream to a VMS or other ongoing recording. Check if the camera has a limited number of viewers or video streams allowed at the same time. |
| The software prompts me with a warning saying that the frame rate is too low. | 1. Make sure the scene has sufficient lighting. If the scene is too dark, the camera does not deliver enough frames per second for the application to work. 2. If the processor in the camera has a high workload, the application might suffer. When streaming video from the camera make sure to open only one stream at a time. |
| The software doesn’t count after changing parameters. | After changing the parameters the software may need to run up to 10 minutes before the counting accuracy is optimal. |
| I still can’t get the software to count. | If you have followed the advice above and still can’t get the software to work, contact your Axis reseller. |
Restart the application
If the counting is inaccurate or the web interface unusually slow, you can try restarting the running services or restart the device.
To restart the device, go to Maintenance > Restart.
Reset the application
Go to Maintenance > Reset and do one of the following:
To clear all counting data from the camera, click Clear data.
To restore all settings of the application to default, click Restore settings.
Back up the settings
To back up the application settings, go to Maintenance > Parameter backups.
Click Backup. The computer saves the file in your browser’s default folder for downloads.
Restore the settings
Go to Maintenance > Parameter backups.
Browse to select the previously saved backup file and then click Restore.
Generate a log report
If you have any trouble with your device you can generate a log report.
Go to Maintenance > Logs.
Click Generate logs.
The browser saves the file on the default download browser on the computer.
Attach the log report when submitting an issue to support.
Manage your license
Go to Maintenance > Registration.
To register a license, click on the Registration page.
If you want to remove you license from this product, click Clear registration.
If you have an updated license, click Renew license.
The light web interface
There is a light-weight version of the web interface at the URL http://<servername>/people-counter/lite/index.html. These pages can for instance be used to embed the application into systems, for example AXIS Camera Station or Milestone's XProtect Smart Client.
There are four pages available:
http://<servername>/local/tvpc/lite/day.html: The page shows the day plot, the same plot that can be seen on the Statistics page.
http://<servername>/local/tvpc/lite/week.html: The page shows the week plot, the same plot that can be seen on the Statistics page.
http://<servername>/local/tvpc/lite/count.html: A page that shows the live count for the current day.
http://<servername>/local/tvpc/lite/liveview.html: A slim version of the live view page that shows live count and the video stream with the counting area as overlay.
The menu at the bottom of the pages can be disabled by appending ?clean to the URL:s above, e.g. http://<servername>/local/tvpc/lite/liveview.html?clean. You can also add a lang tag before lite to display these pages in other languages, example http://<servername>/local/tvpc/cn/lite/liveview.html
Description
AXIS People Counter is an application accessible on your indoor Axis camera that provides simultaneous two-way counting of people, which lets you analyze visitor trends such as peak visitor hours. It is also able to estimate occupancy levels in real-time and provide access to data on the number of people present on either the premises or in a certain area at a certain time. This is helpful when you want to understand occupancy trends that enables you to measure if the occupancy levels exceed a set threshold.
Additionally, the application can detect and notify if more than one person enters within a set time interval or move in the wrong direction. This means that if you set up the application over a one-way entrance you will receive a notification whenever someone tries to leave or if more than one person tries to enter at the same time.
Common examples
Example
Request real time data from the People Counter
Requesthttp://<servername>/local/tvpc/.api?live-sum.jsonReturn{ "serial":"00408CAC512B", "name":"Exit south", "timestamp":"20170503112756", "in":12, "out":318 }See Request real-time data for additional information.
Example
List all days of data available on the People Counter
Requesthttp://<servername>/local/tvpc/.api?list-cnt.jsonReturn{ "timestamp" : "20170513132513", "days":["20170510", "20170511", "20170513"]} }See List available data for additional information.
Example
Request historical data for the 12th to the 15th of May 2017
Requesthttp://<servername>/local/tvpc/.api?export-cnt&date=20170512-20170515See Download binary data for additional information.
Example
Request all available historical data
Requesthttp://<servername>/local/tvpc/.api?export-cnt&date=allSee Download binary data for additional information.
Example
Request historical CSV data for the 12th and the 15th of May 2017 with 15-minute resolution
Requesthttp://<servername>/local/tvpc/.api?export-csv&date=20170512,20170515&res=15mSee Request CSV data for additional information.
Example
Request historical data for all available days, with 24-hour resolution
Requesthttp://<servername>/local/tvpc/.api?export-csv&date=all&res=24hSee Request CSV data for additional information.
Example
Request historical XML data for the 12th and the 15th of May 2017 with 15-minute resolution
Requesthttp://<servername>/local/tvpc/.api?export-xml&date=20170512,20170515&res=15mSee Request XML data for additional information.
Example
Request Live view information from the People Counter
Requesthttp://<servername>/local/tvpc/.api?cntpos.jsonResponse{ "width":320, "height":240, "left":0, "right":296, "top":88, "bottom":224, "yfirst":88, "ylast":152, "radius":0 }See Live view information for additional information.
API specification
Request real-time data
Returns JSON file with real time counting data.
- Format:
- JSON
- Method:
- GET
http://<servername>/local/tvpc/.api?live-sum.json{
"serial":"<camera-serial>",
"name":"<counter-name>",
"timestamp":"<timestamp>",
"in":<in>,
"out":<out>
}| Value | Description |
|---|---|
camera-serial | camera serial number |
counter-name | name of the counter |
timestamp | time in the camera in the format YYYYMMDDhhmmss |
in | number of people passing in until now today |
out | number of people passing out until now |
List available data
Returns a list of days where data exists.
- Format:
- JSON
- Method:
- GET
http://<servername>/local/tvpc/.api?list-cnt.json{
"timestamp" : "<timestamp>",
"days":["YYYYMMDD", [..] "YYYYMMDD"]}
}| Value | Description |
|---|---|
timestamp | time in the camera in the format YYYYMMDDhhmmss |
days | an array of days where there exists |
Download binary data
This script returns a binary data file for the given date(s), to be used in AXIS Store Data Manager
- Format:
- cnt
- Method:
- GET
http://<servername>/local/tvpc/.api?export-cnt&date=<date>| Parameter | Description |
|---|---|
date | a date of the form YYYYMMDD |
a date interval of the form YYYYMMDD-YYYYMMDD | |
comma separated dates of the form YYYYMMDD,[..],YYYYMMDD | |
all for all available data |
Return
A binary data file for the given date(s).
Request CSV data
Returns historical data in CSV format
- Format:
- CSV
- Method:
- GET
http://<servername>/local/tvpc/.api?export-csv[&date=<date>][&res=<res>]| Parameter | Description |
|---|---|
date | a date of the form YYYYMMDD |
a date interval of the form YYYYMMDD-YYYYMMDD | |
comma separated dates of the form YYYYMMDD,[..],YYYYMMDD | |
all (default) for all available data | |
res | 15m (default) for data in 15 minute bins |
1h for data in 1 hour bins | |
24h for data in 1 day bins |
Return
This script returns data in plain text, comma-separated values. The first line contains a description of each element, and the following lines contain the corresponding data for the chosen time interval and resolution.
Request XML data
Returns historical data in XML format
- Format:
- XML
- Method:
- GET
http://<servername>/local/tvpc/.api?export-xml[&date=<date>][&res=<res>]| Parameter | Description |
|---|---|
date | a date of the form YYYYMMDD |
a date interval of the form YYYYMMDD-YYYYMMDD | |
comma separated dates of the form YYYYMMDD,[..],YYYYMMDD | |
all (default) for all available data | |
res | 15m (default) for data in 15 minute bins |
1h for data in 1 hour bins | |
24h for data in 1 day bins |
Return
This script returns data in XML format. The DTD file can be found at: http://<servername>/local/tvpc/appdata.dtd
Request JSON data
Returns historical data in JSON format
- Format:
- JSON
- Method:
- GET
http://<servername>/local/tvpc/.api?export-json[&date=<date>][&res=<res>]| Parameter | Description |
|---|---|
date | a date of the form YYYYMMDD |
a date interval of the form YYYYMMDD-YYYYMMDD | |
comma separated dates of the form YYYYMMDD,[..],YYYYMMDD | |
all (default) for all available data | |
res | 15m (default) for data in 15 minute bins |
1h for data in 1 hour bins | |
24h for data in 1 day bins |
Return
This script returns data in JSON format.
Clear counting data
- Format:
- text/plain
- Method:
- GET
http://<servername>/local/tvpc/.apioperator?clear-dataOKPlease note that this method will permanently delete all counting data from your device.
Live view information
Returns information about the placement of the lines in Live view.
- Format:
- JSON
- Method:
- GET
http://<servername>/local/tvpc/.api?cntpos.json{
"width":<width>,
"height":<height>,
"left":<left>,
"right":<right>,
"top":<top>,
"bottom":<bottom>,
"yfirst":<yfirst>,
"ylast":<ylast>,
"radius":<radius>
}| Value | Description |
|---|---|
width | dimension of the video stream |
height | |
left | x coordinates in pixels forstart and stop for the blue lines in Live view |
right | |
top | y coordinates in pixels for the two blue lines in Live view |
bottom | |
yfirst | y coordinates in pixels for the top and bottom of the red counting area, disregarding curvature |
ylast | |
radius | radius in pixels describing the curvature of the red counting area, as measured in the center of the area on both axes, or if the area is not curved |
Show the system log
- Format:
- text/plain
- Method:
- GET
http://<servername>/local/tvpc/.apioperator?show-logsReturn
Displays the system logs.
Generate a log archive
- Format:
- tar.gz
- Method:
- GET
http://<servername>/local/tvpc/.apioperator?generate-logsReturn
A log archive
List people counter parameters
- Format:
- JSON
- Method:
- GET
http://<servername>/local/tvpc/.api?params.jsonReturn
A JSON object of all the People Counter related parameters.
Set people counter parameters
- Format:
- text
- Method:
- POST
The post format has a format where pairs and values need to be specified, best described by an example: &p1=Counter.Enable&v1=1&p2=Counter.Height&v2=280&setparams=needstobeincluded
For Firmware-version 5.60 and later, use: setparams&Counter.Height=280 instead.
http://<servername>/local/tvpc/.apioperator?setparamsOK