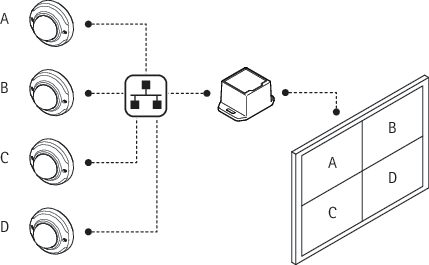
Solution overview
Get started
Find the device on the network
To find Axis devices on the network and assign them IP addresses in Windows®, use AXIS IP Utility or AXIS Device Manager. Both applications are free and can be downloaded from axis.com/support.
For more information about how to find and assign IP addresses, go to How to assign an IP address and access your device.
Browser support
You can use the device with the following browsers:
ChromeTM | EdgeTM | Firefox® | Safari® | |
Windows® | ✓ | ✓ | * | * |
macOS® | ✓ | ✓ | * | * |
Linux® | ✓ | ✓ | * | * |
Other operating systems | * | * | * | * |
✓: Recommended
*: Supported with limitations
Open the device's web interface
Open a browser and type the IP address or host name of the Axis device.
If you don’t know the IP address, use AXIS IP Utility or AXIS Device Manager to find the device on the network.
Type the username and password. If you access the device for the first time, you must create an administrator account. See Create an administrator account.
For descriptions of all features and settings in the web interface of devices with AXIS OS, see AXIS OS web interface help.
Create an administrator account
The first time you log in to your device, you must create an administrator account.
Enter a username.
Enter a password. See Secure passwords.
Re-enter the password.
Accept the license agreement.
Click Add account.
The device has no default account. If you lose the password for your administrator account, you must reset the device. See Reset to factory default settings.
Secure passwords
Use HTTPS (which is enabled by default) to set your password or other sensitive configurations over the network. HTTPS enables secure and encrypted network connections, thereby protecting sensitive data, such as passwords.
The device password is the primary protection for your data and services. Axis devices do not impose a password policy as they may be used in various types of installations.
To protect your data we strongly recommend that you:
Use a password with at least 8 characters, preferably created by a password generator.
Don’t expose the password.
Change the password at a recurring interval, at least once a year.
Web interface overview
This video gives you an overview of the device’s web interface.
Configure your device
Add multiple cameras
The camera wizard only works with Axis cameras. You must add cameras from other brands one by one, see Add a camera.
Go to Video sources.
Click Add video sources and select the method Step-by-step.
Click Next.
The wizard searches the network for Axis cameras.
Click Add credentials and enter Name, Username and Password. Click Save.
The decoder needs usernames and passwords to the cameras to access the video streams. The decoder can have multiple credentials saved. It will try to access all cameras using all of the stored credentials.
Click Next.
Select the cameras you want to add and click Save.
The decoder will try to access the camera with all saved credentials.
To access more settings for the cameras, see Advanced camera settings.
Add a camera
Go to Video sources.
Click Add video sources and select the method Manual.
Click Next.
Select a video source type and click Next.
Enter the configuration details.
For an Axis camera: Enter a name, IP address, username and password for the camera.
For other brands: Enter a name, a URL that can be used to access the video stream, the camera’s username and password, and the codec used for the stream.
Click Save.
To access more settings for the cameras, see Advanced camera settings.
Configure a monitor
Go to Display.
Select one of these options under Multi mode:
To show the video sources one at a time in sequence, select Sequencer, and set the interval that each source is displayed.
To show multiple video sources at the same time, select Multiview, and select a layout.
Under Video output, select a resolution and refresh rate that works with your display. See the documentation for your display.
Advanced camera settings
After you’ve added a camera, you can access more camera settings from the Edit view.
Go to Video sources.
Select a video source.
Click and then click Edit video source.
Remove a camera
Go to Video sources.
Find the camera you want to remove.
Clck and then click Delete video source.
Upgrade your device to firmware version 6.0.x
To upgrade your device to V6.0.x you must first upgrade it to V5.1.8.5. You need the following files:
Firmware T8705_V5.1.8.5.bin (bridge firmware)
Firmware T8705_V6.0.x.bin
Go to Maintenance > Firmware upgrade and click Upgrade. Follow the instructions.
Un upgrade from V5.1.8.2 or V5.1.8.4 to V5.1.8.5 takes approximately 10 minutes.
Un upgrade from V5.1.8.5 to V6.0.x takes approximately 15 minutes.
If the firmware upgrade failed
Send a report to axis.com/support. Include information about the device’s MAC address in the report.
Unzip the included wic file (decoder-image-prod-6.0.x.wic.gz) and save it to an SD card.
Insert the SD card into an SD card reader. Open the file and follow the instructions to upgrade the firmware with the wic file.
The web interface
Show or hide the main menu. Access the product help. Change the language. Set light theme or dark theme. The user menu contains:
The context menu contains:
|
Status
RAM use: Percentage of RAM that’s used. CPU use: Percentage of CPU that’s used. GPU use: Percentage of GPU that’s used. GPU bus use: Percentage of GPU bus that’s used. Decoding process: Current status of the decoding process, Running or Stopped. IP address: The device’s IP address. Date and time: The device’s date and time. |
Video sources
Name: The video source’s name. Type: The video source’s type, Axis or Generic. Add video sources: Create a new video source. You can use two different methods:
The context menu contains: Edit video source: Edit the properties of the video source. Delete video source: Delete the video source. |
Display
Click to configure the sequence order. With the sequence you can decide in which order you want to see the different views. Click to add a new view. You can add as many views as you like. Start sequence: Click to turn on the sequence. View settings:
Resolution: Select which resolution you want to use for the view. |
Jobs
Add job: Click to add a new job. Name: Enter a unique name for the job. Type: Select a type.
Recurrence: Select when the system should run the job.
The context menu contains: Delete: Delete the job. |
System
Time and location
Date and time
The time format depends on the web browser’s language settings.
We recommend you synchronize the device’s date and time with an NTP server.
Synchronization: Select an option for the device’s date and time synchronization.
Time zone: Select which time zone to use. Time will automatically adjust to daylight saving time and standard time.
Note The system uses the date and time settings in all recordings, logs, and system settings. Time sync status: Shows NTP synchronization information and PTP state. Network time synchronized capture: Turn on to allow multiple cameras to capture images simultaneously. |
Network
IPv4
Assign IPv4 automatically: Select IPv4 automatic IP (DHCP) to let the network assign your IP address, subnet mask, and router automatically, without manual configuration. We recommend using automatic IP assignment (DHCP) for most networks. IP address: Enter a unique IP address for the device. Static IP addresses can be assigned at random within isolated networks, provided that each address is unique. To avoid conflicts, we recommend you contact your network administrator before you assign a static IP address. Subnet mask: Enter the subnet mask to define what addresses are inside the local area network. Any address outside the local area network goes through the router. Router: Enter the IP address of the default router (gateway) used to connect devices that are attached to different networks and network segments. Fallback to static IP address if DHCP isn’t available: Select if you want to add a static IP address to use as fallback if DHCP is unavailable and can’t assign an IP address automatically. Note If DHCP isn’t available and the device uses a static address fallback, the static address is configured with a limited scope. |
IPv6
Assign IPv6 automatically: Select to turn on IPv6 and to let the network router assign an IP address to the device automatically. |
Hostname
Assign hostname automatically: Select to let the network router assign a hostname to the device automatically. Hostname: Enter the hostname manually to use as an alternative way of accessing the device. The server report and system log use the hostname. Allowed characters are A–Z, a–z, 0–9 and -. Enable dynamic DNS updates: Allow your device to automatically update its domain name server records whenever its IP address changes. Register DNS name: Enter a unique domain name that points to your device's IP address. Allowed characters are A–Z, a–z, 0–9 and -. TTL: Time to Live (TTL) sets how long a DNS record stays valid before it needs to be updated. |
DNS servers
Assign DNS automatically: Select to let the DHCP server assign search domains and DNS server addresses to the device automatically. We recommend automatic DNS (DHCP) for most networks. Search domains: When you use a hostname that is not fully qualified, click Add search domain and enter a domain in which to search for the hostname the device uses. DNS servers: Click Add DNS server and enter the IP address of the DNS server. This provides the translation of hostnames to IP addresses on your network. |
If DHCP is disabled, features that rely on automatic network configuration, such as hostname, DNS servers, NTP, and others, may stop working.
HTTP and HTTPS
HTTPS is a protocol that provides encryption for page requests from users and for the pages returned by the web server. The encrypted exchange of information is governed by the use of an HTTPS certificate, which guarantees the authenticity of the server.
To use HTTPS on the device, you must install an HTTPS certificate. Go to System > Security to create and install certificates.
Allow access through: Select if a user is allowed to connect to the device through the HTTP, HTTPS, or both HTTP and HTTPS protocols. Note If you view encrypted web pages through HTTPS, you might experience a drop in performance, especially when you request a page for the first time. HTTP port: Enter the HTTP port to use. The device allows port 80 or any port in the range 1024-65535. If you are logged in as an administrator, you can also enter any port in the range 1-1023. If you use a port in this range, you get a warning. HTTPS port: Enter the HTTPS port to use. The device allows port 443 or any port in the range 1024-65535. If you are logged in as an administrator, you can also enter any port in the range 1-1023. If you use a port in this range, you get a warning. Certificate: Select a certificate to enable HTTPS for the device. |
Network discovery protocols
Bonjour®: Select to allow automatic discovery on the network. Bonjour name: Enter a friendly name to be visible on the network. The default name is the device name and MAC address. UPnP®: Select to allow automatic discovery on the network. UPnP name: Enter a friendly name to be visible on the network. The default name is the device name and MAC address. WS-Discovery: Select to allow automatic discovery on the network. LLDP and CDP: Select to allow automatic discovery on the network. If LLDP and CDP are not allowed, it can affect the PoE power negotiation. To resolve any issues with the PoE power negotiation, configure the PoE switch for hardware PoE power negotiation only. Neighbors: Click to show information about neighboring devices connected to the same network. |
Security
Certificates
Certificates are used to authenticate devices on a network. The device supports two types of certificates:
These formats are supported:
Important If you reset the device to factory default, all certificates are deleted. Any pre-installed CA certificates are reinstalled. Add certificate : Click to add a certificate. A step-by-step guide opens up.
The context menu contains:
Secure keystore:
|
Network access control and encryption
IEEE 802.1x IEEE 802.1x is an IEEE standard for port-based network admission control providing secure authentication of wired and wireless network devices. IEEE 802.1x is based on EAP (Extensible Authentication Protocol). To access a network protected by IEEE 802.1x, network devices must authenticate themselves. The authentication is performed by an authentication server, typically a RADIUS server (for example, FreeRADIUS and Microsoft Internet Authentication Server). IEEE 802.1AE MACsec IEEE 802.1AE MACsec is an IEEE standard for media access control (MAC) security that defines connectionless data confidentiality and integrity for media access independent protocols. Certificates When configured without a CA certificate, server certificate validation is disabled and the device tries to authenticate itself regardless of what network it is connected to. When using a certificate, in Axis' implementation, the device and the authentication server authenticate themselves with digital certificates using EAP-TLS (Extensible Authentication Protocol - Transport Layer Security). To allow the device to access a network protected through certificates, you must install a signed client certificate on the device. Authentication method: Select an EAP type used for authentication. Client certificate: Select a client certificate to use IEEE 802.1x. The authentication server uses the certificate to validate the client’s identity. CA certificates: Select CA certificates to validate the authentication server’s identity. When no certificate is selected, the device tries to authenticate itself regardless of what network it is connected to. EAP identity: Enter the user identity associated with the client certificate. EAPOL version: Select the EAPOL version that is used in the network switch. Use IEEE 802.1x: Select to use the IEEE 802.1x protocol. These settings are only available if you use IEEE 802.1x PEAP-MSCHAPv2 as the authentication method:
These settings are only available if you use IEEE 802.1ae MACsec (Static CAK/Pre-Shared Key) as the authentication method:
|
Accounts
Add user: Click to add a new user. You can add up to 100 users. Username: Enter a unique username. New password: Enter a password for the user. Passwords must be 1 to 64 characters long. Only ASCII printable characters (code 32 to 126) are allowed in the password, for example letters, numbers, punctuation, and some symbols. Repeat password: Enter the same password again. Role:
The context menu contains: Update user: Edit the user’s properties. Delete user: Delete the user. You can’t delete the root user. |
Logs
Reports and logs
Reports
Logs
|
Plain config
Plain config is for advanced users with experience of Axis device configuration. Most parameters can be set and edited from this page. |
Maintenance
Restart: Restart the device. This does not affect any of the current settings. Running applications restart automatically. Restore: Return most settings to the factory default values. Afterwards you must reconfigure the device and recreate any events and PTZ presets. Important The only settings saved after restore are:
Factory default: Return all settings to the factory default values. Afterwards you must reset the IP address to make the device accessible. Note All Axis device firmware is digitally signed to ensure that you only install verified firmware on your device. This further increases the overall minimum cybersecurity level of Axis devices. For more information, see the white paper “Signed firmware, secure boot, and security of private keys” at axis.com. Firmware upgrade: Upgrade to a new firmware version. New firmware releases can contain improved functionality, bug fixes, and completely new features. We recommend you to always use the latest release. To download the latest release, go to axis.com/support.
Firmware rollback: Revert to the previously installed firmware version. |
Configuration
Download configuration file: Select which settings you want to include in the configuration file. The file won't include certificates or private keys. Upload configuration file: The uploaded configuration file overwrites the existing configuration within the same area. For example: if your file only contains information about video, the system settings won't be affected. The configuration file doesn’t include certificates or private keys. If you want other certificates than the default self-signed ones, you need to set them manually. |
Learn more
Streaming and storage
Video compression formats
Decide which compression method to use based on your viewing requirements, and on the properties of your network. The available options are:
Motion JPEG
Motion JPEG, or MJPEG, is a digital video sequence that is made up of a series of individual JPEG images. These images are then displayed and updated at a rate sufficient to create a stream that shows constantly updated motion. For the viewer to perceive motion video the rate must be at least 16 image frames per second. Full motion video is perceived at 30 (NTSC) or 25 (PAL) frames per second.
The Motion JPEG stream uses considerable amounts of bandwidth, but provides excellent image quality and access to every image contained in the stream.
H.264 or MPEG-4 Part 10/AVC
H.264 is a licensed technology. The Axis product includes one H.264 viewing client license. To install additional unlicensed copies of the client is prohibited. To purchase additional licenses, contact your Axis reseller.
H.264 can, without compromising image quality, reduce the size of a digital video file by more than 80% compared to the Motion JPEG format and by as much as 50% compared to older MPEG formats. This means that less network bandwidth and storage space are required for a video file. Or seen another way, higher video quality can be achieved for a given bitrate.
Troubleshooting
Reset to factory default settings
Use the reset to factory default function with caution. A reset to factory default resets all settings, including the IP address, to the factory default values.
Go to Maintenance > Factory default.
Click Default.
Click Restore all.
It is also possible to reset parameters to factory default with the restart button. With the device turned on, press and hold the restart button for 10 seconds.
AXIS OS options
Axis offers device software management according to either the active track or the long-term support (LTS) tracks. Being on the active track means continuously getting access to all the latest product features, while the LTS tracks provide a fixed platform with periodic releases focused mainly on bug fixes and security updates.
Using AXIS OS from the active track is recommended if you want to access the newest features, or if you use Axis end-to-end system offerings. The LTS tracks are recommended if you use third-party integrations, which are not continuously validated against the latest active track. With LTS, the products can maintain cybersecurity without introducing any significant functional changes or affecting any existing integrations. For more detailed information about Axis device software strategy, go to axis.com/support/device-software.
Check the current AXIS OS version
AXIS OS determines the functionality of our devices. When you troubleshoot a problem, we recommend that you to start by checking the current AXIS OS version. The latest version might contain a correction that fixes your particular problem.
To check the current AXIS OS version:
Go to the device’s web interface > Status.
Under Device info, see the AXIS OS version.
Upgrade AXIS OS
- When you upgrade the device software, your preconfigured and customized settings are saved. Axis Communications AB can't guarantee that the settings are saved, even if the features are available in the new AXIS OS version.
- Starting from AXIS OS 12.6, you must install every LTS version between your device’s current version and the target version. For example, if the currently installed device software version is AXIS OS 11.2, you have to install the LTS version AXIS OS 11.11 before you can upgrade the device to AXIS OS 12.6. For more information, see AXIS OS Lifecycle guide: Upgrade path.
- Make sure the device remains connected to the power source throughout the upgrade process.
- When you upgrade the device with the latest AXIS OS version in the active track, the product receives the latest functionality available. Always read the upgrade instructions and release notes available with each new release before you upgrade. To find the latest AXIS OS version and the release notes, go to axis.com/support/device-software.
Download the AXIS OS file to your computer, available free of charge at axis.com/support/device-software.
Log in to the device as an administrator.
Go to Maintenance > AXIS OS upgrade and click Upgrade.
- When the upgrade has finished, the product restarts automatically.
You can use AXIS Device Manager to upgrade multiple devices at the same time. Find out more at axis.com/products/axis-device-manager.
Technical issues, clues, and solutions
If you can’t find what you’re looking for here, try the troubleshooting section at axis.com/support.
| Problems upgrading the firmware | |
Firmware upgrade failure | If the firmware upgrade fails, the device reloads the previous firmware. The most common reason is that the wrong firmware file has been uploaded. Check that the name of the firmware file corresponds to your device and try again. |
Problems after firmware upgrade | If you experience problems after a firmware upgrade, roll back to the previously installed version from the Maintenance page. |
| Problems setting the IP address | |||||
The device is located on a different subnet | If the IP address intended for the device and the IP address of the computer used to access the device are located on different subnets, you cannot set the IP address. Contact your network administrator to obtain an IP address. | ||||
The IP address is being used by another device | Disconnect the Axis device from the network. Run the ping command (in a Command/DOS window, type
| ||||
Possible IP address conflict with another device on the same subnet | The static IP address in the Axis device is used before the DHCP server sets a dynamic address. This means that if the same default static IP address is also used by another device, there may be problems accessing the device. | ||||
| The device can’t be accessed from a browser | ||||||||||||
Can’t log in | When HTTPS is enabled, ensure that the correct protocol (HTTP or HTTPS) is used when attempting to log in. You may need to manually type If the password for the user root is lost, the device must be reset to the factory default settings. See Reset to factory default settings. | |||||||||||
The IP address has been changed by DHCP | IP addresses obtained from a DHCP server are dynamic and may change. If the IP address has been changed, use AXIS IP Utility or AXIS Device Manager to locate the device on the network. Identify the device using its model or serial number, or by the DNS name (if the name has been configured). If required, a static IP address can be assigned manually. For instructions, go to axis.com/support. | |||||||||||
Certificate error when using IEEE 802.1X | For authentication to work properly, the date and time settings in the Axis device must be synchronized with an NTP server. Go to System > Date and time. | |||||||||||
Performance considerations
The most important factors to consider:
High image resolution or lower compression levels result in images containing more data which in turn affects the bandwidth.
Access by large numbers of Motion JPEG clients or unicast H.264/H.265/AV1 clients affects the bandwidth.
Simultaneous viewing of different streams (resolution, compression) by different clients affects both frame rate and bandwidth.
Use identical streams wherever possible to maintain a high frame rate. Stream profiles can be used to ensure that streams are identical.
Accessing video streams with different codecs simultaneously affects both frame rate and bandwidth. For optimal performance, use streams with the same codec.
Heavy usage of event settings affects the product’s CPU load which in turn affects the frame rate.
Using HTTPS may reduce frame rate, in particular if streaming Motion JPEG.
Heavy network utilization due to poor infrastructure affects the bandwidth.
Viewing on poorly performing client computers lowers perceived performance and affects frame rate.
Contact support
If you need more help, go to axis.com/support.
Specifications
Product overview
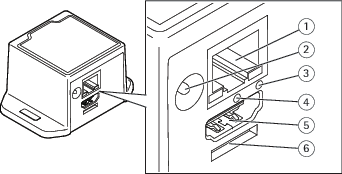
- Network connector
- Power connector
- Network LED
- Restart button
- HDMI connector
- Reserved for operating system
LED
| Network LED | Indication |
| Red | Flashes for network activity. |
| Unlit | No network connection. |
Buttons
Control button
- The control button is used for:
Resetting the product to factory default settings. See Reset to factory default settings.
Connectors
HDMI connector
Use the HDMITM connector to connect a display or public view monitor.
Network connector
RJ45 Ethernet connector.
Power connector
DC connector. Use the supplied adapter.