AXIS Optimizer
AXIS Optimizer unlocks Axis features directly in XProtect or Siemens Siveillance Video. The application optimizes the performance of Axis devices in these video management systems which allows you to save both time and effort when configuring a system or during daily operation. The application is free of charge.
Intended usage of AXIS Optimizer
This product is intended for use by professionals who have extensive knowledge in operating a Video Management System (VMS).
System requirements
AXIS Optimizer is fully supported on the following platforms:
XProtect Essential+
XProtect Express+
XProtect Professional+
XProtect Expert
XProtect Corporate
Siemens Siveillance Video Pro
Siemens Siveillance Video Advanced
Siemens Siveillance Video Core Plus
Siemens Siveillance Video Core
We recommend to use the latest versions of Management Client and Smart Client. The latest version of AXIS Optimizer is always tested and compatible with the latest version of the VMS. For more information, read the Release notes.
Minimum supported platform
- VMS version 2019 R3.
When we refer to Smart Client in the help, we mean both XProtect Smart Client and Video Client in a Siemens system.
Support for federated systems
AXIS Optimizer is fully supported in federated systems.
Support for interconnected systems
AXIS Optimizer is fully supported with interconnected systems.
Requirements
- VMS version 2022 R3 or later.
Release notes
To see the latest release notes, go to axis.com/ftp/pub_soft/cam_srv/optimizer_milestone/latest/relnote.txt.
Install or update AXIS Optimizer
Install AXIS Optimizer
To update AXIS Optimizer, you must have administrator rights.
Make sure you have the correct client version of the VMS.
Log in to your MyAxis account.
From axis.com/products/axis-optimizer-for-milestone-xprotect, download AXIS Optimizer to each device that runs Management Client or Smart Client.
Run the downloaded file and follow the instructions in the step-by-step guide.
Which versions are installed in my system?
In System overview you can see which versions of AXIS Optimizer and AXIS Optimizer Body Worn Extension that are installed on different server and clients in your system.
To view your system’s clients or servers in System overview, they must have AXIS Optimizer version 3.7.17.0, AXIS Optimizer Body Worn Extension version 1.1.11.0 or later versions.
To view active servers and clients:
In Management Client, go to Site Navigation > AXIS Optimizer > System overview.
To upgrade a certain server or client:
Go to that specific server or client and upgrade it locally.
Advanced installation options
To install AXIS Optimizer on several devices at the same time, without user interaction:
Right-click the Start menu.
Click Run.
Browse to the downloaded installation file and click Open.
Add one or more parameters at the end of the path.
Parameter Description /SILENTDuring a silent installation, the step-by-step guide and the background window are not shown. However, the installation progress window is shown. /VERYSILENTDuring a very silent installation, neither the step-by-step guide and the background window nor the installation progress window are shown. /FULLInstall all components, for example the optional event server plugin and Secure Entry plugin. This is useful to combine with /VERYSILENT./SUPPRESSMSGBOXESSuppress all message boxes. This is typically combined with /VERYSILENT./log=<filename>Create a log file. /NORESTARTPrevent the computer from restarting during the installation. /EVENTSERVERPLUGINInstall the event server plugin if the target machine is the event server. /SECUREENTRYInstall the Secure Entry access control service if the target machine is the event server. Press Enter.
Example
Verysilent installation, logged to output.txt, with no restart of the computer
.\AxisOptimizerXProtectSetup.exe /VERYSILENT /log=output.txt /NORESTART
Check installer integrity
To verify the integrity of the AXIS Optimizer installer:
Right click the installer file and select Properties.
Go to Digital Signatures and click on Details.
Verify that the publisher is Axis Communications and that the digital signature is correct.
Update notifications
AXIS Optimizer regularly checks for new versions of itself and notifies you when there are new updates. If you have a network connection, you’ll receive update notifications in Smart Client.
To update AXIS Optimizer, you must have administrator rights.
To change which type of notifications you receive:
In Smart Client, go to Settings > Axis general options > Notification preference.
Select All, Major or None.
To configure update notifications for all clients in your VMS, go to Management Client.
Go to Site Navigation > AXIS Optimizer > System overview.
Click System upgrade settings.
Turn on or off Show upgrade notifications on all clients.
Manual update
You can manually update AXIS Optimizer from both Management Client and Smart Client.
To update AXIS Optimizer, you must have administrator rights.
In Management Client
Go to Site Navigation > Basics > AXIS Optimizer.
Click Update.
In Smart Client
Go to Settings > Axis general options.
Click Update.
Upgrade system automatically
From the VMS management server, you can publish a local AXIS Optimizer version to your system. When you do this, AXIS Optimizer will be upgraded automatically on all client machines. Automatic upgrade never interrupts operator work. Silent installations are performed during machine or VMS client restarts. Automatic upgrade is supported also when the client is not connected to the internet.
Automatic upgrade is supported for clients that run AXIS Optimizer 4.4 or later.
Turn on automatic upgrade
Requirements
- A system where Management Client runs on the same machine as the VMS management server.
- PC administrator rights on the VMS management server.
To turn on automatic upgrade, you must publish a specific AXIS Optimizer version to your system:
On the VMS management server, install the AXIS Optimizer version you want to publish to the whole system.
On the VMS management server machine, open Management Client.
Go to Site Navigation > AXIS Optimizer > System overview.
Click System upgrade settings.
Make sure the Local version is correct and click Publish.
If a published AXIS Optimizer version already exists, it’s replaced by the new version.
- Note
Client machines with an earlier AXIS Optimizer version than 4.4 must be manually upgraded.
Turn off automatic upgrade
To turn off automatic upgrade, you must reset the published version:
On the VMS management server machine, open Management Client.
Go to Site Navigation > AXIS Optimizer > System overview .
Click System upgrade settings > Reset published version.
Learn more
Smart Clients without AXIS Optimizer can access the published installer file from the management server web page (http://[serveradress]/installation/) even if they’re not connected to the internet.
AXIS Optimizer installation package is available and configurable in the VMS Download manager.
On federated or interconnected systems, you must publish AXIS Optimizer on each management server.
After you published a new version of AXIS Optimizer you can monitor which clients has updated to the published version. Machines on the System overview page will show a green check symbol when they are running the published version.
Automatic upgrade is turned off on machines that run a VMS Management server.
User privileges
AXIS Optimizer includes a specific Axis Optimizer user role. The purpose is to make it simple for you to give users the required Smart Client privileges to use AXIS Optimizer’s features and capabilities.
If you run XProtect 2018 R3 or earlier, this role is only available in XProtect Corporate.
If you run XProtect 2019 R1 or later, this role is available for the these XProtect editions:
Corporate
Expert
Professional+
Essential+
Express+
If you prefer to configure privileges manually, use this configuration to let a Smart Client operator use all capabilities included in AXIS Optimizer:
Hardware: Driver Commands
Cameras: AUX commands
For more advanced user roles handling, see Customize feature access for operators.
Access device settings
Device assistant
Use Device assistant to give easy access to all Axis device settings directly in the VMS Management Client. You can easily find and reach your Axis device webpage inside the VMS to change different device settings. You can also configure applications installed on your devices.
- To use Device assistant, the Axis device must be connected to the same network as Management Client.
- Device Assistant is not supported on IPv6 networks.
Configure an Axis device
In Management Client, go to Site Navigation > AXIS Optimizer > Device assistant.
Select a device and go to Device settings. The device’s webpage opens.
Configure the settings you want.
Install applications on an Axis device
In Management Client, go to Site Navigation > AXIS Optimizer > Device assistant.
Select a device and go to Device settings. The device’s webpage opens.
Go to Apps. Where you find the Apps functionality depends on the device software version. For more information, see your device’s help.
Install the applications you want.
Configure applications on an Axis device
In Management Client, go to Site Navigation > AXIS Optimizer > Device assistant.
Select a device and go to Applications. If any applications are installed on the device, you’ll see them here.
Go to the relevant application, for example AXIS Object Analytics.
Configure the application to suit your needs.
Update applications on an Axis device
In Management Client, go to Site Navigation > AXIS Optimizer > Device assistant.
Right-click a device and select Show updates. If any applications can be updated, you’ll see a list of available updates.
Download the update file.
Click How to update and follow the instructions.
Restart an Axis device
In Management Client, go to Site Navigation > AXIS Optimizer > Device assistant.
Right-click a device and select Restart device.
Copy an Axis device's IP address
In Management Client, go to Site Navigation > AXIS Optimizer > Device assistant.
Right-click a device and select Copy device address.
Perform automation
Create actions for Axis devices
Event server plugin
The AXIS Optimizer event server plugin allows you to create custom actions for Axis devices. When you use the XProtect rule engine and the Event server plugin, you can for example:
Perform a custom action when the operator clicks a button in Smart Client. For a setup example, see Dry multiple cameras with one click.
Perform actions without human interaction (automation). For a setup example, see Turn off privacy masks on multiple cameras automatically.
The Event server plugin consists of two parts:
A separate plugin that runs on the event server. This populates the rule engine with new actions.
A page called Axis actions in the Management server where you can create new action presets.
The custom actions for Axis devices are: Run operator control, Turn on/off radar, Start intercom call, and Dry camera (SpeedDry/wiper).
The Event server plugin is included in AXIS Optimizer. On a multi-PC system, you must install AXIS Optimizer on both the Management Client machine and the Event server machine.
Install the Event server plugin
The Event server plugin is an optional component that is included in the AXIS Optimizer installer. You can only install it on a video management system (VMS) event server. If the requirements are fulfilled, you’ll be prompted with an option to install the Event server plugin when you run the AXIS Optimizer installer.
The VMS event server will require a short restart during installation and sometimes during upgrade of AXIS Optimizer. You will be notified when this is the case.
Dry multiple cameras with one click
With the Event server plugin you can set up custom rules to make life easier for the operators. In this example we will show how to dry all cameras in a specific area by clicking an overlay-button.
Requirements
- AXIS Optimizer version 4.0 or later on event server and Management Client
- One or several cameras that supports either SpeedDry or Wiper, for example AXIS Q86, Q87, or Q61 series.
Add a user-defined event:
Go to Site Navigation > Rules and Events and right-click User-defined Event.
Select Add User-defined Event and enter a name, in this example “Dry all cameras”.
Create a new rule:
Go to Site Navigation > Rules and Events and right-click Rules.
Select Add Rule and enter a name, in this example “Dry all cameras Rule”.
Select Perform an action on <event>.
In the Edit the rule description field, click event.
Go to Events > External Events > User-defined Events and select Dry all cameras.
Click Next until you get to Step: 3 Actions.
Select the action Axis: Dry <camera>.
In the Edit the rule description field, click Axis: Dry camera.
In the Select Triggering Devices window, choose Select devices and click OK.
Select which devices you want to trigger the action and click OK, then Finish.
In Smart Client, add the user-defined event as an overlay-button on a map or video view.
Click the overlay-button and make sure the rule works as you want.
Turn on autofocus for multiple cameras with one click
With the Event server plugin you can set up custom rules to make life easier for the operators. In this example we will show how to turn on autofocus for all cameras with just one click.
Requirements
- AXIS Optimizer version 4.1 or later on event server and Management Client
- One or several cameras that support autofocus
Add a user-defined event:
Go to Site Navigation > Rules and Events and right-click User-defined Event.
Select Add User-defined Event and enter a name, in this example “Autofocus”.
Create a new rule:
Go to Site Navigation > Rules and Events and right-click Rules.
Select Add Rule and enter a name, in this example “Perform autofocus”.
Select Perform an action on <event>.
In the Edit the rule description field, click event.
Go to Events > External Events > User-defined Events and select Autofocus. Click OK.
Click Next until you get to Step: 3 Actions.
Select the action Axis: Run autofocus on <camera>.
In the Edit the rule description field, click Axis: Run autofocus on camera.
In the Select Triggering Devices window, choose Select devices and click OK.
Select which devices you want to trigger the action on and click OK, then Finish.
In Smart Client, add the user-defined event “Autofocus” as an overlay-button on a map or video view.
Click the overlay-button and make sure the rule works as you want.
Trigger multiple strobe sirens with one click
With the Event server plugin you can set up custom rules to make life easier for the operators. In this example we show how to activate multiple strobe sirens with one click in Smart Client.
Requirements
- AXIS Optimizer version 4.4 or later on event server and Management Client
- One or several Axis strobe sirens
- Axis strobe siren's output 1 enabled and added to output devices in Management Client
Create a user-defined event:
Go to Site Navigation > Rules and Events and right-click User-defined Event.
Select Add User-defined Event and enter a name, for example “Trigger all strobe sirens”.
In Device assistant, create strobe siren profiles:
Go to Site Navigation > AXIS Optimizer > Device assistant.
Select a strobe siren. The strobe siren’s webpage opens.
Go to Profiles and click Add profile.
Configure what you want the strobe siren to do when the operator triggers the strobe sirens in Smart Client.
Create the same profiles on the other strobe sirens. You must use the same profile name on all devices.
In Axis actions, create an action preset:
Go to Site Navigation > Rules and Events > Axis actions.
Click Add new preset.
Go to Select strobe siren and click Strobe siren.
Select strobe sirens you want to use and click OK.
You’ll see a list of the strobe sirens’ profiles.
Select the strobe siren profile you created in the previous step. The action preset is saved automatically.
Press F5 to refresh the server configuration. Now you can to start to use the new action preset you created.
Create a rule:
Go to Site Navigation > Rules and Events and right-click Rules.
Select Add Rule and enter a name, for example “Trigger all strobe sirens rule”.
Select Perform an action on <event>.
In the Edit the rule description field, click event.
Go to Events > External Events > User-defined Events and select Trigger all strobe sirens.
Click Next until you get to Step 3: Actions.
Select the action Axis: Run a profile on a strobe siren <preset>.
In the Edit the rule description field, click preset.
Select which preset you want to use.
Click Next, then Finish.
In Smart Client, add the user-defined event as an overlay-button on a map or video view.
Click the overlay-button and make sure the rule works as you want.
Turn off privacy masks on multiple cameras automatically
With the Event server plugin you can automate certain actions. In this example we will show how to automatically turn off privacy masks on multiple cameras when an analytics event occurs. The event in the example is that humans or vehicles enter an area where they shouldn’t normally be. Therefore, we want to automatically turn off the privacy masks to get a better view of what’s happening.
The workflow is:
Configure an analytics scenario in AXIS Object Analytics (or other analytics application of your choice)
Create a rule to turn off privacy masks when the analytics event occurs
Test the rule and make sure everything works as you want.
Requirements
- AXIS Optimizer version 4.0 or later on event server and Management Client
- Cameras with AXIS OS 7.40 or later
- Cameras that can generate events, in this example a camera with AXIS Object Analytics
Configure an analytics scenario
Go to Site Navigation > AXIS Optimizer > Device assistant and find the device with the analytics you want to use.
Click Applications and create an analytics scenario that will trigger the action.
Go to Devices > Cameras and find the camera you created the analytics scenario on.
In the Properties window, click Events > Add.
Select a driver event, in this example “Object Analytics: Event test Rising” and click OK.
Click Add and select the driver event “Object Analytics: Event test Falling”. Then click OK.
Click Save.
Add operator controls to relevant cameras
Go to AXIS Optimizer > Operator controls and open the Controls library.
In the Configuration window, select the relevant folder and activate both Turn off privacy mask and Turn on privacy mask.
Create action presets
Go to Rules and Events > Axis actions and click Add new preset.
Click Cameras and select relevant cameras. In this example: AXIS P1375 and AXIS Q6075-E. Then, select the control Turn on privacy mask.
Click Add new preset > Cameras and select relevant cameras. In this example: AXIS P1375 and AXIS Q6075-E. Then, select the control Turn off privacy mask.
Create a rule to turn off privacy masks when the analytics event occurs
Go to Site Navigation > Rules and Events and right-click Rules.
Select Add Rule and enter a name, in this example “Turn off privacy mask on analytics”.
Select Perform an action on <event>.
In the Edit the rule description field, click event. Go to Devices > Configurable Events and select Object Analytics: Event test Rising.
In the Edit the rule description field, select a device, in this example AXIS P1375.
Click Next until you get to Step: 3 Actions.
Select the action Axis: Run operator control: <preset>.
In the Edit the rule description field, click preset. Then add the target Turn off privacy mask on 2 cameras and click OK.
Click Finish.
Create a rule to turn on the privacy masks again
Select Add Rule and enter a name, in this example “Turn on privacy mask on analytics stop”.
Select Perform an action on <event>.
In the Edit the rule description section, click event. Go to Devices > Configurable Events and select Object Analytics: Event test Failing.
In the Edit the rule description section, select a device, in this example AXIS P1375.
Click Next until you get to Step: 3 Actions.
Select the action Axis: Run operator control: <preset>.
In the Edit the rule description section, click preset. Then add the target Turn on privacy mask on 2 cameras and click OK.
Click Finish.
Test the rule
Go to AXIS Optimizer > Device assistant and find the device with the analytics you’ve used to create the automation. In this example AXIS P1375.
Open the relevant scenario and click Test alarm.
Activate a strobe siren when a camera detects motion
With the event server plugin, you can set up custom rules to automate actions. In this example, we show how to activate strobe sirens automatically when a camera detects motion.
Requirements
- AXIS Optimizer version 4.4 or later on event server and Management Client
- One or several Axis strobe sirens
- Axis strobe siren’s output 1 enabled and added to output devices in Management Client.
- For older version than VMS version 2022 R2, Axis actions are not available as stop actions. For older versions you need to create two separate rules for running and stopping the strobe siren.
Create strobe siren profiles:
Go to Site Navigation > AXIS Optimizer > Device assistant.
Go to Axis output devices and select a strobe siren. The strobe siren’s webpage opens.
Go to Profiles and click Add profile.
Make sure to choose the same profile name for all the sirens.
Configure what you want the strobe siren to do when it detects motion.
Create action presets for start and stop:
Go to Site Navigation > Rules and Events > Axis actions.
To create a start preset, go to Strobe siren and click Add new preset.
Go to Select strobe siren and click Strobe siren.
Select one or more strobe sirens from the list.
Select the siren profile that you created previously from the list. The action preset is saved automatically.
To create a stop preset, click Add new preset.
Go to Select strobe siren and click Strobe siren.
Select the same strobe sirens from the list that were chosen for the start preset.
Go to Select action and select Stop.
Select the same siren profile that was created for the start action. The action preset is saved automatically.
Click click to refresh or press F5 to refresh the server configuration.
Create a rule:
Go to Site Navigation > Rules and Events > Rules.
Right-click Rules, select Add Rule, and enter a name.
Under Edit the rule description, click event.
Go to Devices > Predefined Events and select Motion Started.
Under Edit the rule description, click devices/recording_server/management_server.
Select the camera that should trigger the strobe sirens.
Click Next until you get to Step 3: Actions.
Select the action Axis: Start or stop a profile on a strobe siren: <preset>.
Under Edit the rule description, click preset.
Select the start preset that you created previously.
Click Next and select Perform stop action on <event>.
Click Next and select Axis: Start or stop a profile on strobe siren: <event>.
Under Edit the rule description, click preset.
Select the stop preset that you created previously.
Select Finish.
Test that the strobe sirens run correctly when there is motion detected by the camera.
Play audio clips on speakers or in a speaker zone when a camera detects motion
With the event server plugin, you can set up custom rules to automate actions, so called action presets. In this example, we show how to automatically play an audio clip on an audio speaker or in a speaker zone, when a camera detects motion.
Requirements
- AXIS Optimizer version 4.6 or later on the event server and Management Client
- One or several dedicated Axis speakers or Axis devices with built-in speakers
- To play an audio clip in a speaker zone requires a correctly configured AXIS Audio Manager Edge audio system. For more information, see Configure speakers and zones in AXIS Audio Manager Edge mode
To upload an audio clip:
Place the audio clip that you want to upload to the speakers in the default folder C:\Users\Public\Documents\AXIS Optimizer for Milestone XProtect - Audio Clips\.
In Management Client, go to Site Navigation > AXIS Optimizer > Speaker manager and select a speaker, device group, or speaker zone from the list.
- Note
For more information on how to turn on AXIS Audio Manager Edge mode, see Optimize search speed.
Go to Audio clips and click + in front of the audio clip that you want to upload.
Without AXIS Audio Manager Edge mode, repeat steps 1.2-1.3 for each speaker that you want to play the audio clip from. Make sure to upload the same audio file to each speaker.
To create action presets for playing an audio clip on a speaker or in a speaker zone:
Go to Site Navigation > Rules and Events > Axis actions.
To create a preset, go to Audio clips and click Add new preset.
With AXIS Audio Manager Edge mode, go to Select playback destination.
Without AXIS Audio Manager Edge mode, go to Select speaker.
Select a speaker or a speaker zone.
From the list, select the audio clip that you uploaded in step 1. The action preset is saved automatically.
Click click to refresh or press F5 to refresh the server configuration.
To create a rule:
Go to Site Navigation > Rules and Events > Rules.
Right-click Rules, select Add Rule, and enter a name.
Under Edit the rule description, click event.
Go to Devices > Predefined Events and select Motion Started.
Under Edit the rule description, click devices/recording_server/management_server.
Select the camera that should trigger the action preset or audio clip.
Click Next until you get to Step 3: Actions.
Select the action Axis: Play audio clip: <preset>.
Under Edit the rule description, click preset.
Select the preset that you created in the previous step.
Select Finish.
Test that the audio clip plays correctly when motion is detected by the camera.
Troubleshoot a rule
If a rule doesn't work, first check the event server messages to see that the event service is running.
You can also check the AXIS Optimizer logs on the event server. If Management Client or Smart Client are available, use them to enable and to save logs.
Centrally manage license plate lists
When using AXIS Optimizer list manager, you can centrally manage license plate lists for all cameras at once. You can create and manage allow lists, block lists, and custom lists directly from the VMS. The system supports combining lists. This means that you can have a global list that applies to all cameras in the system and local lists that applies to specific cameras.
Centralized list management is useful, for example, when you want to automate parking entry and exit or want to receive an alarm when the system registers a certain license plate.
You must be an administrator to create and edit lists. It's possible to give read and edit rights to other roles, see section Configure list permissions.
Create a list
Requirements
- AXIS License Plate Verifier 1.8 or later running on the cameras
- If you want to create custom lists, AXIS License Plate Verifier 2.0 or later is needed
In Management Client, go to Site Navigation > AXIS Optimizer > License plate lists.
Select the cameras that you want to send the allow list, block list, and custom list to.
(Optional) Add user roles that can view and edit the allow list, block list, and custom lists.
Add license plates to the allow list, block list, and custom list.
You can also import existing license plate lists.
When the list gets status Synchronized, it has been pushed to the cameras you selected.
Configure list permissions
You can configure which user roles that can edit the allow list, block list, and custom list. This is useful for example when the administrator has set up the lists, but you want the operator to add visitors based on daily needs.
In Management Client
All permissions to view and edit lists can be chosen individually for each list.
Go to Security > Roles and select a role.
Go to the AXIS Optimizer tab.
Go to Role settings > AXIS Optimizer > License plate lists
Select Read in the License plate lists (node) field.
Select a list under License plate lists and select Edit license plates.
For older versions than XProtect 2023 R2, go to MIP > AXIS Optimizer > AXIS Optimizer Security > License plate lists and select Edit license plate lists.
Edit a list
In Management Client
Go to Site Navigation > AXIS Optimizer > License plate lists.
Select the site that you want to edit.
Update Cameras or License plates as needed.
When the list gets status Synchronized, your changes have been pushed to the cameras you selected.
In Smart Client
Go to Axis license plates and click License plate lists.
If you don’t see the tab, go to Settings > Axis search options and select Show license plate tab.
Select the site that you want to edit.
Add license plates to the allow list, block list, and custom list.
You can also import existing license plates lists.
When the list gets status Synchronized, it has been pushed to the cameras you selected.
Import a list
You can import lists in several text or CSV formats.
Allowed text format: one license plate on each line
Allowed CSV formats:
One license plate on each line
Two fields: license plate and date
Three fields: license plate, owner, and comment
Four fields: license plate, owner, comment, and the string “Active” or “Inactive”. (Same format as when you export a list.)
In Management Client
Go to Site Navigation > AXIS Optimizer > License plate lists.
Select the site that you want to edit.
Go to Allowed, Blocked, or Custom.
Click and then select Import to allow list, Import to block list, or Import to custom list.
In the Reset list dialog:
Click Yes to remove all existing license plates and add only the newly imported license plates to the list.
Click No to merge the newly imported license plates with the existing license plates on the list.
In Smart Client
Go to Axis license plates and click License plate lists.
If you don’t see the tab, go to Settings > Axis search options and select Show license plate tab.
Select the site that you want to edit.
Go to Allowed, Blocked, or Custom.
Click and then select Import to allow list, Import to block list, or Import to custom list.
In the Reset list dialog:
Click Yes to remove all existing license plates and add only the newly imported license plates to the list.
Click No to merge the newly imported license plates with the existing license plates on the list.
Export a list
To export license plate lists, you must be have administrator rights.
In Management Client
Go to Site Navigation > AXIS Optimizer > License plate lists.
Select the site that you want to edit.
Go to Allowed, Blocked, or Custom.
Click and then select Export allow list, Export block list, or Export custom list.
The exported list will be in CSV format with four fields: license plate, owner, comment, and Active or Inactive status.
In Smart Client
Go to Axis license plates and click License plate lists.
If you don’t see the tab, go to Settings > Axis search options and select Show license plate tab.
Select the site that you want to edit.
Go to Allowed, Blocked, or Custom.
Click and then select Export allow list, Export block list, or Export custom list.
The exported list will be in CSV format with four fields: license plate, owner, comment, and Active or Inactive status.
Learn more about lists
You can create several sites.
Each site is associated with one or several cameras that have AXIS License Plate Verifier installed.
Each site is associated with one or several VMS user roles. The user role defines who has permission to read and edit the license plate lists.
All lists are stored in the VMS database.
When you add the camera to a site, already existing license plates on the camera are overwritten.
If the same camera is present in several sites, the camera will receive the sum of all lists.
If the same license plate is present in several lists, “block” has the highest priority, “allowed” has medium priority, and “custom” has the lowest.
For each license plate, you can add information about the vehicle owner. However, this information is not synchronized to the cameras.
Respond to live events
Use device controls
Operator controls
The operator controls allow you to access an Axis camera’s specific features directly from Smart Client. Which features you’ll have access to depends on which cameras you have in your system and the features they have. In addition to the pre-installed operator controls, you can create custom ones. You can also configure which controls an operator has access to.
Some examples of operator controls are:
Turn on or off wiper
Turn on or off heater
Turn on or off IR
Focus recall
Turn on or off WDR
Turn on or off electronic image stabilization (EIS)
Turn on or off privacy masks.
For information about your camera's specific operator controls, refer to the datasheet.
Access the operator controls
Requirements
- Axis devices with AXIS OS 7.10, 7.40 or later. (Versions 7.20 and 7.30 don’t support operator controls.)
In Smart Client, click Live and go to your Axis camera.
Click and select which function to use.
Save a focus area for a PTZ camera
The focus recall function allows you to save focus areas to which the PTZ camera returns automatically when it moves to that area of the scene. This is especially useful in low light conditions, where the camera would otherwise have trouble finding the focus.
In Smart Client, move the camera to the area you want to focus on.
- Note
Light conditions must be good when you set the focus area.
Focus the camera.
Select Add Focus Recall Zone.
Later, when you pan or tilt the camera and move the view to an area, the camera automatically recalls the preset focus for that view. Even if you zoom in or out, the camera will keep the same focus position.
If the zone is incorrectly configured, select Remove Focus Recall Zone.
Autofocus a camera
Cameras with autofocus can adjust the lens mechanically and automatically so that the image stays focused in the area of interest when the view changes.
Autofocus a PTZ camera
In Smart Client, select a camera view.
Click and go to Set Focus > AF.
Focus Control allows you to move the focus point closer or further away:
For a large step, click the large bar.
For a small step, click the small bar.
Autofocus fixed box and fixed dome cameras
In Smart Client, select a camera view.
Click and go to Autofocus.
Turn on speed dry or wiper
The speed dry function enables the dome to shake itself off when it becomes wet. When the dome vibrates at high speed, the surface tension of the water breaks and removes the drips. This allows the camera to produce sharp images even in rainy weather.
To turn on the speed dry function
In Smart Client, select a camera view.
Click and go to PTZ > Speed Dry.
The speed dry function is only available in AXIS Q61 series cameras.
To turn on the wiper function
The wiper removes excess water and rain from the lens of Axis positioning cameras.
In Smart Client, select a camera view.
Click .
The wiper function is only available in AXIS Q86 series cameras.
Measure spot temperature
If you have a camera embedded with spot temperature reading in your system, you can measure the temperature directly in the camera view. The AXIS cameras with spot temperature reading are AXIS Q1961-TE, AXIS Q2101-E and AXIS Q2901-E.
In Smart Client, open a camera view in a camera embedded with spot temperature reading.
To measure the spot temperature, click and select:
Measure spot temperature for AXIS Q2901-E.
Enable temperature spot meter for AXIS Q1961-TE and AXIS Q2101-E.
Click any area in the view, and you’ll see the current spot temperature.
For Q1961-TE and AXIS Q2101-E, click Done.
For AXIS Q1961-TE and AXIS Q2101-E, the spot temperature will remain on the image until disabled:
Select > Disable temperature spot meter.
If digital zoom is used, temperature measurements can give incorrect result.
Automatically zoom in and track a moving object
Autotracking
With autotracking, the camera automatically zooms in on and tracks moving objects, for example a vehicle or a person. You can manually select an object to track, or set up trigger areas and let the camera detect moving objects. When the camera doesn't track an object, it returns to its home position after 5 seconds.
Configure trigger areas in the PTZ camera web interface.
In Smart Client you’ll see:
Red square: the tracked object.
Blue zones: objects that aren't being tracked, but can be, if they enter a trigger zone or are right-clicked.
Configure autotracking
Requirements
- AXIS OS 12.0
- One or several Axis cameras supporting Autotracking 2, for example, AXIS Q6075 PTZ Dome Network Camera
Make sure the camera and metadata devices are enabled.
Select Metadata 1 for your camera and click Settings.
Go to Metadata stream > Event data and select Yes.
Click Save.
Configure Autotracking in the PTZ camera web interface.
Turn on or off autotracking
In Smart Client, click .
Select Turn on autotracking or Turn off autotracking.
If there are several options to turn on/off autotracking, use the last option on the list.
Start autotracking manually
If you hover the mouse over an object, the overlay will be filled. Right clicking when hovering an object sets that object as a target, and the camera will start to track the targeted object. The camera resets after 5 s if the object can't be tracked anymore.
Right clicking outside the blue boxes stops autotracking.
Create custom operator controls
In Management Client, go to Site Navigation > AXIS Optimizer > Operator controls.
Select a device or a group of devices.
Click Add new control.
Enter a Name and a Description.
Select Administrator if you want the operator control to be available only to users with administrator rights.
Add the VAPIX URL for the specific control.
Example: To add a Defog on operator control, enter this URL:
/axis-cgi/param.cgi?action=update&imageSource.IO.Sensor.Defog=on.To learn more about Axis network device APIs, see the VAPIX Library.
Go to Smart Client and test that the operator control works as expected.
Configure access to operator controls
You can configure which operator controls an operator in Smart Client has access to.
In Management Client, go to Site Navigation > AXIS Optimizer > Operator controls.
Select a device or a group of devices.
Select which operator controls you want the operators to have access to in Smart Client.
Interact through speakers
Speaker manager
The Speaker manager integrates Axis audio products into the VMS, to give you full functionality of your Axis devices.
Access speakers related to your camera
Connect cameras to a speaker or speaker groups, and access speakers from the live view. You no longer need to find your speakers manually.
Send audio to a group of speakers
Send audio to many speakers with a single click.
Manage audio clips
You can easily manage your audio clips.
Take immediate action with your speakers
Respond quickly to an alarm without leaving the Alarm Manager.
Synchronize audio between speakers
If you want to use your audio system for background music, the Speaker manager can help you set up zones to synchronize the audio between your speakers (only in AXIS Audio Manager Pro and Edge modes).
Modes
Speaker manager supports three different modes for different kinds of speaker setups.
Pro for AXIS Audio Manager Pro systems
A comprehensive software solution designed for large-scale or advanced public address systems. It supports up to 5,000+ speakers and 500+ zones, and offers flexible options for licensing and installation. It is recommended for larger systems or for users with more advanced scheduling needs.
Edge for AXIS Audio Manager Edge systems
A streamlined software solution that manages up to 200 speakers across 20 zones. It is embedded directly on Axis network speakers and requires no servers or additional licenses. It is recommended for smaller systems with no advanced scheduling needs.
Legacy
The legacy mode uses native speaker integration to broadcast audio to a group of speakers or trigger audio clips. It doesn’t support synchronized broadcasting. It is recommended for systems with individual speakers and no synchronized broadcasting needs.
Configure mode
The first time you enter this page you will be asked to select a mode, but you can change mode at any time. The configuration you make in each mode is separate but are preserved when switching between modes.
Go to Site Navigation> AXIS Optimizer > Speaker manager .
In Mode, click on the mode you are currently in and select your desired mode in the pop-up window.
Click Switch mode.
AXIS Audio Manager Pro mode
To use this mode:
Install the AXIS Audio Manager Pro software on a server machine, for example, a recording server.
License and configure AXIS Audio Manager Pro with API-access.
Optional: set up a server certificate for the web interface, see Certificates.
Change AXIS Audio Manager Pro server from port 443 if installed on a VMS server machine.
This mode doesn't require any speakers to be added or licensed in the VMS but a hardware will be automatically created for the connection to the AXIS Audio Manager Pro server (one VMS device license needed). To learn more about AXIS Audio Manager Pro, see AXIS Audio Manager Pro user manual.
AXIS Audio Manager Pro mode is limited to support on single local site. Multi-site, federated, and interconnected site architectures are outside the scope of this integration.
Connect to an AXIS Audio Manager Pro server in Pro mode
In Management Client, go to Site Navigation > AXIS Optimizer> Speaker manager.
Click Connect.
In the dialog:
Select a recording server that you want the AXIS Audio Manager Pro server hardware to be added to.
Enter address and HTTPS port to the AXIS Audio Manager Pro server.
Enter API username and password (API access must be enabled on the AXIS Audio Manager Pro server).
Click Connect.
You can see all destinations and zones available in AXIS Audio Manager Pro on the left side. When you click AXIS Audio Manager Pro server, the right side shows the web interface for AXIS Audio Manager Pro.
To access the web interface, you need a direct connection from the Management Client machine and AXIS Audio Manager Pro server.
If you make any changes to zones, destinations, and audio clips in the web interface:
Go to Site Navigation > AXIS Optimizer > Speaker manager.
Click Update
Associate a camera to a destination or zone
You can associate a camera to a specific destination or zone and use them directly in Smart Client’s camera view.
In Management Client, go to Site Navigation > AXIS Optimizer > Speaker manager and select a destination or zone.
In Associated camera(s), click Add cameras... and select the cameras you want to associate the destination or zone with.
When a camera is associated to a destination or zone, the tool bar in Smart Client’s camera view shows ![]() .
.
AXIS Audio Manager Edge mode
AXIS Audio Manager Edge is pre-installed on most Axis speakers and will be automatically detected when you select this mode. Site leaders, intermediary devices for paging source, and standalone speakers need to be added to the VMS for AXIS Audio Manager Edge mode to work properly.
In AXIS Audio Manager Edge mode, you cannot use built-in camera audio outputs and other incompatible audio devices.
To learn more about AXIS Audio Manager Edge, see AXIS Audio Manager Edge user manual.
Configure speakers and zones in AXIS Audio Manager Edge mode
- To play audio clips and speak live, you must first turn on paging for your zones.
In Management Client, go to Site Navigation > Devices > Speakers to add device groups, or add and remove speakers from device groups.
Go to Site Navigation > AXIS Optimizer > Speaker manager, and make sure that Edge mode is selected.
Speaker manager will then search for all speakers in the VMS system, and show all AXIS Audio Manager Edge sites and zones that can be used in Smart Client.
In the site list, select a zone with paging off.
Select Turn on paging for the zone.
- If you make any changes to zones or paging sources:
Go to Site Navigation > AXIS Optimizer > Speaker manager.
Click Update
If the setup fails, check your AXIS Audio Manager Edge configuration and try again.
Associate a camera to a speaker or zone
To use a specific speaker or zone directly in Smart Client’s camera view, it’s possible to associate them to a camera.
In Management Client, go to Site Navigation > AXIS Optimizer > Speaker manager and select a speaker or zone.
In the Associated cameras window, click + Add cameras and select the cameras that you want to associate the speaker or zone with.
- When a camera is associated to a speaker, device group, or zone, the tool bar in Smart Client’s camera view shows
 .
.
Upload audio clips to speakers
To play audio clips on a speaker or zone from Smart Client, you must first upload the audio clips to the speakers in Management Client.
Place the audio clips you want to upload to the speakers in the default folder C:\Users\Public\Documents\AXIS Optimizer for Milestone XProtect - Audio Clips\.
In Management Client, go to Site Navigation > AXIS Optimizer > Speaker manager and select a speaker or zone.
Go to Audio clips and click + in front of the clips you want to upload to the speakers.
Legacy mode
Legacy mode extends the native functionality of your Axis speakers and other audio capable Axis devices that have been added to the VMS. In contrast to the other other modes, Legacy mode doesn't support synchronized broadcasting to multiple speakers.
Configure speakers in legacy mode
In Management Client, go to Site Navigation > Devices > Speakers to add device groups, or add and remove speakers from device groups.
Go to Site Navigation > AXIS Optimizer > Speaker manager and make sure that legacy mode is selected.
Click

In the Manage Side Panel window, select the speakers that you want to show in Smart Client.
Click Add and OK.
The speakers in the Visible panel are now shown in Smart Client for all users that have access to the speaker.
To remove speakers:
Go to Site Navigation > AXIS Optimizer > Speaker manager and click
.In the Manage Side Panel window, select the speakers that you want to remove.
Click Remove and OK.
Associate a camera to a speaker or speaker group
You can associate a camera to a specific destination or zone and use them directly in Smart Client’s camera view.
In Management Client, go to Site Navigation > AXIS Optimizer > Speaker manager and select a speaker or speaker group.
In Associated camera(s), click Add cameras... and select the cameras you want to associate the speaker or speaker group with.
When a camera is associated to a speaker or speaker group, the tool bar in Smart Client’s camera view shows ![]() .
.
Upload audio clips to speakers
To play audio clips on a speaker or zone from Smart Client, you must first upload the audio clips to the speakers in Management Client.
Place the audio clips you want to upload to the speakers in the default folder C:\Users\Public\Documents\AXIS Optimizer for Milestone XProtect - Audio Clips\.
In Management Client, go to Site Navigation > AXIS Optimizer > Speaker manager and select a speaker or speaker group.
Go to Audio clips and click + in front of the clips you want to upload to the speakers.
Change the volume
To change the volume of your speakers:
In Management Client, go to Site Navigation > Speaker manager and select a speaker, or speaker group.
Go to Volume and adjust to the wanted volume.
Play audio on speakers
In Smart Client, go to Live > MIP plug-ins > Axis speaker control and select a speaker or zone in the drop-down list.
Let your microphone send audio to the speaker:
Press and hold
while you speak.Make sure that the microphone level meter is showing voice activity.
Play an audio clip on the speaker:
Go to Media clip and select an audio clip in the drop-down list.
To start playing the audio clip on the selected speaker, click play.
Play audio on speakers in camera view
In Smart Client, go to a camera view.
If there is an association made to a speaker, device group, or zone,
is visible in the tool bar.Click
to open the Axis speaker control window.Let your microphone send audio to the speaker:
Press and hold
while you speak.Make sure that the microphone level meter is showing voice activity.
Play an audio clip on the speaker:
Go to Media clip and select an audio clip in the drop-down list.
To start playing the audio clip on the selected speaker, click play.
Play audio on speakers in alarms
In Smart Client, go to Alarms.
Select an alarm the has a camera as source.
If there is an association made to a speaker or zone, speaker controls will be visible.
Let your microphone send audio to the speaker:
Press and hold
while you speak.Make sure that the microphone level meter is showing voice activity.
Play an audio clip on the speaker:
Go to Media clip and select an audio clip in the drop-down list.
To start playing the audio clip on the selected speaker, click play.
Audio clip bookmarks in camera view or alarms
When you play an audio clip from the speaker controls in a camera view or Alarms, a bookmark is created with information about who and what device played the audio clip.
To search for audio clip bookmarks:
In Smart Client, go to Search.
Select a time interval and one or several cameras.
Click Search for > Bookmarks > New search.
Manage visitors
Intercom plugin
Axis network intercoms combine communication, video surveillance, and remote entry control in one device. AXIS Optimizer makes it easy to configure and use Axis intercoms together with the VMS. For example, you can receive calls and open doors.
Set up an intercom
The door lock should typically be connected to the first relay on the intercom. AXIS Optimizer determines which output port to use based on the Usage information. It will use the first port having Usage = Door (RELAY1 by default).
Requirements
- An Axis intercom
- A microphone installed on the PC that receives the calls
- Smart Client up and running
From version 5.0.X.X, AXIS Optimizer configures intercoms in the VMS using a different configuration method than in earlier versions. The metadata device can be used for call detection instead of using Input 1. We still support the old configuration method, but we recommend the new configuration method for new installations.
Install the latest version of AXIS Optimizer on each client where you want to receive calls and control the door from.
Log in to Management Client.
Add your Axis intercom to the Recording Server.
In Management Client, enable all devices that you need. To be able to receive calls in Smart Client you need:
Camera 1
Microphone
Speaker
Metadata
Input 2 (optional if you have a security relay connected to the intercom on port 2)
Output connected to the door. If you know which output that’s connected to the door, select that one. If not select all outputs.
Go to Site Navigation > Devices > Metadata select the Metadata device for the intercom you’re installing.
Click Settings.
Set Event data to Yes.
Click Save.
If you've enabled Input 2, you need to set it up too.
Go to Site Navigation > Devices > Input and select Input 2.
Click Events and then Add.
Select Input Falling event and add it to the enabled inputs. Repeat for Input Rising event.
Click Save.
For setting up permissions for specific roles, see Set permissions for intercom.
Set permissions for intercom
To handle a call, you must first enable permissions.
Go to Site Navigation > Security > Roles.
Choose a role.
Go to Overall Security.
Make sure that the required permissions for each security group are set. Go to Hardware and select Driver commands.
To set permissions on a system level, go to Overall Security.
To set permissions on a device level, go to Device.
Set permissions for the security groups:
Go to Cameras. Select Read and View live.
Go to Microphones. Select Read and Listen.
For Overall Security, go to Speakers. Select Read and Speak.
For Device, go to Speakers and select Read. Then go to the tab Speech and select Speak.
Go to Metadata. Select Read and Live.
Go to Input. Select Read.
Go to Output. Select Read and Activate.
To assign permissions to control which operators that handle calls from a certain intercom:
Select the Read permission for the metadata device 1 of the specific intercom.
Clear this permission for all other roles. Users that doesn't have permission will not be able to receive calls.
To view call history, you need additional permissions.
To set permissions on a system level, go to Overall Security.
To set permissions on a device level, go to Device.
Select these permissions for the security groups:
Go to Cameras. Select Playback and Read sequences.
Go to Microphones. Select Playback and Read sequences.
Go to Speakers. Select Listen, Playback, and Read sequences.
Make a test call
In Smart Client, go to Settings > Axis intercom options.
Click Test call.
Select an intercom and click Make call.
Prevent echo during calls
With push-to-talk, you send audio in only one direction at a time through the intercom. You can turn on push-to-talk when there is an echo in a call.
To turn on Push-to-talk:
In Smart Client, go to Settings > Axis intercom options.
Go to Call and select Push-to-talk.
Control the intercom from live view
For each intercom and intercom view, click ![]() to quickly control the device.
to quickly control the device.
| How do I? | Instructions | Comment |
|---|---|---|
Open the lock | Click | When the lock is unlocked, you can't click Access or Extended access. |
Know if a door is locked or unlocked | Click | - |
Talk to a person in front of the intercom | Click | The call window opens and starts two-way communication with the intercom. |
Find out who called yesterday | Click | You’ll see a list of calls made with the current intercom. |
Respond to a call from live view
When a visitor presses the call button on the intercom, a call window appears on each running Smart Client. The call window automatically selects the appropriate camera view when you resize the window, for example corridor or landscape view.
| How do I? | Instructions | Comment |
|---|---|---|
Answer the call | Click Accept | A two-way audio channel between the operator and the person by the intercom opens. |
Send the call to another operator because I’m busy | Close the window by clicking X | When you dismiss a call, a different operator can take the call on a another client The intercom continues to ring and flash until someone answers the call. If nobody answers, the call gets status missed in the call history. |
Refuse the call because I’ve already opened the door based on visual confirmation and don’t need to talk to the person Refuse the call because I don’t want to talk to an unwanted visitor | Click Decline | When you decline a call, the call windows automatically close on other clients. No other operator can take the call. The intercom stops to ring and flash, then the call window closes. The call gets status answered in the call history. |
Open the door | Click Access | The intercom lock is opened for 7 s. To configure how long the door stays open:
|
Temporarily stop audio from the operator to the intercom. | Click Mute | - |
Talk to the visitor when push-to-talk is enabled. | Click Talk | Release the talk button to hear the visitor when they speak. |
Terminate the call. | Click Hang up | The default auto-close setting is that the call window closes when you decline or hang up a call. To change the default call window behavior:
|
Show multiple cameras in the call window
You can show up to three cameras at the same time in the call window. This means that you can see the intercom’s video stream and the video streams from two other cameras within the same call window. This is useful for example when you want to see the delivery person and the area around the delivery door at the same time.
To configure multiple cameras in the call window:
In Smart Client, go to Settings > Axis intercom options. Go to Call > Intercom settings.
Go to Selected device and select which device you want to configure.
Go to Multiple cameras. Select which intercom you want to see as camera 1 in the call window.
Select which associated cameras you want to see as camera 2 and camera 3 in the call window when the intercom calls.
Close the Intercom settings window.
Call window actions
With call window actions, you can set up user-defined events that are tied to rules in the XProtect rule engine. Which events you can set up and use depend on your role.
To set up call window actions:
In Smart Client, go to Settings > Axis intercom options.
Go to Call > Intercom settings.
Go to Selected device and select which device you want to configure.
Go to Call window actions to select the call window actions you want to use.
There are two types of call window actions:
Access button action: When you set up an access button action, you override the default action of the Access button. For example, you can set up to open a set of doors with the Access button.
Custom action: When you set up a custom action, a button is shown in the call window. You can trigger the custom action by clicking this button. A custom action is an action that don’t necessarily relate to door access, for example sending emails, triggering alarms or starting continuous recordings.
Show a page in the call window
You can show pages in the call window when using AXIS I8307-VE Network Intercom. This is useful for displaying information, for example, a map or opening hours, to the person standing in front of the intercom.
First, configure these pages in your intercom’s web interface, see AXIS I8307-VE Network Intercom.
When there is an incoming call from the intercom:
Click Show page to see a dialog of all configured pages on your device.
Click Load previews to see a preview of all pages.
To see a preview of one configured page, hover on the page and click the image icon.
Click on a configured page to display it on the intercom.
You can set up the call window to display both the intercom camera feed and the page using different associated cameras, that is, camera 1 for camera feed and camera 2 for page display, see Show multiple cameras in the call window.
Note that the page closes when the call ends. Repeat the steps above to show a page for a new call.
Filter on call extension
By default, all PCs connected to an intercom receives the calls. By adding call extensions and filtering on them in the VMS, you can configure the intercoms to route calls to certain Smart Clients in your VMS system. You can set up schedules for the call routing and add fallback contacts. You can also route calls to SIP-based contacts and add them as fallback contacts.
- In the intercom web interface
Go to Communication > SIP.
Select Enable SIP.
Click Save.
Go to Communication > VMS Calls.
Make sure Allow calls in the video management system (VMS) is turned on.
Go to Communication > Contact list.
Under Recipients, click to add a new contact. Enter information for the new contact and click Save. You can add several contacts.
Under SIP address enter
VMS_CALL:<extension>. Replace<extension>with the call extension name for your contact, for exampleReceptionA.If you want to set up a schedule for the contact, choose the contact’s Availability.
You can add a fallback contact who will receive the call if none of the original contacts replies, for example
ReceptionB.
Go to Communication > Calls.
For devices with AXIS OS earlier than version 11.6, turn off Make calls in the video management system (VMS).
Under Recipients, remove the contact VMS and add the new contact you created.
In Management Client
We recommend that you configure the intercoms in the VMS to use a metadata device for call detection. See Set up an intercom.
- In Smart Client
- Set up call extension for every user who should receive the calls. The setting is stored on the user level. This means that the user will receive the calls independent on which PC is used.
Log in to Smart Client as the user who should receive the calls.
Go to Settings > Axis intercom options.
Under Call > Call extension, enter the contact’s call extension name, for example
ReceptionA. The user will now only receive calls if the call extension matches the filter value.If you want to add several call extension names, separate them with semicolon, for example
ReceptionA;ReceptionC
View the call history
In the call history you can view answered and missed calls, and if the door has been unlocked. You can select among the calls and view the corresponding playback video if available.
In Smart Client, go to the intercom’s view.
Click
 > Call history.
Call history is limited to 39 calls and 1000 access log records. The limited number of calls can be lower if you mute the conversation frequently.
To register when a door has been unlocked, you must set the retention time (days) for the Axis intercom:
- In Management Client, go to Tools > Options > Alarm and Events > Event retention.
- Set the time for Output Activated and Output Deactivated.
Turn off microphone when there's no active call
It’s possible to turn off the microphone when no calls are coming in to the Axis intercom. The microphone will be turned on when there’s an active call.
- You need administrator rights to turn off the microphone.
- This is not supported in federated architecture or when you use fallback contacts.
In Smart Client, go to Settings > Axis intercom options.
Select Turn off intercom microphone when no active call.
Receive an alarm if a door is forced open
If a door has a security relay (Input 2), the door overlay in the Smart Client’s call window shows when the door is open or closed. This means that if someone opens the door by force while the door is locked, you can receive an alarm.
To receive an alarm, at least one Smart Client must be running.
To configure the alarm:
In Smart Client, go to Settings > Axis intercom options > Administrator options.
Select Trigger an alarm when a door has been forced open.
Receive an alarm if a door stays open too long
If a door has a security relay (Input 2), the door overlay in the Smart Client’s call window shows when the door is open or closed. This means that if someone opens the door and the door stays open for too long, you can receive an alarm.
To receive an alarm, at least one Smart Client must be running.
To configure the alarm:
In Smart Client, go to Settings > Axis intercom options > Administrator options.
Select Trigger an alarm when a door has been open longer than (s).
Enter for how long the door can stay open before the alarm goes off.
Prevent a client from receiving calls
You can configure a client to not receive any calls. This means that when someone places a call, no call window opens on the specific client.
In Smart Client, go to Settings > Axis intercom options > Call.
Clear Receive calls on this client.
Visualize audio
Microphone view
You can visualize audio in your system by adding one or several microphone views to Smart Client. Then you can monitor audio both in live view and playback. You can see when audio levels rise above a certain level using the built in audio detection on your Axis device. Typically uses cases are:
Requirements
- VMS Smart Client 2020 R2 or later.
Configure VMS for microphone view
Set detection levels:
In Management Client, go to Site Navigation > AXIS Optimizer > Device assistant and select your device.
Open the Detectors settings. How you open these settings depends on your device software version.
Go to Audio detection and modify Input 1 sound level to suit your needs.
Get events from the camera into the VMS:
In Management Client, go to Site Navigation > Devices > Microphones.
Click your microphone, then click Events.
Add events Audio Falling and Audio Rising.
Configure for how long the system keeps metadata about detected audio:
Go to Tools > Options > Alarm and Events > Device events.
Find Audio Falling and set retention time.
Find Audio Raising and set retention time.
Verify that you’ve set up audio recording. You can for example record audio all the time or a create a recording rule based on audio raising or audio falling events.
For each microphone you want to use with microphone view, repeat the steps above.
In Smart Client, go to Settings > Timeline > Additional data and select Show.
Add microphone view to Smart Client
Open Smart Client and click Setup.
Go to Views.
Click Create new view and select a format.
Go to System overview > AXIS Optimizer.
Click Microphone view and drag it into the view.
Select a microphone.
Click Setup.
Use microphone view
Live view
Audio levels are displayed as a bar graph with current level to the right and up to 60 s audio history moving to the left.
Click in the view to listen to audio from the microphone.
In each microphone view there’s a headphone icon. Click the icon to mute or unmute audio from each view without having to select the view itself. This allows you to listen to several microphones at the same time.
Playback
An icon will highlight when there’s detected audio available for the microphone.
Yellow bars indicate that audio has been detected according to the detection levels you’ve set on the device.
Click in the view to listen to audio from the microphone.
In each microphone view there’s a headphone icon. Click the icon to mute or unmute audio from each view without having to select the view itself. This allows you to listen to several microphones at the same time.
Listen to several microphones at the same time
The microphone view allows you to listen to several microphones at the same time, both in live view and playback.
Open Smart Client and click Setup.
Go to Views.
Click Create new view and select a split view.
Go to System overview > AXIS Optimizer.
For each microphone you want to listen to:
Click Microphone view and drag it into the view.
Select a microphone.
Click Setup.
For each microphone, decide if you want to mute or unmute it by clicking the headphone icon in each microphone view. Now you can listen to all the unmuted microphones at the same time.
Detect incidents with audio
You might want to monitor actions from areas where you’re not allowed to install cameras, for example restrooms. In microphone view you can quickly see when an incident happens that is, when the sound level exceeds the detection levels.
Configure VMS for microphone view. Remember to set relevant detection levels for the device and the area you want to monitor.
Add a microphone view with the device to live view in Smart Client, see Add microphone view to Smart Client.
Investigate incidents after they happened
After an incident occurred, you can quickly identify periods in the playback timeline when audio was detected by your microphones.
Add one or several microphone views with relevant devices to playback in Smart Client, see Add microphone view to Smart Client.
Forensic search
AXIS Optimizer offers four search categories for Axis devices in Centralized search:
Forensic search (object search)
You can also add a separate license plate search tab to Smart Client, see Axis license plates.
You can configure these search categories in a centralized panel, see Configure Axis search categories.
Forensic search
Axis cameras with AXIS OS 9.50 or later generate metadata that describes all currently moving objects in a camera's field-of-view. The VMS can record this data together with the corresponding video and audio. The Forensic search function in AXIS Optimizer allows you to analyze and search this data. Use Forensic search to get an overview of all activity in the scene or quickly find a specific object or event of interest.
Before you start
Make sure that the camera has the latest AXIS OS version.
Make sure your VMS has a correct version:
Corporate 2019 R3 or later, or Expert 2019 R3 or later
Professional+ 2022 R3 or later, or Express+ 2022 R3 or later
Camera time must be synchronized with NTP.
To filter by object types Human, Vehicle, Bike, Bus, Car, or Truck:
Use an Axis device with support for AXIS Object Analytics. See the Analytics filter in the Product selector.
Go to System > Analytics metadata and enable Analytics Scene Description in the camera’s web page.
To filter by Vehicle color Upper body clothing color, or Lower body clothing color:
Use an Axis device with support for AXIS Object Analytics. See the Analytics filter in the Product selector.
Use an Axis device with ARTPEC-8 or CV25. See the System-on-chip filter in the Product selector.
Configure Forensic search
In Management Client, make sure the metadata device is enabled for the cameras.
Make sure the metadata device is related to the camera:
Go to Devices > Camera and select your device.
Go to the Client tab and make sure that the camera’s metadata device is selected under Related metadata.
Go to Site Navigation > Devices > Metadata.
Select your device and click Record. Make sure Recording is enabled.
By default, metadata is only recorded when the VMS detects motion in a scene. Therefore, we recommend to adjust the motion threshold to your environment so you don’t miss any object movements.
Click Settings and make sure Analytics data is enabled.
Open Smart Client’s live view and make sure that you see bounding boxes over objects and that the boxes display correctly.
It can take a while for the clock to adapt to NTP time.
Wait at least 15 min to let the system record video and metadata. After that, you can start searching, see Perform a search.
Turn on Consolidated metadata to improve the search speed on devices running AXIS OS 11.10 or higher. See Metadata and search.
Perform a search
Before you can use this search function, you need to configure it in Management Client. To learn how to do this, see Configure Forensic search.
In Smart Client, go to Search.
Select a time interval and one or several cameras.
Click Search for > Forensic search > New search. For each search result, you’ll see the object and the object’s travel path in the thumbnail.
The thumbnail shows the video frame when the object was the most visible.
The green point marks the location where the camera first detected the object.
The red point marks the location where the camera last detected the object.
To see the complete video sequence for a search result, select it and click Play forward in the preview panel.
To hide the graphical overlays, go to Bounding boxes and select Hide.
- Note
Analytics applications that run on the camera, for example AXIS Object Analytics and AXIS Loitering Guard, might also burn in overlays in the video. To remove these overlays, go to the application’s web configuration page.
Select search filters to narrow down the number of search results.
To learn more about how to use the different filters, see Fine-tune a search.
Select the search results you want to examine closer. You can for example bookmark them or Create a high quality PDF report.
Fine-tune a search
To narrow down the search results you can use one or several search filters.
Region of interest
Detect objects that have moved in a specific area.
Object direction
Detect objects that have moved along a specific route in a scene: to the left, to the right, downwards, or upwards.
Object type
Detect objects of a certain type: human, vehicle, bike, bus, car or truck.
- Note
- Speed (km/h or mph) and license plate is only supported on AXIS Q1686–DLE Radar-Video Fusion Camera.
- You need to turn on speed (km/h or mph) and license plate before you can use them. To do this, see Configure Axis search categories.
Speed (km/h or mph)
Detect vehicles that move within a certain speed.
License plate
Detect vehicles that have a specific license plate. You can also use it to search for license plates that includes certain alphabets or numbers.
Vehicle color
Detect vehicles of the chosen color.
Upper body clothing color
Detect clothing of the chosen color on a person’s upper body.
Lower body clothing color
Detect clothing of the chosen color on a person’s lower body.
Time-of-day
Detect objects that were detected during a specific part of the day. This filter is useful when you search over several days, but you’re only interested in objects at a specific time of each day, for example during the afternoon.
Minimum time in scene (s)
Detect objects that were detected and tracked for a minimum number of seconds. This filter filters out uninteresting objects, for example objects far away and false objects (lighting effects). The default value is 1 s. This means that when the filter is not set, it excludes objects with a duration less than 1 s.
Swaying objects (% of image)
Exclude objects that only moved in a constraint area, for example a flag or a tree moving in the wind. The default value is 5-100%. This means that when the filter is not set, it excludes objects that did not move more than 5% of the image area.
Limitations
To get the correct video footage for the search results, it’s important to have the correct clock synchronization.
The data analyzed in Forensic search doesn’t take the scene’s perspective into consideration. This means that an object’s size and speed differ depending on how close to the camera the object is.
Weather conditions such as heavy rain or snow may affect the detection accuracy.
If there’s a good contrast of the object in low light scenes, the analytic will become more accurate.
A single object can, under some circumstances, generate multiple results. For example when tracking is lost when an object is temporary obscured by another object.
Overlays may differ depending on XProtect version. For example: overlays in video preview require XProtect 2020 R3 and overlay colors require XProtect 2020 R2.
For Forensic search to work on video streams that have been rotated 180 degrees, you must:
use AXIS OS 10.6 or later on the cameras, or
use Device Pack 11.0 or later on the recording server
The white balance setting in the camera should be accurate in order to get good color detection
Vehicle search
When you use AXIS Optimizer together with certain applications installed on the camera, you can search, identify and share video evidence about vehicles. Vehicle search supports license plate data from these applications:
AXIS License Plate Verifier by Axis Communications
CAMMRA AI by FF Group (Version 1.3 or higher required)
VaxALPR On Camera by Vaxtor Recognition Technologies
VaxALPR On Camera MMC by Vaxtor Recognition Technologies
Which search filters you can use depends on which application you’ve installed on the cameras, see Fine-tune a search
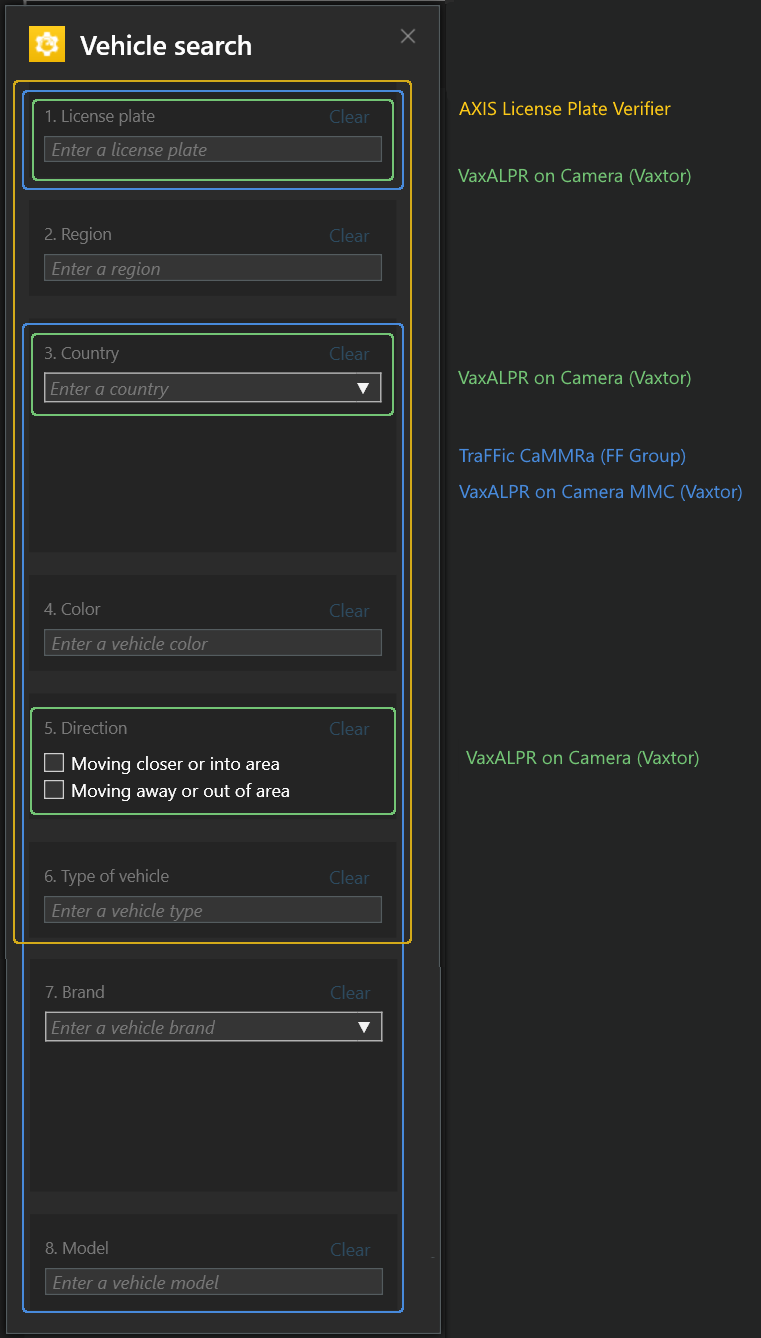
Configure vehicle search
In Management Client, add the camera that runs the chosen application.
Enable all devices that you need. To be able to use AXIS Licence Plate Verifier, Camera 1 and Metadata 1 are required.
Make sure the metadata device is related to the camera:
Go to Devices > Camera and select your device.
Go to the Client tab and make sure that the camera’s metadata device is selected under Related metadata.
Configure metadata:
Go to Site Navigation > Recording Server and find the device.
Select Metadata 1 and click Settings.
Go to Metadata stream > Event data and select Yes.
Go to the Record settings tab and make sure that recording is enabled for metadata.
Click Save.
Configure the application so that it works for a standard user:
Add read and playback rights on the specific camera and user.
Add read and playback rights on the metadata for the specific camera and user.
Search for a vehicle
In Smart Client, go to Search.
Select a time interval and one or several cameras.
Click Search for > Vehicle search > New search.
Select search filters to narrow down the number of search results.
To learn more about the different filters, see Fine-tune a search.
Select the search results you want to examine closer. You can for example bookmark them or Create a high quality PDF report.
Fine-tune a search
To narrow down the search results you can use one or several search filters. Different applications give you different filter options.
License plate
Find a specific license plate number.
Application: AXIS License Plate Verifier, VaxALPR On Camera, CAMMRA AI or VaxALPR On Camera MMC.
Region
Find vehicles from a certain region.
Application: Axis License Plate Verifier 2.9.19.
- Note
Set camera location in Axis License Plate Verifier settings for optimal region recognition.
Country
Find vehicles from a certain country.
Application: Axis License Plate Verifier 2.9.19, VaxALPR On Camera, CAMMRA AI or VaxALPR On Camera MMC.
Color
Find vehicles in a specific color.
Application: Axis License Plate Verifier 2.9.19, CAMMRA AI or VaxALPR On Camera MMC.
Direction
Find vehicles moving in a specific direction.
Application: Axis License Plate Verifier 2.9.19, VaxALPR On Camera, CAMMRA AI or VaxALPR On Camera MMC.
Type of vehicle
Find a specific type of vehicle.
Application: Axis License Plate Verifier 2.9.19, CAMMRA AI or VaxALPR On Camera MMC.
Brand
Find a specific brand of vehicle.
Application: CAMMRA AI or VaxALPR On Camera MMC.
Model
Find a specific model of vehicle.
Application: CAMMRA AI or VaxALPR On Camera MMC.
Optimize search speed
You can improve your search speed by controlling the data your system stores on the VMS metadata device.
Disable analytics data if you don’t need it.
Go to Devices > Metadata and select your device.
Click Settings and disable Analytics data.
If you need analytics data, you can rather use consolidated metadata if it’s available. See Metadata and search.
Disable events you don't need from AXIS License Plate Verifier. You only need the Lost event for AXIS Optimizer to work. See AXIS License Plate Verifier.
Make sure to use AXIS OS 12.8 or later.
Zone speed search
In AXIS Optimizer, you can use Zone speed search to search for speeding vehicles that have been detected when entering a predetermined zone in a camera’s view. Zone speed search works along with the application AXIS Speed monitor to visualize the speed of vehicles in a radar detection zone in the camera's live view. With AXIS Zone speed search, you can set up specific filters to narrow your search, and export and share video evidence during investigations.
Configure Zone speed search
Requirements
- VMS system:
Corporate or Expert 2019 R3 or later
Professional+ or Express+ 2022 R3 or later
- Camera time synchronized with NTP
In Management Client, add the camera that runs the chosen application.
Enable all devices that you need. To be able to use AXIS Zone speed search, Camera 1 and Metadata 1 are required.
Make sure the metadata device is related to the camera:
Go to Devices > Camera and select your device.
Go to the Client tab and make sure that the camera’s metadata device is selected under Related metadata.
To configure metadata:
Go to Site Navigation > Recording Server and find the device.
Select Metadata 1 and click Settings.
Go to Metadata stream > Event data and select Yes.
Go to the Record settings tab and make sure that recording is enabled for metadata.
Click Save.
To configure the application so that it works for a standard user:
Add read and playback rights on the specific camera and user.
Add read and playback rights on the metadata for the specific camera and user.
Search for zone speed events
In Smart Client, go to Search.
Select a time interval and one or several cameras.
Click Search for > Zone speed search > New search.
Select search filters to narrow down the number of search results.
To learn more about the different filters, see Fine-tune a search.
Select the search results you want to examine closer. You can for example bookmark them or Create a high quality PDF report.
Fine-tune a search
To narrow down the search results of the speeding events, you can use one or several search filters.
Max speed
Filter the maximum speed of any object in the zone during the event duration. You can set both a lower and a upper limit for the maximum speed.
Object type
If Vehicle is selected, the search will only show speeding events where the fastest object in the zone was classified as a vehicle.
Zone name
Search and filter zones by name.
Container search
When you use AXIS Optimizer together with certain applications, you can search, identify and share video evidence about containers. Container search supports data from this application:
VaxOCR Containers by Vaxtor Recognition Technologies
Configure Container search
In Management Client, add the camera that runs the chosen application.
Enable all devices that you need.
Make sure the metadata device is related to the camera:
Go to Devices > Camera and select your device.
Go to the Client tab and make sure that the camera’s metadata device is selected under Related metadata.
Configure metadata:
Go to Site Navigation > Recording Server and find the device.
Select Metadata 1 and click Settings.
Go to Metadata stream > Event data and select Yes.
Go to the Record settings tab and make sure that recording is enabled for metadata.
Click Save.
Configure the application so that it works for a standard user:
Add read and playback rights on the specific camera and user.
Add read and playback rights on the metadata for the specific camera and user.
Search for a container
In Smart Client, go to Search.
Select a time interval and one or several cameras.
Click Search for > Container search > New search.
Select search filters to narrow down the number of search results.
To learn more about the different filters, see Fine-tune a search.
Select the search results you want to examine closer. You can for example bookmark them or Create a high quality PDF report.
Fine-tune a search
To narrow down the search results you can use one or several search filters. All filter options come from the application VaxOCR Containers.
Container code
Find a specific container code.
Owner
Find containers belonging to a certain owner.
Owner code
Find containers belonging to a certain owner.
Size
Find containers of a certain size and type.
Size code
Find containers of a certain size and type.
City or country
Find containers from a certain city or country.
Validation
Find containers that have already been validated through their owner code or control digit.
Create a high quality PDF report
Create a report based on your search results. You can use this function to include high resolution images in the result.
In Smart Client, perform a search.
Select the search results you want to include in the report.
Click > Create high quality PDF report.
(Optional) Enter Report name, Report destination and Notes.
For each search result, select which frame you want to include in the report. To enlarge an image, double-click.
Click Create. When the report is ready, you’ll get a notification.
Axis license plates
You can add a separate tab for license plate search and management in Smart Client. This tab centralizes all operator tasks related to license plate management, search, and export based on the information provided by your LPR enabled Axis cameras.
Before you start
Configure Axis license plates
In Management Client, add the camera that runs the chosen application.
Enable all devices that you need. To be able to use AXIS Licence Plate Verifier, Camera 1 and Metadata 1 are required.
Make sure the metadata device is related to the camera:
Go to Devices > Camera and select your device.
Go to the Client tab and make sure that the camera’s metadata device is selected under Related metadata.
Configure metadata:
Go to Site Navigation > Recording Server and find the device.
Select Metadata 1 and click Settings.
Go to Metadata stream > Event data and select Yes.
Go to the Record settings tab and make sure that recording is enabled for metadata.
Click Save.
Search for a license plate
In Smart Client, go to Axis license plates.
If you don’t see the tab, go to Settings > Axis search options and select Show license plate tab.
Click Add camera... and select relevant cameras > Click Close.
You must be an admin to add cameras to the system. When license plates are detected by the camera, they will appear live in the list, including cropped images of the license plates taken by the camera. The search result will not display more than 5000 results.
Enter a license plate and a Time interval to filter the search result.
Enter a custom Time interval between two chosen dates, to filter the search result.
Search for a license plate live
In Smart Client, go to Axis license plates.
If you don’t see the tab, go to Settings > Axis search options and select Show license plate tab.
Click Add camera... and select relevant cameras > Click Close.
You must be an admin to add cameras to the system. When license plates are detected by the camera, they will appear live in the list, including cropped images of the license plates taken by the camera. The search result will not display more than 5000 results.
Enter a license plate and select Time interval > Live to filter the search result.
Fine-tune a search
To narrow down the search results you can use one or several search filters.
Time interval
Filter on search hits within a period of time.
License plate
Filter on partial or complete license plate text.
Cameras
Filter on search hits detected by specific cameras.
Direction
Filter on vehicles moving in a certain direction.
Lists
Filter on search hits at certain sites, and filter on search hits in allow, block, and custom lists. For more information on how to set up lists, see Centrally manage license plate lists.
Optimize search speed
You can improve your search speed by controlling the data your system stores on the VMS metadata device.
Disable analytics data if you don’t need it.
Go to Devices > Metadata and select your device.
Click Settings and disable Analytics data.
If you need analytics data, you can rather use consolidated metadata if it’s available. See Metadata and search.
Disable events you don't need from AXIS License Plate Verifier. You only need the Lost event for AXIS Optimizer to work. See AXIS License Plate Verifier.
Make sure to use AXIS OS 12.8 or later.
Export a license plate search as a PDF report
Use this function to compile your search results of interest as a PDF report with high quality images.
Click Export....
Select PDF....
(Optional) Enter Report name, Report destination, and Notes.
For each search result, select which frame you want to include in the report. To enlarge an image, double-click it.
Click Create. When the report is ready, you’ll get a notification.
Export a license plate search as a CSV report
Use this function to compile large numbers of search results as a CSV report.
Click Export....
Select CSV....
Choose a destination for the file to export to.
Axis insights
Axis insights gives an overview of data from your devices through charts and dashboards. With this, you can view metadata for all your devices. You can view data about detected objects, identified vehicles, and alarms. You can also create new dashboards and share them with other users.
Axis insights is available in default administrator and operator views. The default administrator view in Axis insights is only available for users with administrator rights while the default operator view is available for all operators with appropriate permissions. See Configure Role settings. The operator view provides specific data from selected camera views that you set up while the administrator view provides an overview of the entire system.
Access Axis insights
Go to Smart Client and click Axis insights.
Dashboard: Select a dashboard from the drop-down list.
Camera view: Select a specific camera view for the data overview.
Time range: Select a specific time range.
Auto-update: Turn on to refresh data automatically.
The context menu contains:
Edit dashboard: Edit, share, or remove the dashboard.
Add chart: Create a new chart in the dashboard.
About Axis insights: Read about Axis insights.
The context menu in each chart contains:
Maximize chart: Click to enlarge chart.
Copy as image: Click to copy chart to your clipboard.
Export: Click to export chart as PNG or CSV.
Edit chart: Click to edit chart.
Remove chart: Click to remove chart.
- Note
- You can click the figure in some charts to see additional information.
 : Shows the specific selections that apply to each chart in your dashboard.
Create a new dashboard
Dashboard: Select Add dashboard from the drop-down list.
Click Empty to create a new dashboard or click From existing dashboard to create a dashboard similar to one available in the system.
Name: Enter a name for your dashboard.
Allow other users to view this dashboard: Click to share your dashboard with other users in read-only mode.
Click Apply.
Add chart: Click to add a new chart.
Select chart type: Select the type of chart you want and click Next. You can search for a chart type using tags or chart titles such as video analytics, vehicles, line charts, and so on.
Modify data selections: Select applicable filters under each category.
Adjust appearance: Edit texts and select chart size.
Configure dashboard drop-down list
- By default, you can only see the dashboards you created.
To see dashboards shared by other users in the Dashboard drop-down list:
Go to Shared dashboards.
Turn on the toggle for each shared dashboard you want to add to the drop-down list.
Show insights for a specific camera view
When viewing live and playback video in a camera view, you can open Axis insights with the active camera view pre-selected.
To open Axis insights for a specific camera view:
Go to Smart Client and open a view.
Click Show insights.
Configure Axis insights
Check that the camera supports Axis Object Analytics. See analytics in Axis Product Selector.
Check that the camera’s date and time is set correctly.
Make sure the metadata device is enabled for the cameras in Management Client.
Make sure the metadata device is related to the camera:
Go to Devices > Camera and select your device.
Go to the Client tab and make sure that the camera’s metadata device is selected under Related metadata.
To view all available data in Axis insights, enable scene analysis on your camera using AXIS Scene Metadata:
Go to Devices > Metadata and select your device.
Click Record and make sure Recording is enabled.
Click Settings and make sure Analytics data is enabled.
Turn on Consolidated metadata for faster loading time, if available. See Metadata and search.
To enable data for chart types using AXIS Object Analytics, AXIS Image Health Analytics, or Environmental sensors:
Go to Devices > Metadata and select your device.
Click Record and make sure Recording is enabled.
Click Settings and make sure Event data is enabled.
We recommend that you create a rule in the VMS to always record metadata from this device.
Set permissions for the security groups:
Go to Site Navigation > Security > Roles.
Select a role.
Go to Cameras. Select Read.
Go to Metadata. Select Read, Live, and Playback.
To add license plate metadata to Axis insights, see Configure Axis license plates
Troubleshoot Axis insights
| Problem | Solution |
The charts show "no data". | You need to configure Axis insights. See Configure Axis insights. |
The operator view takes very long time to load. |
|
Video dewarping
Dewarping flattens out and corrects the perspective of a geometric, distorted image caused by a wide-angle or fisheye lens. Axis dewarping in the VMS can be used with any Axis 360° panoramic camera. Dewarping is done either directly in the camera, or in Smart Client.
More details about dewarping:
When you use client-side dewarping, you’ll get smooth dewarping both in live and recorded video.
When you go back to a view, you’ll automatically go to the latest dewarping location.
Dewarping is included when you export videos.
You can save a home position, see Set a home position.
You can configure if operators are allowed to control and edit dewarping views, see Allow operators to control and edit dewarping views.
Create a dewarping view
To optimize the stream for dewarping, select the maximum available resolution for Video stream 1 of Camera 1 in Management Client. For more information, see Performance and troubleshooting.
Open Smart Client and click Setup.
Go to Views.
Click Create new view and select a format.
Go to System overview > AXIS Optimizer.
Click Dewarping view and drag it into the view.
Select a camera and the camera’s current mounting position.
Click Setup.
Go to the new dewarping view and click
 .
.Click Set view type and select one option. Depending on how the camera is mounted, you can select Quad, Normal, Normal with overview or Panorama.
We recommend to use 100 % DPI. If the resolution is other than 100%, Axis dewarping on the second display may not be fully visible.
If you use another DPI settings, the dewarp windows may only be partially visible. Follow the instructions in these external articles to solve this problem:
Create a dewarping view for multisensor panoramic cameras
You can use dewarping views for multisensor panoramic cameras, for example AXIS P3807-PVE Network Camera and AXIS Q3819-PVE Panoramic Camera.
Client-side stitching. If the camera is set to capture mode client dewarp, AXIS Optimizer performs stitching of the four images into one seamless panorama (only AXIS P3807-PVE).
Horizon adjustment. It it possible to adjust the horizon of the panorama. This might be desired if the camera is tilted to the ground and the world horizon is curved. This will also make the virtual PTZ control more intuitive.
PTZ control. Makes it possible to zoom in and move around in the image as if it was a PTZ camera.
Requirements
- Users with one of the following user rights:
Optimizer role
Hardware > Driver commands = Allow
- An Axis multisensor panoramic camera
If applicable, set the capture mode to Client Dewarp during the initial device setup.
Open Smart Client and click Setup.
Go to Views.
Click Create new view and select a format.
Go to System overview > AXIS Optimizer.
Click Dewarping view and drag it into the view.
Select a multisensor panoramic camera.
The first time you add the multisensor panoramic camera to a dewarping view, a horizon calibration window will be displayed above the view.
Click the arrows to make the red line align to the world horizon.
Click Done to save your settings and exit the calibration mode.
Wide view
Wide view is a view type for multisensor panoramic cameras. Turn on wide view if the normal 120° field of view isn’t enough. With wide view, the image will always be dewarped. Turn off wide view to get a transition to normal view when fully zoomed out.
Set a home position
In Smart Client, open a dewarping view.
Go to the position you want to save as home position.
Click
, then Set home position.
Allow operators to control and edit dewarping views
You can configure if operators should be allowed to control and edit dewarping views, see Customize feature access for operators.
Performance and troubleshooting
Performance considerations
Axis video dewarping is performed in the GPU when possible, but the video dewarping will also put load on the CPU.
To prevent the frame rate to drop in a large view with many dewarping views, consider the following:
Camera resolution. A high camera resolution, for example 2880x2880, requires a lot of computer power compared to for example 1920x1920.
Camera frame rate. If you don’t need a high frame rate, a change to a lower frame rate can prevent stuttering in the dewarping view and other views.
Monitor resolution. High resolution monitors, for example 4K, require a lot of resources to show the video. If you don’t need the higher resolution, a lower monitor resolution will make it possible to run more dewarped views without stuttering.
Dynamic resolution
The video stream will be automatically downscaled, if possible, without decreasing video quality. This can improve the performance of the dewarping views.
If you experience a blink when zooming in from overview, it can help to turn off dynamic resolution.
To turn on or off dynamic resolution: in Smart Client, go to Settings > Axis dewarping options > Rendering options and select or clear Dynamic resolution.
Dynamic resolution is enabled by default.
Compatibility rendering
If there is any visual errors in the dewarping image, for example black image, or the performance seems worse than expected, enable compatibility rendering. Note that a negative effect of compatibility rendering is that transitions between views and scrubbing in playback may flicker.
To turn on or off compatibility rendering: open Smart Client and go to Settings > Axis dewarping options > Rendering options and select or clear Use compatibility rendering.
Use compatibility rendering is disabled by default.
What to expect
In a reference system with an Intel i7 8700 NVIDIA Gefore 1050 GTX and three 1920x1080 monitors you can expect that:
7 dewarping views in 1920x1920 resolution and 25fps can be run without frame drops, or
4 dewarping views in 2880x2880 resolution and 25 fps
If one of the three displays runs in 4K resolution instead of 1920x1080 you can expect that:
5 dewarping views in 1920x1920 resolution and 25fps can be run without frame drops, or
3 dewarping views in 2880x2880 resolution and 25 fps. One dewarping view on each monitor.
Frame rate and resolution scales are linear. A computer that can run 5 dewarped views with 30 fps can run 10 views if you reduce the frame rate to 15 fps.
Body worn integration
AXIS Optimizer Body Worn Extension lets in-field camera users record, tag and share video with office-based investigators, who can search for and manage video evidence using the VMS. The service securely enables connection and transfer between Axis body worn system and the VMS. AXIS Body Worn Extension is a free, standalone service you must install on the recording server.
The supported versions are:
- VMS version 2020 R1 Corporate or newer versions
- VMS version 2020 R1 Professional+ or newer versions
- VMS version 2020 R1 Expert or newer versions
Always use the latest VMS hotfixes and cumulative patch installers.
Learn more
To download the service itself or read the integration guide and solution note, go to axis.com.
To read the user manual, go to axis.help.com.
Access control
Access control is a solution that combines physical access control with video surveillance. This integration lets you configure an Axis access control system directly from the Management Client. The system seamlessly integrates with XProtect, allowing operators to monitor access and perform access control actions in the Smart Client.
Requirements
- VMS version 2024 R1 or later.
- XProtect Access licenses, see access licenses.
- Install AXIS Optimizer on the event server and Management Client.
Port 53459 and 53461 will open for incoming traffic (TCP) when you install AXIS Optimizer through AXIS Secure Entry.
To use doors in AXIS Secure Entry, you need to get a license per door, see Activate door licenses.
Access control configuration
Before you start, do the following:
- Upgrade the door controller software. See the table below for minimum and recommended AXIS OS version for your VMS version.
- Make sure the date and time are correct.
| AXIS Optimizer version | Minimum AXIS OS version | Recommended AXIS OS version |
|---|---|---|
| 6.0 | 12..6.94.1 | 12.9.65.3 |
| 5.8 | 12.6.94.1 | 12.8.55.1 |
| 5.6 | 12.6.94.1 | 12.6.94.1 |
Add an Axis network door controller to your system
Go to Site Navigation > AXIS Optimizer > Access control.
Under Configuration, select Devices.
Select Discovered devices to see the list of units you can add to the system.
Select the units you want to add.
Click + Add in the popup window and provide the credentials for the controller.
- You should see added controllers in the Management tab.
- To manually add a controller to the system, click + Add in the Management tab.
- To integrate your update into the VMS whenever you add, remove, or edit a door controller name:
Go to Site Navigation > Access control and click on the Access Control integration.
Click Refresh Configuration in the General settings tab.
Activate door licenses
Before you can add doors, you need to activate the licenses you have in your system.
In Site Navigation, go to License Information.
Click Activate License Manually and select either Online or Offline.
To activate door licenses online:
Enter your username and password.
To activate door licenses offline, see activate licenses offline.
If you need to adjust the number of door licenses to be activated:
Go to AXIS Optimizer > Access control.
Under Configuration, select Devices.
Go to Allocated door licenses > Custom license allocation and enter the number of door licenses you want to use.
Click Apply.
Go to License Information and reactivate your licenses.
Configure access control
Go to Site Navigation > AXIS Optimizer > Access control.
To edit the predefined identification profiles or create a new identification profile, see Identification profiles.
To use a custom setup for card formats and PIN length, see Card formats and PIN.
Add a door and apply an identification profile to the door. See Add a door.
Add a zone and add doors to the zone. See Add a zone.
Device software compatibility for door controllers
Keep in mind the following when you upgrade AXIS OS on your door controller:
- Supported AXIS OS versions: The supported AXIS OS versions listed above only apply when upgrading from their original recommended VMS version and when the system has a door. If the system doesn't meet these conditions, you must upgrade to the recommended AXIS OS version for the specific VMS version.
- Minimum supported AXIS OS version: The oldest installed AXIS OS version in the system determines the minimum supported AXIS OS version, with a limit of two prior versions.
- Upgrading beyond recommended AXIS OS version: Suppose you upgrade to an AXIS OS version above the recommended one for a particular VMS version. Then, you can always downgrade back to the recommended AXIS OS version without any issues, as long as it's within the support limits set for the VMS version.
- Future AXIS OS recommendations: Always follow the recommended AXIS OS version for the respective VMS version to ensure system stability and full compatibility.
Access control integration
To integrate access control into the VMS:
Go to Site Navigation > Access Control.
Right-click Access Control and click Create new....
In the Create Access Control System Integration dialog:
Enter a name for the integration.
Select AXIS Secure Entry from the drop-down menu in Integration plug-in.
Click Next until you see the Associate cameras dialog.
To associate cameras to door access points:
Click your device under Cameras to see the lists of cameras configured in the XProtect system.
Select and drag a camera to the access point you want to associate it with.
Click Close to close the dialog.
- For more information about access control integration in XProtect, see Using access control in XProtect Smart Client.
- For more information about access control properties, such as general settings, doors and associated cameras, access control events, and so on, see Access control properties.
Doors and zones
Go to Site Navigation > AXIS Optimizer > Access control > Doors and zones to get an overview and configure doors and zones.
Pin chart | View the controller pin chart associated with a door. If you want to print the pin chart, click Print. |
Identification profile | Change identification profile on doors. |
Secure Channel | Turn on or off OSDP Secure Channel for a specific reader. |
| Doors | ||||||
| Name | The name of the door. | |||||
| Door controller | The door controller connected to the door. | |||||
| Side A | The zone that side A of the door is in. | |||||
| Side B | The zone that side B of the door is in. | |||||
| Identification profile | The identification profile applied to the door. | |||||
| Card formats and PIN | Shows the type of card formats or PIN length. | |||||
| Status | The status of the door.
| |||||
| Zones | ||||||
| Name | The name of the zone. | |||||
| Number of doors | The number of doors included in the zone. | |||||
Example of doors and zones
There are two zones: green zone and blue zone.
There are three doors: green door, blue door, and brown door.
The green door is an internal door in the green zone.
The blue door is a perimeter door for the blue zone only.
The brown door is a perimeter door for both the green zone and blue zone.
Add a door
- You can configure a door controller with one door that has two locks, or two doors that have one lock each.
- If a door controller has no doors and you're using a new version of Axis Optimizer with older software on the door controller, the system will prevent you from adding a door. However, the system does allow new doors on system controllers with older software if there's already an existing door.
Create a new door configuration to add a door:
Go to Site Navigation > AXIS Optimizer > Access control > Doors and zones.
Click
 Add door.
Enter a door name.
In the Controller drop-down menu, select a door controller. The controller grays out when you can’t add another door, when it’s offline, or HTTPS isn’t active.
In the Door type drop-down menu, select the type of door you want to create.
Click Next to go to the door configuration page.
In the Primary lock drop-down menu, select a relay port.
To configure two locks on the door, select a relay port from the Secondary lock drop-down menu.
Select an identification profile. See Identification profiles.
Configure the door settings. See Door settings.
Set up a monitoring door. See Add a monitoring door.
Click Save.
Copy an existing door configuration to add a door:
Go to Site Navigation > AXIS Optimizer > Access control > Doors and zones.
Click
Add door.Enter a door name.
In the Controller drop-down menu, select a door controller.
Click Next.
In the Copy configuration drop-down menu, select an existing door configuration. It shows the connected doors, and the controller grays out if it was configured with two doors or one door with two locks.
Change the settings if you want.
Click Save.
To edit a door:
Go to Site Navigation > AXIS Optimizer> Access control > Doors and zones > Doors.
Select a door in the list.
Click
 Edit.
Edit.Change the settings and click Save.
To remove a door:
Go to Site Navigation > AXIS Optimizer> Access control > Doors and zones > Doors.
Select a door in the list.
Click
 Remove.
Click Yes.
To integrate your update into the VMS whenever you add, remove, or edit a door name:
Go to Site Navigation > Access control and click on the Access Control integration.
Click Refresh Configuration in the General settings tab.
Door settings
Go to Site Navigation > AXIS Optimizer> Access control > Doors and zones.
Select the door you want to edit.
Click
Edit.
Access time (sec) | Set the number of seconds the door remains unlocked after access was granted. The door remains unlocked until the door opens or until the set time ends. The door locks when it closes even if there is access time left. |
Open-too-long time (sec) | Only valid if you have configured a door monitor. Set the number of seconds the door stays open. If the door is open when the set time ends, it triggers the door open too long alarm. Set up an action rule to configure which action the open too long event triggers. |
Long access time (sec) | Set the number of seconds the door remains unlocked after access was granted. Long access time overrides the access time for cardholders that has this setting turned on. |
Long open-too-long time (sec) | Only valid if you have configured a door monitor. Set the number of seconds the door stays open. If the door is open when the set time ends, it triggers the door open-too-long event. Long open-too-long time overrides the already set open-too-long time for cardholders if you turn on the Long access time setting. |
Relock delay time (ms) | Set the time, in milliseconds, that the door stays unlocked after the it’s opened or closed. |
Relock |
|
Door security level
You can add the following security features to the door:
- Two-person rule
- The two-person rule requires two people to use a valid credential to gain access.
- Double-swipe
- The double-swipe allows a cardholder override the current state of a door. For example, they can use it to lock or unlock a door outside the regular schedule, which is more convenient than going into the system to unlock the door. Double-swipe does not affect an existing schedule. For example, if a door is scheduled to lock at closing time, and employee leaves for lunch break, the door will still lock according to the schedule.
You can configure the security level while you’re adding a new door, or you can do it on an existing door.
To add Two-person rule to an existing door:
Go to Site Navigation > AXIS Optimizer > Access control > Doors and zones.
Select the door you want to configure a security level for.
Click Edit.
Click Security level.
Turn on Two-person rule.
Click Apply.
| Two-person rule | |
| Side A and Side B | Select which sides of the door to use the rule on. |
| Schedules | Select when the rule is active. |
| Timeout (seconds) | Timeout is the maximum allowed time between card swipes or other type of valid credential. |
To add Double-swipe to an existing door:
Go to Site Navigation > AXIS Optimizer > Access control > Doors and zones.
Select the door you want to configure a security level for.
Click Edit.
Click Security level.
Turn on Double-swipe.
Click Apply.
Apply Double-swipe to a cardholder.
Go to Cardholder management.
Click
 on the cardholder you want to edit and click Edit.
Click More.
Select Allow double-swipe.
Click Apply.
| Double-swipe | |||||||
| Timeout (seconds) | Timeout is the maximum allowed time between card swipes or other type of valid credential. | ||||||
Time options
- Access granted - lock unlocks
- Access time
- No action taken - lock locks
- Action taken (door opened) - lock locks or stays unlocked until door closes
- Open-too-long time
- Open-too-long alarm goes off
- Access granted - lock unlocks
- Access time
- 2+3: Long access time
- No action taken - lock locks
- Action taken (door opened) - lock locks or stays unlocked until door closes
- Open-too-long time
- 6+7: Long open-too-long time
- Open-too-long alarm goes off
Add a door monitor
A door monitor is a door position switch that monitors the physical state of a door. You can add a door monitor to your door and configure how to connect the door monitor.
Go to the door configuration page. See Add a door
Under Sensors, click Add.
Select Door monitor sensor.
Select the I/O port you want to connect the door monitor to.
Under Door open if, select how the door monitor circuits are connected.
To ignore the state changes of the digital input before it enters a new stable state, set a Debounce time.
To trigger an event when an interruption in the connection between the door controller and the door monitor occurs, turn on Supervised input. See Supervised inputs.
| Door open if | |
Circuit is open | The door monitor circuit is normally closed. The door monitor sends the door an open signal when the circuit is open. The door monitor sends the door a closed signal when the circuit is closed. |
Circuit is closed | The door monitor circuit is normally open. The door monitor sends the door an open signal when the circuit is closed. The door monitor sends the door a closed signal when the circuit is open. |
Add a monitoring door
A monitoring door is a door type that can show you if it’s open or closed. For example, you can use this on a fire safety door that doesn’t require a lock but where you need to know if the door is open.
A monitoring door is different from a regular door with a door monitor. A regular door with a door monitor supports locks and readers but requires a door controller. A monitoring door supports one door position sensor but only requires a network I/O relay module connected to a door controller. You can connect up to five door position sensors to one network I/O relay module.
A monitoring door requires an AXIS A9210 Network I/O Relay Module with the latest software including the AXIS Monitoring Door ACAP application.
To set up a monitoring door:
Install your AXIS A9210 and upgrade it with the latest version of AXIS OS.
Install the door position sensors.
In the VMS, go to Site Navigation > AXIS Optimizer > Access control > Doors and zones.
Click Add door.
Enter a name.
Under Type, select Monitoring door.
Under Device, select your network I/O relay module.
Click Next.
Under Sensors, click + Add and select Door position sensor.
Select the I/O that's connected to the door position sensor.
Click Add.
Add a reader
You can configure a door controller to use two wired readers. Select to add a reader on one side or both sides of a door.
If you apply a custom setup of card formats or PIN length to a reader, you can see it in Card formats under Configuration > Access control > Doors and zones. See Doors and zones.
Go to the door configuration page. See Add a door.
Under one side of the door, click Add.
Select Card reader.
Select the Reader type.
To use a custom PIN length setup for this reader.
Click Advanced.
Turn on Custom PIN length.
Set the Min PIN length, Max PIN length, and End of PIN character.
To use a custom card format for this reader.
Click Advanced.
Turn on Custom card formats.
Select the card formats you want to use for the reader. If a card format with the same bit length is already in use, you must deactivate it first. A warning icon displays in the client when the card format setup is different from the configured system setup.
Click Add.
To add a reader to the other side of the door, do this procedure again.
| Reader type | |
OSDP RS485 half duplex | For RS485 readers, select OSDP RS485 half duplex and a reader port. |
Wiegand | For readers that use Wiegand protocols, select Wiegand and a reader port. |
| Wiegand | |||||
LED control | Select Single wire or Dual wire (R/G). Readers with dual LED control use different wires for the red and green LEDs. | ||||
Tamper alert | Select when the reader tamper input is active.
| ||||
Tamper debounce time | To ignore the state changes of the reader tamper input before it enters a new stable state, set a Tamper debounce time. | ||||
Supervised input | Turn on to trigger an event when there is interruption in the connection between the door controller and the reader. See Supervised inputs. | ||||
Add a REX device
You can select to add a request to exit (REX) device on one side or both sides of the door. A REX device can be a PIR sensor, REX button, or push bar.
Go to the door configuration page. See Add a door.
Under one side of the door, click Add.
Select REX device.
Select the I/O port that you want to connect the REX device to. If there is only one port available, it will be selected automatically.
Select what Action to trigger when the door receives the REX signal.
Under REX active, select the door monitor circuit connection.
To ignore the state changes of the digital input before it enters a new stable state, set a Debounce time (ms).
To trigger an event when an interruption in the connection between the door controller and the REX device occurs, turn on Supervised input. See Supervised inputs.
| Action | |
Unlock door | Select to unlock the door when it receives the REX signal. |
None | Select if you don’t want to trigger any action when the door receives the REX signal. |
| REX active | |||||
Circuit is open | Select if the REX circuit is normally closed. The REX device sends the signal when the circuit is open. | ||||
Circuit is closed | Select if the REX circuit is normally open. The REX device sends the signal when the circuit is closed. | ||||
Add a zone
A zone is a specific physical area with a group of doors. You can create zones and add doors to the zones. There are two types of doors:
Perimeter door: Cardholders enter or leave the zone through this door.
Internal door: An internal door within the zone.
- Note
A perimeter door can belong to two zones. An internal door can only belong to one zone.
Go to Site Navigation > AXIS Optimizer > Access control > Doors and zones > Zones.
Click
Add zone.Enter a zone name.
Click Add door.
Select the doors you want to add to the zone, and click Add.
The door is set as a perimeter door by default. To change it, select Internal door from the drop-down menu.
A perimeter door uses door side A as entrance to the zone by default. To change it, select Leave from the drop-down menu.
To remove a door from the zone, select it and click Remove.
Click Save.
To edit a zone:
Go to Site Navigation > AXIS Optimizer > Access control > Doors and zones > Zones.
Select a zone in the list.
Click
Edit.Change the settings and click Save.
To remove a zone:
Go to Site Navigation > AXIS Optimizer > Access control > Doors and zones > Zones.
Select a zone in the list.
Click
Remove.Click Yes.
Zone security level
You can add the following security feature to a zone:
- Anti-passback
- Prevents people from using the same credentials as someone who entered an area before them. It enforces that a person must first exit the area before they can use their credentials again.
- With anti-passback, all doors in the zone must have door position sensors so the system can register that a user opened the door after swiping their card.
- If a door controller goes offline, anti-passback works as long as all doors in the zone belong to the same door controller. However, if the doors in the zone belong to different door controllers that go offline, anti-passback stops working.
You can configure the security level while you add a new zone, or you can do it on an existing zone. To add a security level to an existing zone:
Go to Site Navigation > AXIS Optimizer > Access control > Doors and zones.
Select the zone you want to configure a security level for.
Click Edit.
Click Security level.
Turn on the security features you want to add to the door.
Click Apply.
| Anti-passback | |
| Log violation only (Soft) | Use this if you want to allow a second person to enter the door using the same credentials as the first person. This option only results in a system alarm. |
| Deny access (Hard) | Use this if you want to prevent the second user from entering the door if they’re using the same credentials as the first person. This option also results in a system alarm. |
| Timeout (seconds) | The amount of time until the system allows a user to re-enter. Enter 0 if you don’t want timeout, meaning that the zone has anti-passback until the user leaves the zone. Only use 0 timeout with Deny access (Hard) if all doors in the zone have readers on both sides. |
Supervised inputs
Supervised inputs can trigger an event when there is interruption in the connection to a door controller.
Connection between the door controller and the door monitor. See Add a door monitor.
Connection between the door controller and the reader that uses Wiegand protocols. See Add a reader.
Connection between the door controller and the REX device. See Add a REX device.
To use supervised inputs:
Install end of line resistors as close to the peripheral device as possible according to the connection diagram.
Go to the configuration page of a reader, door monitor, or REX device, turn on Supervised input.
If you followed the parallel first connection diagram, select Parallel first connection with a 22 KΩ parallel resistor and a 4.7 KΩ serial resistor.
If you followed the serial first connection diagram, select Serial first connection, and select a resistor value from the Resistor values drop-down menu.
Connection diagrams
Parallel first connection
The resistor values must be 4.7 kΩ and 22 kΩ.
Serial first connection
The resistor values must be the same and within range 1-10 kΩ.
Manual actions
You can perform the following manual actions on doors and zones:
- Reset
- Returns to the configured system rules.
- Grant access
- Unlocks a door or zone for 7 seconds and then locks it again.
- Unlock
- Keeps the door unlocked until you Reset.
- Lock
- Keeps the door locked until the system grants a cardholder access.
- Lockdown
- No one gets in or out until you reset or unlock.
To perform a manual action:
Go to Site Navigation > AXIS Optimizer > Access control > Doors and zones.
Select the door or zone you want to perform a manual action on.
Click any of the manual actions.
The door will stay in the manual action status, also known as manual override mode, until you reset it back to its regular schedule.
Card formats and PIN
A card format defines how a card stores data. It’s a translation table between the incoming data and the validated data in the system. Each card format has a different set of rules for how to organize the stored information. By defining a card format, you tell the system how to interpret the information that the controller gets from the card reader.
There are predefined commonly used card formats available for you to use as they are or edit as required. You can also create custom card formats.
Go to Site Navigation > AXIS Optimizer > Access control > Card formats and PIN to create, edit, or activate card formats. You can also configure PIN.
The custom card formats can contain the following data fields used for credential validation.
- Card number
- A subset of the credential binary data encoded as decimal or hexadecimal numbers. Use the card number to identify a specific card or cardholder.
- Facility code
- A subset of the credential binary data encoded as decimal or hexadecimal numbers. Use the facility code to identify a specific end customer or site.
To create a card format:
Go to Site Navigation > AXIS Optimizer > Access control > Card formats and PIN.
Click Add card format.
Enter a card format name.
In the Bit length field, type a bit length between 1 and 256.
Select Invert bit order if you want to invert the bit order of the data received from the card reader.
Select Invert byte order if you want to invert the byte order of the data received from the card reader. This option is only available when you specify a bit length that you can divide by eight.
Select and configure the data fields to be active in the card format. Either Card number or Facility code must be active in the card format.
Click OK.
To activate the card format, select the checkbox in front of the card format name.
- Two card formats with the same bit length can’t be active at the same time. For example, if you have defined two 32-bit card formats, only one of these can be active. Deactivate the card format to active the other.
- You can only activate and deactivate card formats if the door controller has been configured with at least one reader.
Click to see an example of the output after inverting bit order. | |
Range | Set the bit range of the data for the data field. The range must be within what you have specified for Bit length. |
Output format | Select the output format of the data for the data field. Decimal: Also known as base-10 positional numeral system, consists of the numbers 0–9. Hexadecimal: also known as base-16 positional numeral system, consists of 16 unique symbols: the numbers 0–9 and the letters a–f. |
Bit order of subrange | Select the bit order. Little endian: The first bit is the smallest (least significant). Big endian: The first bit is the biggest (most significant). |
To edit a card format:
Go to Site Navigation > AXIS Optimizer > Access control > Card formats and PIN.
Select a card format and click
.If you edit a predefined card format, you can only edit Invert bit order and Invert byte order.
Click OK.
You can only remove the custom card formats. To remove a custom card format:
Go to Site Navigation > AXIS Optimizer > Access control > Card formats and PIN.
Select a custom card format, click
and Yes.
To reset a predefined card format:
Go to Site Navigation > AXIS Optimizer > Access control > Card formats and PIN.
Click
 to reset a card format to the default field map.
To configure PIN length:
Go to Site Navigation > AXIS Optimizer > Access control > Card formats and PIN.
Under PIN configuration, click
.Specify Min PIN length, Max PIN length, and End of PIN character.
Click OK.
Card format settings
Overview
The card number in decimal is
64332.One reader transfers the card number to hexadecimal number
FB4C. The other reader transfers it to hexadecimal number4CFB.AXIS A1610 Network Door Controller receives
FB4Cand transfers it to decimal number64332according to the card format settings on the reader.AXIS A1610 Network Door Controller receives
4CFB, changes it toFB4Cby inverting byte order, and transfers it to decimal number64332according to the card format settings on the reader.
Invert bit order
After inverting bit order, the card data received from the reader is read from right to left bit by bit.
Invert byte order
A group of eight bits is a byte. After inverting byte order, the card data received from the reader is read from right to left byte by byte.
26-bit standard Wiegand card format
- Leading parity
- Facility code
- Card number
- Trailing parity
Identification profiles
An identification profile is a combination of identification types and schedules. You can apply an identification profile to one, or more, doors to set how and when a cardholder can access a door.
Identification types are carriers of the credential information necessary to access a door. Common identification types are tokens, personal identification numbers (PINs), fingerprints, facial maps, and REX devices. An identification type can carry one or more types of information.
Schedules, also known as Time profiles, are created in Management Client. To set up time profiles, see Time profiles (explained).
Supported identification types: Card, PIN, and REX.
Go to Site Navigation > AXIS Optimizer > Access control > Identification profiles.
There are five default identification profiles available for you to use as they are or edit as required.
- Card
- Cardholders must swipe the card to access the door.
- Card and PIN
- Cardholders must swipe the card and enter the PIN to access the door.
- PIN
- Cardholders must enter the PIN to access the door.
- Card or PIN
- Cardholders must swipe the card or enter the PIN to access the door.
- License plate
- Cardholders must drive towards the camera in a vehicle with an approved license plate.
To create an identification profile:
Go to Site Navigation > AXIS Optimizer > Access control > Identification profiles.
Click Create identification profile.
Enter an identification profile name.
Select Include facility code for card validation to use facility code as one of the credential validation fields. This field is only available if you turn on Facility code under Access management > Settings.
Configure the identification profile for one side of the door.
On the other side of the door, do the previous steps again.
Click OK.
To edit an identification profile:
Go to Site Navigation > AXIS Optimizer > Access control > Identification profiles.
Select an identification profile and click
.To change the identification profile name, enter a new name.
Do your edits to the side of the door.
To edit the identification profile on the other side of the door, do the previous steps again.
Click OK.
To remove an identification profile:
Go to Site Navigation > AXIS Optimizer > Access control > Identification profiles.
Select an identification profile and click
.If the identification profile is used on a door, select another identification profile for the door.
Click OK.
| Edit identification profile | |
To remove an identification type and the related schedule. | |
Identification type | To change an identification type, select one, or more, types from the Identification type drop-down menu. |
Schedule | To change a schedule, select one, or more, schedules from the Schedule drop-down menu. |
| Add an identification type and the related schedule, click Add and set the identification types and schedules. |
Encrypted communication
OSDP Secure Channel
Secure Entry supports OSDP (Open Supervised Device Protocol) Secure Channel to active line encryption between controller and Axis readers.
To turn on OSDP Secure Channel for an entire system:
Go to Site Navigation > AXIS Optimizer > Access control > Encrypted communication.
Enter your main encryption key and click OK.
Turn on OSDP Secure Channel. This option is only available after you enter the main encryption key.
By default, the main encryption key generates a OSDP Secure Channel key. To manually set the OSDP Secure Channel key:
Under OSDP Secure Channel, click
.Clear Use main encryption key to generate OSDP Secure Channel key.
Enter the OSDP Secure Channel key and click OK.
To turn on or turn off OSDP Secure Channel for a specific reader, see Doors and zones.
Multi server BETA
The connected sub servers can, with multi-server, use the global cardholders and cardholder groups from the main server.
- One system can support up to 64 sub servers.
- It requires that the main server and sub servers are on the same network.
- On main server and sub servers, make sure to configure Windows Firewall to allow incoming TCP connections on the Secure Entry port. The default port is 53461.
Workflow
Configure a server as a sub server and generate the configuration file. See Generate the configuration file from the sub server.
Configure a server as a main server and import the configuration file of the sub servers. See Import the configuration file to the main server.
Configure global cardholders and cardholder groups on the main server. See Add a cardholder and Add a group.
View and monitor global cardholders and cardholder groups from the sub server. See Access management.
Generate the configuration file from the sub server
From the sub server, go to AXIS Optimizer > Access control > Multi server.
Click Sub server.
Click Generate. It generates a configuration file in .json format.
Click Download and choose a location to save the file.
Import the configuration file to the main server
From the main server, go to AXIS Optimizer > Access control > Multi server.
Click Main server.
Click
Add and go to the configuration file generated from the sub server.Enter the server name, IP address, and port number of the sub server.
Click Import to add the sub server.
The status of the sub server shows
Connected.
Revoke a sub server
You can only revoke a sub server before you import its configuration file to a main server.
From the main server, go to AXIS Optimizer > Access control > Multi server.
Click Sub server and click Revoke server.
Now you can configure this server as a main server or sub server.
Remove a sub server
After you import the configuration file of a sub server, it connects the sub server to the main server.
To remove a sub server:
From the main server:
Go to Access management > Dashboard.
Change the global cardholders and groups to local cardholders and groups.
Go to AXIS Optimizer > Access control > Multi server.
Click Main server to show the sub server list.
Select the sub server and click Delete.
From the sub server:
Go to AXIS Optimizer > Access control > Multi server.
Click Sub server and Revoke server.
Access management
The Access management tab allows you to configure and manage the system’s cardholders, groups, and access rules.
Workflow of access management
The access management structure is flexible, which allows you to develop a workflow that suits your needs. The following is a workflow example:
Add groups. See Add a group.
Add cardholders. See Add a cardholder.
Add cardholders to groups.
Add access rules. See Add an access rule.
Apply groups to access rules.
Apply zones to access rules.
Apply doors to access rules.
Add a cardholder
A cardholder is a person with a unique ID registered in the system. Configure a cardholder with credentials that identifies the person and when and how to grant the person access to doors.
Go to Site Navigation > AXIS Optimizer > Access control > Cardholder management.
Go to Cardholders and click + Add.
Enter the first and last name of the cardholder and click Next.
Optionally, click Advanced and select any options.
Add a credential to the cardholder. See Add credentials
Click Save.
Add the cardholder to a group.
Under Groups, select the group you want to add the cardholder to and click Edit.
Click + Add and select the cardholder you want to add to the group. You can select multiple cardholders.
Click Add.
Click Save.
| Advanced | |
|---|---|
Long access time | Select to let the cardholder to have long access time and long open-too-long time when there is an installed door monitor. |
Suspend cardholder | Select to suspend the cardholder. |
Allow double swipe | Select to allow a cardholder to override the current state of a door. For example, they can use it to unlock a door outside the regular schedule. |
Exempt from lockdown | Select to let the cardholder to have access during lockdown. |
Exempt from anti-passback | Select to give a cardholder an exemption from the anti-passback rule. Anti-passback prevents people from using the same credentials as someone who entered an area before them. The first person must first exit the area before their credentials can be used again. |
Global cardholder | Select to make it possible to view and monitor the cardholder on the sub servers. This option is only available for cardholders created on the main server. See . |
Add credentials
You can add the following types of credentials to a cardholder:
PIN
Card
License plate
Mobile phone
To add a license plate credential to a cardholder:
Under Credentials, click + Add and select License plate.
Enter a credential name that describes the vehicle.
Enter the license plate number for the vehicle.
Set the start and end date for the credential.
Click Add.
See example in Use license plate number as a credential.
To add a PIN credential to a cardholder:
Under Credentials, click + Add and select PIN.
Enter a PIN.
To use a duress PIN to trigger a silent alarm, turn on Duress PIN and enter a duress PIN.
Click Add.
A PIN credential is always valid. You can also configure a duress PIN that opens the door and triggers a silent alarm in the system.
To add a card credential to a cardholder:
Under Credentials, click + Add and select Card.
To manually enter the card data, enter a card name, card number, and bit length.
- Note
Bit length is configurable only when you create a card format with a specific bit length that’s not in the system.
To automatically get the card data of the last swiped card:
Select a door from the Select reader drop-down menu.
Swipe the card on the reader connected to that door.
Click Get last swiped card data from the door’s reader(s).
Enter a facility code. This field is only available If you have enabled Facility code under Access management > Settings.
Set the start and end date for the credential.
Click Add.
| Expiration date | |
|---|---|
Valid from | Set a date and time for when the credential should be valid. |
Valid to | Select an option from the drop-down menu. |
| Valid to | |
|---|---|
No end date | The credential never expires. |
Date | Set a date and time when the credential expires. |
From first use | Select how long after the first use the credential expires. Select days, months, years, or number of times after the first use. |
From last use | Select how long after the last use the credential expire. Select days, months, or years after the last use. |
Use license plate number as a credential
This example shows you how to use a door controller, a camera with AXIS License Plate Verifier, and a vehicle’s license plate number as credentials to grant access.
Add the door controller and the camera to AXIS Optimizer.
Set date and time for the new devices with Synchronize with server computer time.
Upgrade the software on the new devices to the latest available version.
Add a new door connected to your door controller. See Add a door.
Add a reader on Side A. See Add a reader.
Under Door settings, select AXIS License Plate Verifier as Reader type and enter a name for the reader.
Optionally, add a reader or REX device on Side B.
Click Ok.
Install and activate AXIS License Plate Verifier on your camera. See the AXIS License Plate Verifier user manual.
Start AXIS License Plate Verifier.
Configure AXIS License Plate Verifier.
Go to Configuration > Access control > Encrypted communication.
Under External Peripheral Authentication Key, click Show authentication key and Copy key.
Open AXIS License Plate Verifier from the camera’s web interface.
Don’t do the setup.
Go to Settings.
Under Access control, select Secure Entry as Type.
In IP address, enter the IP address for the door controller.
In Authentication key, paste the Authentication key that you copied earlier.
Click Connect.
Under Door controller name, select your door controller.
Under Reader name, select the reader you added earlier.
Turn on integration.
Add the cardholder that you want to give access to. See Add a cardholder.
Add license plate credentials to the new cardholder. See Add credentials.
Add an access rule. See Add an access rule.
Add a schedule.
Add the cardholder that you want to give license plate access to.
Add the door with the AXIS License Plate Verifier reader.
Add a group
Groups allow you to manage cardholders and their access rules collectively and efficiently.
Go to Site Navigation > AXIS Optimizer > Access control > Cardholder management.
Go to Groups and click + Add.
Enter a name and optionally initials for the group.
Select Global group to make it possible to view and monitor the cardholder on the sub servers. This option is only available for cardholders created on the main server. See Multi server BETA.
Add cardholders to the group:
Click + Add.
Select the cardholders you want to add and click Add.
Click Save.
Add an access rule
An access rule defines the conditions that must be met to grant access.
An access rule consists of:
- Cardholders and cardholder groups
- who to grant access.
- Doors and zones
- where the access applies.
- Schedules
- when to grant access.
To add an access rule:
Go to Access control > Cardholder management.
Under Access rules, click + Add.
Enter a name for the access rule and click Next.
Configure the cardholders and groups:
Under Cardholders or Groups, click + Add.
Select the cardholders or groups and click Add.
Configure the doors and zones:
Under Doors or Zones, click + Add.
Select the doors or zones and click Add.
Configure the schedules:
Under Schedules, click + Add.
Select one or more schedules and click Add.
Click Save.
An access rule that’s missing one or more of the components described above is incomplete. You can view all incomplete access rules in the Incomplete tab.
Manually unlock doors and zones
For information about manual actions, like manually unlocking a door, see Manual actions.
For information about manual actions, like manually unlocking a zone, see Manual actions.
Export system configuration reports
You can export reports that contain different types of information about the system. AXIS Optimizer exports the report as a comma-separated value (CSV) file and saves it in the default download folder. To export a report:
Go to Reports > System configuration.
Select the reports you want to export and click Download.
Cardholders details | Includes information about the cardholders, credentials, card validation, and last transaction. |
Cardholders access | Includes the cardholder information and information about the cardholder groups, access rules, doors, and zones related to the cardholder. |
Cardholders group access | Includes the cardholder group name and information about the cardholders, access rules, doors, and zones related to the cardholder group. |
Access rule | Includes the access rule name and information about the cardholders, cardholder groups, doors, and zones related to the access rule. |
Door access | Includes the door name and information about the cardholders, cardholder groups, access rules, and zones related to the door. |
Zone access | Includes the zone name and information about the cardholders, cardholder groups, access rules, and doors related to the zone. |
Create cardholder activity reports
A roll call report lists cardholders within a specified zone, helping identify who's present at a given moment.
A mustering report lists cardholders within a specified zone, helping identify who's safe and missing during emergencies. It assists building managers in locating staff and visitors after evacuations. A muster point is a designated reader where personnel report during emergencies, generating a report of people on and off-site. The system marks cardholders as missing until they check in at a muster point or until someone manually marks them as safe.
Both roll call and mustering reports require zones to track cardholders.
To create and run a roll call or mustering report:
Go to Reports > Cardholder activity.
Click + Add and select Roll call / Mustering.
Enter a name for the report.
Select which zones to include in the report.
Select any groups you want to include in the report.
If you want a mustering report, select Mustering point and a reader for the mustering point.
Select a time frame for the report.
Click Save.
Select the report and click Run.
| Roll call report status | Description |
|---|---|
| Present | The cardholder entered the specified zone and did not exit before you ran the report. |
| Not present | The cardholder exited the specified zone and did not enter again before you ran the report. |
| Mustering report status | Description |
|---|---|
| Safe | The cardholder swiped their card at the mustering point. |
| Missing | The cardholder didn’t swipe their card at the mustering point. |
Access management settings
To customize the cardholder fields used in the access management dashboard:
On the Access management tab, click Settings > Custom cardholder fields.
Click + Add and enter a name. You can add up to 6 custom fields.
Click Add.
To use facility code to verify your access control system:
On the Access management tab, click Settings > Facility code.
Select Facility code on.
- Note
You must also select Include facility code for card validation when you configure identification profiles. See .
Import and export
Import cardholders
This option imports cardholders, cardholder groups, credentials, and cardholder photos from a CSV file. To import cardholder photos, make sure that the server has access to the photos.
When you import cardholders the access management system automatically saves the system configuration, including all hardware configuration, and deletes any previously saved one.
| Import options | |
|---|---|
New | This option removes existing cardholders and adds new cardholders. |
Update | This option updates the existing cardholders and adds new cardholders. |
Add | This option keeps existing cardholders and adds new cardholders. Card numbers and cardholder IDs are unique and can only be used once. |
On the Access management tab, click Import and export.
Click Import cardholders.
Select New, Update, or Add .
Click Next.
Click Choose a file and go to the CSV file. Click Open.
Enter a column delimiter and select a unique identifier and click Next.
Assign a heading to each column.
Click Import.
| Import settings | |
|---|---|
First row is header | Select if the CSV file contains a column header. |
Column delimiter | Enter a column delimiter format for the CSV file. |
Unique identifier | The system uses Cardholder ID to identify a cardholder by default. You can also use first and last name, or the email address. The Unique identifier prevents the import of duplicate personnel records. |
Card number format | Allow both hexadecimal and number is selected by default. |
Export cardholders
This option exports the cardholder data in the system to a CSV file.
On the Access management tab, click Import and export.
Click Export cardholders.
Choose a download location and click Save.
AXIS Optimizer updates cardholder photos in C:\ProgramData\Axis Communications\AXIS Camera Station\Components\AXIS Secure Entry\Cardholder photos whenever the configuration changes.
Undo import
The system automatically saves its configuration when you import cardholders. The Undo import option resets the cardholder data and all hardware configuration to the state before the last cardholder import.
On the Access management tab, click Import and export.
Click Undo import.
Click Yes.
Backup and restore
Automatic backups are performed every night. The three latest backup files are stored in C:\ProgramData\Axis Communications\AXIS Optimizer Secure Entry\backup
. To restore these files:
Move the backup file to
C:\ProgramData\Axis Communications\AXIS Optimizer Secure Entry\restore
.Restart AXIS Secure Entry by using one of these methods:
Start the MSC (Services) program, find 'AXIS Optimizer Secure Entry Service', and restart.
Restart your computer.
Re-run the AXIS Optimizer installer on the event server machine.
Access management in Smart Client
Through Smart Client, operators can perform operations related to your access control system. Most functions in access control, such as manual door control, are available in Smart Client. For more information about these features, see Using access control in Smart Client.
You can also manage access directly in Smart Client. The following features that are in Management Client are also available in Smart Client:
Cardholder management
General settings
Custom cardholder fields
Facility code
Email templates
Badge templates BETA
To show the Axis access management tab in Smart Client:
Install AXIS Optimizer on the Smart Client machine.
Activate one door license, if none has been activated. To activate a door license, see Activate door licenses.
Make sure the signed-in user has access management permissions, see AXIS Secure Entry role settings.
AXIS Secure Entry role settings
In Management Client, go to Site Navigation > Security > Roles.
Select a specific role in the system.
Select AXIS Optimizer.
Expand the list and click Access control.
Select Read for Access control security settings.
Click the feature the role should have permission to and select Grant.
Access control configuration: It gives the operator role permission to all functions in the Configuration tab.
Access management: It gives the operator role permission to all functions in the Access Management tab.
System management and security controls
Customize feature access for operators
Role settings
By default, an operator has access to all AXIS Optimizer features in Smart Client if they also have access to the device in the VMS. However, in Management Client, it’s possible to configure what features an operator has access to through Role settings.
Configure Role settings
Turn on Role settings:
In Management Client, go to Site Navigation > Security > AXIS Optimizer Security.
- Note
You can’t turn off role settings once you turn it on. The setting is permanent.
Select Turn on role settings.
Restart Management Client.
Configure Role settings:
In Management Client, go to Site Navigation > Security > Roles.
Select a role and go to Overall security.
Click AXIS Optimizer Security.
Select which features the role should have access to or not.
Full control
Gives the operator role full access to all AXIS Optimizer features.Edit (not applicable)
A VMS function that isn’t applicable to AXIS Optimizer Role settings.Access AXIS Optimizer in Management Client
The operator role can use all AXIS Optimizer administration features in Management Client.Manage AXIS Optimizer security
The operator role can change the settings in Site Navigation > Security > AXIS Optimizer Security.Dynamic camera operator controls
The operator role gets access to all pre-installed functions the system finds on a device.Remote focus operator control
The operator role can set the remote focus on fixed dome cameras.PTZ operator controls
The operator role gets access to specific operator PTZ controls: focus control, PTZ presets, operator controls for Autotracking 2, washer and SpeedDry/Wiper button.Temperature spot measurement control
The operator role can measure the spot temperature on AXIS Q2901-E.Speaker operator control
The operator role gets access to all Speaker manager features in Smart Client.Access visitor management
The operator role gets access to everything related to visitor management, for example answer a call and open a door in live view.Access call history
The operator role can access a intercom's call history. You must allow Access visitor management to use this setting.Extended search functions
If you select Deny, the AXIS License Plate Verifier tab is hidden in Smart Client. Also, you can’t use the Vehicles and Containers search in the Centralized search.Control dewarping view
The operator role can move around in the dewarping views.Edit a dewarping view’s home position
The operator role can edit a camera’s home position.Web page
The operator role can create a view with a web browser.Axis insights dashboard
The operator role gets access to Axis insights dashboard.
Click Save.
Restart all running Smart Clients in your system.
Device management
AXIS Device Manager Extend
In AXIS Optimizer, you can use AXIS Device Manager Extend to manage devices from multiple sites. By setting up edge hosts on recording servers, AXIS Device Manager Extend can connect to your devices in the VMS. It makes it easy to review warranty information and perform software upgrades on multiple devices and sites from a single user interface.
For more information about AXIS Device Manager Extend, see the user manual.
Requirements
- Log in to a MyAxis account.
- The recording servers must have internet access.
- Only supported with devices running AXIS OS 6.50. To learn which devices are supported, see the FAQ.
Install the edge host
Edge host is an on-premise management service that makes it possible for AXIS Device Manager Extend to communicate with your local devices in the VMS.
The edge host and the desktop client need to be installed to use AXIS Device Manager Extend in the VMS. Both the edge host and the desktop client are included in the AXIS Device Manager Extend installer.
Download the AXIS Device Manager Extend installer.
The edge host must be installed on the VMS recording servers.
Run the installer on the recording server and only select to install the edge host.
See the Axis Device Manager Extend user manual for more information about open network ports and other requirements.
Claim the edge host and synchronize devices
Open Management Client.
Go to Site Navigation > AXIS Optimizer > System overview.
Select and log in to MyAxis.
Click on a recording server tile with an installed edge host ready to be claimed.
In the sidebar, create a new organization or select a previously created organization.
Click and claim the edge host.
Wait until the page has reloaded and click Synchronize.
All Axis devices on the recording server will now be added to the edge host and belong to the organization that you selected.
- Note
AXIS Device Manager Extend must be able to access the Axis hardware in the VMS. For more info about supported devices, see Troubleshooting for adding devices to the edge host.
If you add new devices to a recording server or change any device information, you need to perform step 7 again to synchronize the changes with the AXIS Device Manager Extend system.
Repeat steps 4-7 for all recording servers with devices that you want to add to AXIS Device Manager Extend.
Edge host status
On each recording server in System overview, you can see whether or not the edge host has been installed or claimed yet. You can turn on Show machines that need edge host action to filter the view.
– No edge host was detected on the recording server.
If no edge host has been installed, download and install the edge host on the recording server. See Install the edge host.
If edge host is installed, this means that you need to log in to MyAxis account to be able to detect the edge host.
– The edge host is installed but not claimed. Claim the edge host by creating a new organization or select a previously created organization. See Claim the edge host and synchronize devices.
– The edge host is installed and claimed but unreachable. Check if the recording server has internet access.
– The edge host is synchronized.
– The edge host needs synchronization. It can be new devices in the VMS that can be added to the edge host or updated device information that needs to be synchronized.
Use AXIS Device Manager Extend to configure devices
When the devices have been synchronized to the edge host, you can configure the devices in AXIS Device Manager Extend. You can do this from any PC connected to the internet.
If you also want to manage devices over a remote connection, you need to turn on remote access on each edge host.
Install and open the AXIS Device Manager Extend desktop application.
Select the organization that was used to claim the edge host.
The synchronized devices can be found under a site with the same name as the VMS recording server.
Troubleshooting for adding devices to the edge host
If you have trouble adding devices to the edge host, make sure to do the following:
AXIS Optimizer will only add enabled hardware from the VMS.
Check that the connection with the hardware isn’t broken in the VMS.
Make sure that the device has AXIS OS 6.50 or higher.
Make sure that the device is set to digest authentication. By default, AXIS Device Management does not support basic authentication.
Try to add devices directly from the AXIS Device Manager Extend application.
Collect logs from AXIS Device Manager Extend and contact Axis support.
In AXIS Device Manager Extend application, go to the specific site, on the recording server, where the camera is installed.
Go to Settings and click Download sitelog.
AXIS Site Designer import
In AXIS Optimizer, you can import your AXIS Site Designer design project and apply the configuration to your VMS in one easy import process. Use AXIS Site Designer to design and configure your system. Once your project is finished you can import settings for all cameras and other devices from AXIS Site Designer to Management Client using AXIS Optimizer.
For more information about AXIS Site Designer, see the user manual.
Requirements
- VMS version 2020 R2 or later
Import design project
In AXIS Site Designer
Create a project and configure the devices.
Once you are finished with your project, generate a code or download the settings file.
- Note
If you make any updates to your design project, you need to generate a new code or download a new settings file.
In Management Client
Make sure that relevant devices are added to your VMS.
Go to Site Navigation > AXIS Optimizer > Import design project.
A step-by-step guide opens up. Select the project you want to import by either entering the access code or selecting the project’s settings file. Click Next.
In Project overview you can see information about how many devices are found in the AXIS Site Designer project and how many devices are found in the VMS. Click Next.
In the next step, devices in the VMS are matched to devices in the AXIS Site Designer design project. Devices with only one possible match are automatically selected. Only devices that are matched will be imported. When you’re finished matching, click Next.
Settings for all the matched devices are imported and applied to your VMS. This can take several minutes depending on the size of the design project. Click Next.
In Results of import you can find details about the different steps of the import process. If some settings couldn’t be imported, fix the problems and run the import again. Click Export... if you’d like to save the list of result as a file. Click Done to close the step-by-step guide.
Imported settings
Only devices that are matched between the VMS and the design project are part of the import. The following settings are imported and applied to the VMS for all device types:
Device name used in the design project
Device description used in the design project
Geolocation settings, if the device is placed on a map
If the device is a video-enabled device, the following settings are applied as well:
One or two video streams configured in the VMS (resolution, frame rate, codec, compression and Zipstream settings)
Video stream 1 is configured for live view and recording.
Video stream 2 is configured for recording, if the stream settings in the design project differ between the live view and recording.
Rules for motion detection or continuous recording are set up according to the design project. The VMS built-in motion detection is used, time profiles for the rules are created, and storage profiles for different retention times are created on the recording servers.
Microphone is turned on or off according to the audio settings in the design project.
Limitations
There are limitations in the VMS when it comes to import of AXIS Site Designer design projects.
The default motion recording rule in the VMS can override the recording rules created by the import. Turn off any conflicting rules or exclude affected devices from the rules.
Recording estimates can be inaccurate for the VMS motion-triggered recordings.
Floor plans are not supported in current version.
If both motion-triggered recordings and continuous recordings are configured simultaneously in the design project, only stream settings from the motion-triggered recording settings will be used.
You can’t configure minimum frame rate for Zipstream in the VMS.
Account management
Account management helps you manage the accounts and passwords on all Axis devices used by XProtect.
According to Axis guidelines, you shouldn’t use root account to connect to devices. With Account management you can create an XProtect service account. Unique 16-character passwords are created for each device. Devices that already have the XProtect account get new passwords.
Connect to devices with XProtect service account
Go to Site Navigation > AXIS Optimizer > Account management.
The graph shows how many devices that are online, how many of these that have the XProtect service account and how many that don’t have the XProtect service account.
Click Show device details to see more information about the devices. Devices that are online are shown at the top of the list. You can select specific devices to generate passwords for. If none are selected, all devices that are online will get new passwords. Click OK.
- Note
Passwords will be sent in plain text between the recording server and the Axis device if you select HTTP in the hardware configuration. We recommend you set up HTTPS to secure the communication between the VMS and your device.
Click Generate passwords. The generated password includes a random text of 16 ASCII characters that ranges from 32 to 126.
Click Show device details to see live status updates of the process. During the process, you will see a short interruption of active live views and pending recordings.
Devices that are online get the XProtect service account and new passwords. Devices that are online and already had the XProtect service account only get new passwords.
Axis events
The Axis events feature gives an overview of available events for Axis devices in your VMS. You can test events on a specific device, view details about the events, and add events to multiple devices.
In Site Navigation, go to Rules and Events > Axis events. A list of all available events is shown in the Configuration window. You can see which events are active in your system and which events that are not active.
For each event you can see the device name of the devices that the event is added to. You can also see the event display name, state of the event and last time the event was triggered.
Requirements
- VMS version 2023 R2 or later.
Set up an event for multiple devices
Go to Configuration and select an event.
Click Add devices.
The Add devices window shows a list of devices to which the event can be added. Select one or more devices and click Add devices.
To remove an event from a device, click Remove.
Events information
In Axis events, you can view the last known occurrence, state of events, and real-time updates in the user interface. To do that, you need to set the retention time in Management Client.
Go to Tools > Options > Alarm and Events > Event retention.
Set the retention time for the entire device events group or specific events within the group.
Metadata and search
Metadata and search gives an overview of all the devices you added in your VMS, their metadata capabilities, and the Axis search categories that are visible for your operators.
Metadata and search allows you to turn on specific features for these devices, that is, you can turn on event data, analytics data, and consolidated data for multiple devices, and also view the analytics features supported by your devices. With Axis search categories, you can control search options for all operators to reflect the available analytics features in your VMS. The support for search categories and filters vary with camera models and installed analytics applications.
Configure metadata settings
Go to Management Client > Site Navigation > AXIS Optimizer > Metadata and search.
Event data: Turn on for your VMS to retrieve event data from the device. You need this for several features in AXIS Optimizer.
Analytics data: Turn on to use the forensic search feature and show bounding boxes in live view and playback.
Analytics features: View the video analytics features that your device currently supports such as object type (humans, cars) and object color. Upgrading the device software may give more analytics features.
Consolidated metadata: Turn on for faster forensic search and shorter loading time in Axis insights.
- Note
Consolidated metadata requirements
- Axis devices with AXIS OS 11.10 or later versions.
Consolidated metadata limitations
- Bounding boxes in live view and recording, and the VMS built-in search options are not available.
: Click to reload when you make changes to your device configuration.
Configure Axis search categories
Go to Management Client > Site Navigation > AXIS Optimizer > Metadata and search.
Turn on the search categories you want to use in the Axis search categories dialog:
Forensic search
Vehicle search
Zone speed search
Container search
Select applicable filters under each search category.
- Note
Axis search categories requirements
- AXIS Optimizer version 5.3 or later in Smart Client.
Cybersecurity
Cybersecurity supports a successful product lifecycle with minimized risks. You can find in-depth information and documentation about our cybersecurity approach at axis.com/about-axis/cybersecurity. Follow the cybersecurity guidelines below to receive product security notifications from Axis and to configure your product for a secure lifecycle and decommissioning.
At Axis Trust Center, you can find information about how Axis implements security compliance, transparency, data protection, and privacy.
Vulnerability management
Axis is a Common Vulnerability and Exposures (CVE) Numbering Authority (CNA). To minimize your risk of exposure, we follow industry standards when identifying and resolving vulnerabilities in our devices, software, and services. Refer to axis.com/vulnerability-management for information about our vulnerability management policy or to report a vulnerability.
Security notifications
Subscribe to Axis security notification emails at axis.com/security-notification-service. We will send you information about vulnerabilities, corresponding security advisories, and other security-related matters for your Axis product.
Secure product lifecycle
Axis minimizes risks throughout the lifetime of our products through secure lifecycle management. Use our hardening guides at help.axis.com to more securely configure and operate your Axis products and to find information about:
- Secure first-use
- Axis products are pre-configured with high default protection to allow for secure initialization and encrypted communication from the very start.
- Intended use and common configuration mistakes
- Our guides provide information about the intended usage of Axis products, including common security-relevant misuse and configuration mistakes that should be avoided.
- Managing vulnerabilities and supply chain transparency
- A Software Bill of Material (SBOM) is published with every software release on axis.com to disclose vulnerabilities and improve supply chain transparency.
- Decommissioning and the secure erasure of data
- To securely decommission a product when it reaches the end of its lifecycle, reset it to factory default settings. This erases your configurations, stored data, and sensitive information.
Need more help?
FAQ
Question | Answer |
How do I update AXIS Optimizer when the client PC doesn’t have Internet access? | Publish the new version on the VMS management server, see Upgrade system automatically. |
Do I need to back up the settings before upgrading to a newer version of AXIS Optimizer? | No, you don’t need to backup. Nothing will change when you upgrade to a newer version. |
If I’ve more than 30 clients PCs with AXIS Optimizer, do I need to upgrade them one by one? | You can upgrade the clients individually. You can also push the upgrade automatically by publishing a local AXIS Optimizer version to your system, see Upgrade system automatically. |
Can I enable or disable each plugin within AXIS Optimizer separately? | No, but they are not taking any resources if you are not actively using them. |
Which ports does AXIS Optimizer use? | Ports 80 and 443 are both necessary to communicate with axis.com so your system can get information about new releases and download updates. Port 53459 and 53461 are opened for incoming traffic (TCP) when you install AXIS Optimizer through AXIS Secure Entry. |
Troubleshooting
If you have technical issues, turn on debug logging, reproduce the problem and then share these logs with your Axis support. You can turn on debug logging in Management Client or Smart Client.
In Management Client:
Go to Site Navigation > Basics > AXIS Optimizer.
Select Turn on debug logging.
Click Save report to save the logs on your device.
In Smart Client:
Go to Settings > Axis general options.
Select Turn on debug logging.
Click Save report to save the logs on your device.
Contact support
If you need more help, go to axis.com/support.
Tips and tricks
Add web page in a Smart Client view
AXIS Optimizer allows you to an display almost any web pages directly in Smart Client, not only html pages. This web view is powered by a modern browser engine and compatible with most web pages. This is useful, for example when you want to access AXIS Body Worn Manager from Smart Client or show a dashboard from AXIS Store Reporter next to your live views.
In Smart Client, click Setup.
Go to Views.
Create new view or select an existing one.
Go to System overview > AXIS Optimizer.
Click Web view and drag it into the view.
Enter an address and click OK.
Click Setup.
Export videos with embedded search functions
Export videos in XProtect format
To view videos with embedded AXIS Optimizer search functions and/or Axis dewarp capabilities, make sure to export videos in the XProtect format. This can be helpful, for example, for demo purposes.
- Note
Start from step 3 for AXIS Optimizer version 5.3 or later versions.
In Smart Client, go to Settings > Axis search options.
Turn on Include search plugins in exports.
Select XProtect format when creating the export in Smart Client.
Unblock exports on receiving computers
To successfully use the export on another computer make sure to unblock the export file archive.
On the receiving computer, right-click the export file (zip) and select Properties.
Under General click Unblock > OK.
Extract the export and open the file “SmartClient-Player.exe".
Play back exported Axis dewarp view
Open the exported project.
Select the view that includes the Axis dewarped view.