About AXIS Camera Station Integrator Suite
The AXIS Camera Station Integrator Suite is a toolbox that simplifies the delivery of the surveillance system and will help you avoid errors and save both time and money at all stages of the system lifetime. The toolbox consists of the following:
AXIS Site Designer
A browser based tool that simplifies system design and product selection. The tool provides instant access to the complete Axis portfolio. Bandwidth and storage is automatically calculated and suitable recording solutions are recommended. The system design documentation is automatically created and you can easily shared the design.
Auto configuration
To shorten installation time and eliminate installation mistakes, you can import the settings done in AXIS Site Designer to AXIS Camera Station 5.
AXIS Installation Verifier
An application integrated into AXIS Camera Station 5. It will perform an on-site live system verification to ensure everything is working properly. This will verify system performance and provide documentation which you can give to the customer at the initial installation and at future service visits.
AXIS System Health Monitoring
Use AXIS System Health Monitoring to verify the status of AXIS Camera Station 5 installations. The portal allows you to monitor all your installations and automatically get notification if there’s an issue with any of the connected devices.
Helpful links for an integrator
Here are some links we think can help you get started. Enjoy the reading!
Workflow
The workflow to design an Axis end-to-end solution is:
Design your system
About AXIS Site Designer
AXIS Site Designer is a web-based tool where you can design system and select products. The tool includes instant access to the complete Axis portfolio. Bandwidth and storage is automatically calculated and suitable recording solutions are recommended. The system design documentation is automatically created and you can easily share the complete design.
How to create a project in AXIS Site Designer
This example describes how you design and configure a solution in AXIS Site Designer. You can then import this configuration to AXIS Camera Station 5.
Prerequisites:
- An active My Axis account
Sign in to AXIS Site Designer.
Create a new project.
Add cameras to your project.
Use the camera 2D visualization tool and filters to find a suitable camera, then click Add.
Configure the cameras.
You can, for example, create schedules for your recordings: continuous recording during office hours and motion triggered recording during out of office hours. You can also configure for how many days the system will keep the recording.
Add devices to your project.
You can, for example, add speaker systems, recording solutions, accessories and network components to the project.
Next step: How to import an AXIS Site Designer project
Configure your system
How to import an AXIS Site Designer project
This example describes how you import an AXIS Site Designer project to AXIS Camera Station 5.
Prerequisites:
- An active My Axis account
- An AXIS Site Designer project
Log in to AXIS Site Designer.
Open your project.
Go to Share with AXIS Camera Station 5 and click one of the following options:
Generate access code - Use this option when your AXIS Camera Station 5 server has internet access.
Download camera settings - Use this option when your AXIS Camera Station 5 server doesn’t have internet access.
In AXIS Camera Station 5, go to Configuration > Devices > Add device.
Click Add, select Site Designer configuration and click Next.
Select one of the following options, then click Import:
If you generated an access code, select Access code.
If you downloaded a file, select Choose file.
Click Install.
The import automatically matches the configuration for a specific model based on the AXIS Site Designer configuration and the models in AXIS Camera Station 5. If you’ve multiple configurations for one camera model, you must manually select which configuration to use.
Next step: Test your system
Connect to AXIS Camera Station 5 server
This section explains how to connect to AXIS Camera Station 5 server from a computer or from a mobile app. You can connect to the server in different ways:
This information is based on AXIS Camera Station 5.16 and higher. These steps can be performed in older versions, but the interface may look different.
Connect to the server from a local network
Connect to the server from the internet:
via Axis Secure Remote Access
via port mapping (not recommended)
Prerequisites:
- An active My Axis account
- AXIS Camera Station 5.16 or later (You can perform most steps in older versions but the interface might look different.)
Prepare your system
Before you can connect to the AXIS Camera Station 5 server from a client device, you must prepare your system. Following instructions will help you manage the general settings.
Install AXIS Camera Station 5 Windows® app.
Create Windows users, see Create Windows user.
Add Windows users to AXIS Camera Station 5 Windows app.
Configure the server’s firewall.
Install AXIS Camera Station 5 mobile app.
These steps depend on your system’s configuration, the client’s configuration and the network infrastructure.
About user and user groups
For the advanced users:
To make sure you have a Windows- and AXIS Camera Station 5 userID/password, open port xx and yy to configure the mobile app.
To connect to AXIS Camera Station 5 server from a client device you need a Windows user with the correct permissions. This user can either be the default administrator account on the Windows device the server is installed on, or a user that has been created.
The AXIS Camera Station 5 allows both local Windows users and user groups, as well as domain users and user groups. If you use a domain setup, you must join the server to the domain. This may have to be done by your IT department.
Log in as current user:
If the current Windows user is added to the permission list on the server, select Current user and click Log in.
Log in as other user:
If the current Windows user is not added to the permission list on the server, clear Log in as current user and click Log in.
On the next page, select Other user.
Enter you credentials and click Log in.
A user or a user group can have one of the following roles:
Administrator:
Full access to all functionality and all devices
Operator:
Full access to all functionality except Configuration menu,Configuration workspace, Device management page, and Audit log.
Full access to selected devices and I/O ports.
Selected access to playback and recording export.
Viewer:
Access to live video from selected cameras.
Access to selected I/O ports.
Click Advanced under each tab for more options to customize the Operator and Viewer accounts.
Install AXIS Camera Station 5 Windows app (client)
Download the Windows app from axis.com/products/axis-camera-station
Install the Windows app that has the same version as the server.
For AXIS Camera Station 5 version 5 or later:
If your server and client share the same network and have different updated versions, the server will provide the client with information about which version to use at the first connection.
Create Windows user
To use local Windows users and user groups, you must add them to the Windows server that AXIS Camera Station 5 is installed on. We recommend that all users have their own account.
Go to Computer Management > System tools > Local Users and Groups > Users.
Right-click the Users folder and select New user
Fill in the required information.
Clear User must change password at next logon.
Click Create.
Add Windows users to AXIS Camera Station 5
When Windows users has been created, they must be added to AXIS Camera Station 5.
Open AXIS Camera Station 5 client and log in to the server with the current user.
Go to Configuration > Security > User permissions.
Click add.
Select the scope for which you want to add the account from.
Server: fetches the local users and groups.
Domain: fetches the domain users and groups.
Select the user and click Add.
Select the role and permission level of the user and click OK.
If you use a local account, we recommend you to login with that user as a test after adding it.
Configure the firewall on the server
During the installation, AXIS Camera Station 5 will automatically configure the Windows firewall exceptions for incoming traffic. If you see a third-party firewall, you might have to request for a similar set of exceptions to be added to the configuration. In most cases only the Inbound port range of 55752 and 55757 requires an exception.
This table shows the different ports in a typical AXIS Camera Station 5 setup:
| Port Number | Protocol | Inbound/Outbound | Used by | Comments |
| 80 & 443 | HTTP & HTTPS | Outbound | Server & client to internet | Activate license, download firmware, connected services, and more. |
| 80 | HTTP | Outbound | Server & device | Video stream & device data |
| 5353 | UDP | Multicast (Inbound + Outbound) | Server & device | mDNS Discovery (Bonjour) search for cameras Multicast 224.0.0.251 |
| 1900 | UDP | Multicast (Inbound + Outbound) | Server & device | SSDP Discovery upnp search for devices Multicast 239.255.255.250 |
| 3702 | UDP | Multicast (Inbound + Outbound) | Server & device | WS-Discovery webservices discovery Onvif Multicast 239.255.255.250 |
| 55752 | TCP | Inbound | Server & client | Video, audio, metadata stream (AES encryption) If TCP fails on 55754, 55752 with HTTP is used for application data (AES encryption) |
| 55754 | TCP | Inbound | Server & client | Encrypted application data (TLS 1.2 encryption) |
| 55755 | TCP | Inbound | Server & client | Server discovery SSDP/UPNP |
| 55756 | TCP | Inbound | Server & mobile app | Encrypted application data HTTPS Video stream MP4 over HTTPS |
| 55757 | TCP | Inbound | Server & mobile app | Video stream RTSP over HTTP |
| *50333 | TCP | Inbound | AXIS Camera Station 5 server & 3rd party application | Application data for 3rd party applications using ACS API |
| *50334 | TCP | Inbound | AXIS Camera Station 5 server & 3rd party application | Video port used by 3rd party applications using AXIS Camera Station 5 API |
Connect to server via Axis Secure Remote Access
Secure remote access allows a client or mobile app to connect a server without a port forward. When a secure peer-to-peer connection is established between the client or mobile app and the server, there are no limits of data transfer.
When no direct communication can be established, the communication is relayed through the mediator servers. The relayed data transfer is 1 GB per month per My Axis user.
For more information about Axis Secure Remote Access, see axis.com/technologies/axis-secure-remote-access
To manage Axis Secure Remote Access, it requires:
AXIS Camera Station 5 5.12 or higher
Internet access (If using a proxy server, see Advanced settings)
A My Axis account
Configure the server
Log in to AXIS Camera Station 5 server with an administrator user. Use the same network as the server when you log in.
Go to Configuration > Connected services > Axis Secure Remote Access.
Log in to your My Axis account.
Connect from the Windows app (client)
Open the AXIS Camera Station 5 app.
Click on AXIS Secure Remote Access.
Enter the same user credentials that you used when you configured the server.
Select Remote server and a server from the list.
The server displays as ServerName (Secure Remote Access).Click Log in.
Connect from the mobile app (client)
Open the AXIS Camera Station 5 mobile app.
Click Sign in.
Enter the user credentials for your My Axis account.
Select a server.
Log in with the Windows account user credentials that you’ve configured. You only have to enter your credentials the first time you access a server, the mobile app will save your user credentials.
Depending on your system configuration, you might have to use the format domain/user or servername/user
Connect your server via port mapping
For cybersecurity reasons we don’t recommend to use port mapping.
Axis Communications recommend using Axis Secure Remote Access instead. Read more about cybersecurity and Axis Secure Remote Access on axis.com.
Port mapping enables you to connect to your server from a remote location on your router. Depending on your network’s infrastructure, you may have to involve you network administrator to perform this configuration.
Configure the server
On the router where the AXIS Camera Station 5 server is connected to the internet, open the following ports:
To allow Windows client connection: 55752 and 55754
To allow mobile connection: 55756 and 55757
Connect from the windows app (client)
Open the AXIS Camera Station 5 Windows app.
Select Remote server.
Type the public IP or fully qualified name of the network where AXIS Camera Station 5 server is installed.
If your port is forwarding rules, don’t use the default port. If you want to connect to port 60009, add 60009 in the address.
Example
myserver.axis.com:60009
Connect from the mobile app
Open AXIS Camera Station 5 mobile app.
Click Add system and enter the public IP or public fully qualified name.
If you don’t use the default values, adjust the port number accordingly.
Log in with the Windows account user credentials that you’ve configured. You only have to enter your credentials the first time you access a server, the mobile app will save your user credentials.
Advanced settings
Client proxy settings
If a proxy server is between the client and the server, you must configure the proxy settings in Windows on the client computer. Contact Axis support for more information.
Server proxy settings
If the proxy server is between the network device and the server, you must configure the proxy settings in Windows on the server. Contact Axis support for more information.
Port mapping more than one server
If you run more than one server on the same network requiring port mapping, you must change the AXIS Camera Station 5 default port (55752). Each server must have a unique port.
For each server do the following:
Open AXIS Camera Station 5 service control.
Click on Stop in the server status.
Select Modify settings.
Edit the HTTP port, all other ports adjust to their expected number.
Save and restart the service.
User the new port range for the port forward.
Test your system
About AXIS Installation Verifier
AXIS Installation Verifier is a tool, embedded in AXIS Camera Station 5 version 5.02 or later. It verifies that your system is working as it should by running a series of tests once you've completed the system installation and configuration.
The AXIS Installation Verifier mimics the recording part of the AXIS Camera Station 5 server. The tool performs one test with the current settings, one test with emulated low light test and then also a stress test in order to find the system's bottlenecks.
AXIS Installation Verifier generates a verification report in PDF format and you can hand the report over to the customer.
How to run AXIS Installation Verifier
Complete the installation and configuration of AXIS Camera Station 5.
In AXIS Camera Station 5 client, go to the main menu and click Help > Installation Verifier. The tests will take approximately 20 minutes.
During the tests, the devices will be set to maintenance mode and won’t provide a video stream for live view or recording. The status of the different tests can be:
Running: The test is ongoing, please wait.
Passed: All testable devices passed the test. See report for details.
Not passed: Not all testable devices passed the test. See report for details.
Failed: The test couldn’t be finalized and therefore no report will be generated. It is recommended to take a snapshot of the test window, generate an AXIS Camera Station 5 system report and contact Axis support.
Once all tests are completed, click View Report to open the report or Save Report to download the file to the client PC.
How to analyze and understand the report
Test results: general information
The report is a PDF file which can be handed-over from the system integrator to the end customer once the installation is complete and the system validated.

The first section of the first page contains information about the system, such as hardware, operating system, date and time the tests were executed. There is also an area where you can write the customer’s name.

The second section indicates the results of the tests. Each test (normal conditions, low-light and stress test) has a duration of 5 minutes. Storage, devices and network are the three areas tested by the tool. There are two possible outcomes to the verification:
The system has passed the tests and is verified. The system should be able to cope with the load and the current configuration. You can also see the expected load during the low-light simulation, which is usually the most resource consuming scenario.
In the example above, the stress test has determined the limits of the system and concluded that normal and low-light conditions are expected to use 40-60% of the resources.


Issues have been found and some things need to be changed to improve the stability of the system. The result of each test and the issues found are listed together with the error messages. More details can be found in the next pages of the report.
In the example above, one of the devices was not accessible during the test. The most probable reason for that is a network problem, or overloaded device, not being able to respond.


At the bottom of the first page, there is an area where you can enter customer information, comments on the test or any other necessary information.
Test results: AXIS Camera Station 5 server

The physical and virtual memory is indicated at the top of the page.
Random access memory (RAM) is physical memory that holds the applications, documents and procedures on the server.
Virtual memory is a storage area that holds the files on your hard drive for retrieval when the server runs out of RAM. The virtual memory is much slower than the physical one and should never be used.
AXIS Camera Station 5 server is tested against two metrics:
Processor time: This measures the percentage of elapsed time the processor spends executing a non-idle thread. If the percentage is greater than 85 percent, the processor is overwhelmed and the server may require a faster processor or the configuration should be adjusted.
Used memory: This measures the percentage of physical memory used by all running processes. If this value is higher than 85 percent, that means there is insufficient memory, and paging activity can increase. Add more memory to the server to resolve this problem or limit the number of applications running on the server.
Test results: tested cameras and devices

The list of tested cameras and devices is presented on the next page. A device can contain several cameras. Example: multi-sensor devices or multi-channel encoders are counted as one device but 3, 4, or even 16 cameras (one camera per sensor/channel).
A green checkmark indicates that the camera passed the related test.
N/A means that the test couldn’t run for the camera, for example the camera doesn’t support the ExposureValue parameter for the low-light simulation.
A red sign is displayed if the camera did not pass the test. More details can be found in the camera specific results, in the following pages.
Test results: notes and considerations
Minor adjustments which can improve the installation but will not fail the test that are listed on this page. For example when the default router is not in the same subnet as the device or when the DNS or NTP server is missing.
Test results: excluded cameras and devices

If a device does not support any of the tests, it will be excluded. The following devices will not be tested:
Device is not Vapix®: Third party devices are not tested.
Device has no enabled cameras: Devices with no video sensor, such as network switches, audio devices, door controllers, I/O modules.
Video codec not supported: Devices with no H.264 support (usually firmware 4.x).
Device status is not OK: Devices in maintenance mode, inaccessible, wrong credentials.
Test results: camera specific results
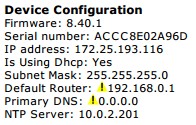
All camera information such as firmware, serial number, IP address and the video profile used for recording is listed. There is also a summary of the received and missing video frames for each of the tests.
- If a device is configured to record with two different video profiles (e.g. Medium for Continuous and High for Motion Detection), only the highest profile will be tested, regardless of the schedules configured.
- If both, Continuous and Motion recording are disabled, the profile selected for Manual recording will be used for the tests, even if is currently not active.
The Device configuration section lists the most important information from the tested device. If some parameters are incorrect (not configured or different subnet), an exclamation mark will be displayed in front of the parameter.
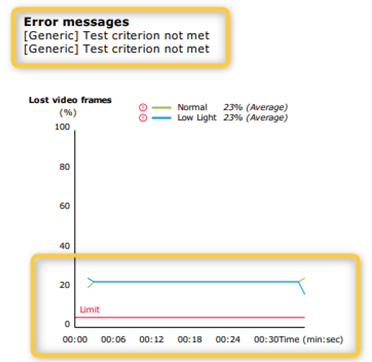
The graphs show the three metrics measured during the duration of the test, for normal and low-light conditions.
Lost video frames: The quota of missing video frames per one second interval. A high average value indicates a network bottleneck or that the device is overloaded. The average of lost video frames is usually below 1%.
Storage buffer : Utilization of the storage buffer per one second interval. A high peak value indicates a problem with the storage. The storage buffer is usually below 20%.
Received rate: The data rate (excluding overhead) sent by the camera and received by the AXIS Camera Station server.
In the graph below, the lost video frames quota is high.

The most likely reasons for this are:
The camera is overloaded, maybe because too many view areas are in use (360 degrees cameras for example) or too many streams are pulled.
Bottleneck on the network, between the camera and AXIS Camera Station 5 server.
Faulty or poor quality network cable.
Insufficient or unreliable power source, including PoE.
An additional frame lost criterion is considered when running the normal and low light test:
A consideration is added for every device failing the criterion (more than 5% frame loss). This will not fail the test.
If more than 5% of the devices in the test fail the above criterion, the test status will be “Not passed”.
Below is an example where the test criterion was not met for the normal and low light test:
The graph below shows an example of a test which couldn’t complete. The most likely reasons for this are:
The camera was disconnected or the network was interrupted during the test.
The power source couldn’t cover the camera needs during the test.
The camera was overloaded and took too long to respond to the server’s requests.

After the camera’s test results, a snapshot from the camera is displayed:

Test results: storage devices

Storage devices are tested against the same conditions.
The tool tests local hard drives against two metrics:
Disk write rate: The total data rate written to this storage representation per one second interval.
Used write buffers (count): Utilization of the storage buffer (300 samples) per one second interval. A high peak value indicates a problem with the storage. In general, this value should be below 1 or 2.
Currently, Network Attached Storages (NAS) are not tested.
Information about storage usage and capacity is available:
Total capacity: The total size of the storage.
Other data: Data which is not indexed by AXIS Camera Station 5 server. This may be external files such as random documents, Operating system files, files in the recycle bin.
Maximum usage: Recording limit set in AXIS Camera Station 5. AXIS Camera Station 5 will allocate a maximum percentage of the storage for its recording files. By default, this value is set to 99% for non-OS drives and to total size-60GB for OS drives.

Troubleshooting
If any of the test fails (Failed), no report will be generated. We recommend to take a snapshot of the test window, generate an AXIS Camera Station 5 system report from the help menu and contact Axis support via the online helpdesk.
There is a difference between Not passed and Failed:
- Not passed indicates that the server, some devices or the storage didn’t fulfil the conditions to pass the test.
- Failed means that the test did not complete and no conclusion regarding the system performance is available.

Considerations and limitations
Only H.264 is supported. Cameras with no support for H.264 will be ignored.
The low-light test only runs on cameras with support for ExposureValue parameter. N/A will be displayed for cameras without ExposureValue support.
Low-light test might give the same result as normal conditions on some cameras with WDR support.
Third party cameras will be ignored.
Network Attached Storages are not tested but show as validated.
Monitor your system
About AXIS System Health Monitoring BETA
The current status of AXIS Camera Station 5 installations are verified by logging into AXIS System Health Monitoring. AXIS System Health Monitoring allows you to monitor all your installations and automatically get notification if there’s an issue with any of the connected devices.
How to configure AXIS System Health Monitoring BETA
This example describes how you configure AXIS System Health Monitoring.
Download and install the latest version of AXIS Camera Station 5 available on axis.com.
Configure AXIS System Health Monitoring.
Under Configuration > System Health Monitoring > Settings, choose whether you need to set up a firewall rule to allow AXIS System Health Monitoring pass through Windows Defender.
Under Configuration > System Health Monitoring > Notifications, configure your SMTP server, the email recipients and what notification rules to send an email for.
Configure AXIS System Health Monitoring for multisystem setup.
Go to Configuration > System Health Monitoring > Multisystem.
Under Generate system configuration, click Generate.
Copy the configuration and transfer it to the system where you want to collect the data.
Expand Retrieve data from other systems and paste the previously copied configuration and click Add. Repeat steps above for each system.
Features
| Feature | Desciption |
| Inventory | Inventory with device summary. |
| Device information | Type, model, firmware version, IP address, MAC address, API mode, Recording type, etc. |
| Video Management System (VMS) information | Software version, operating system, Hardware, CPU/Memory/Network usage, etc. |
| Download system reports | From the systems page, an AXIS Camera Station 5 system report or AXIS System Health Monitoring report can be generated. |
| Notification log | Show a history of all notification logs generated. |
| Storage information | Show storage usage and retention times for cameras, and other recording related information. |
Troubleshooting
Issue type | Error message | Solution |
Runtime | System is not visible in multisystem setup. | AXIS System Health Monitoring has not collected any data from the system. Allow AXIS System Health Monitoring a minute to collect data after a new system has been added. If an error icon is displayed on the Manage servers page, verify:
The tooltip on the error icon might also provide a hint to the problem. |
Support logs
The debug logs for AXIS System Health Monitoring are saved on the AXIS Camera Station 5 server at: C:\ProgramData\Axis Communications\AXIS System Health Monitoring\logs.
FAQ
Q: Which AXIS Camera Station 5 version is required to use AXIS System Health Monitoring?
A: Version 5.41 introduced official support of AXIS System Health Monitoring.
Q: How often is the device or VMS status updated?
A: It can take up to 60 seconds for the device or VMS status to be updated in the AXIS System Health Monitoring interface.
Considerations and limitations
Storage: Used space for cameras connected to AXIS S3008 is not supported.
Inactivated storage devices will be visible and gathered data kept for up to 2 weeks.
Notification settings only affect local AXIS System Health Monitoring server.
Accessing AXIS System Health Monitoring in AXIS Camera Station 5 requires Administrator permissions.
Retention warnings do not support motion detection recordings.
Recordings created with other means (Manual/Events etc.) than “continuous” or “motion detection” are flagged with “Recording type: None”.
Set up Axis products in your system
Set up AXIS OS Recorders
AXIS OS Recorders include AXIS S30 Series and AXIS S40 Series.
You need an AXIS OS Recorder firmware 10.4 or later, and Axis device firmware 5.50 or later. AXIS OS Recorders don't require a license.
Limitations
When you use AXIS OS Recorder as recording storage for your devices in AXIS Camera Station 5, keep these limitations in mind:
AXIS OS Recorder doesn’t support body worn camera recordings or the prerecorded videos used for demos in AXIS Camera Station 5.
Recording streams go directly from cameras to AXIS OS Recorder. Make sure your AXIS OS Recorder connects to the same network as your cameras and that all devices can communicate with each other.
Third-party cameras and devices with non-numeric resolutions like D1, CIF, and 4CIF aren’t supported.
Failover recording isn’t supported for cameras with AXIS OS Recorder as recording storage.
Internal events from AXIS OS Recorders are not listed in the device event triggers configuration page.
Locking recordings through bookmarks isn’t supported.
Audio from an external audio device connected to a camera isn't recorded.
Storage of Scene Description Metadata is not supported on the AXIS OS Recorder. Instead, it is the AXIS Camera Station Pro server that will store the metadata. Therefore an uninterrupted connection between the server and the cameras is required to allow Smart search 2 to work.
Analytics data used for automatic video redaction and Smart search 1 is not supported.
AXIS Installation Verifier isn’t supported for AXIS OS Recorder and connected devices.
2N IP Intercom devices aren’t supported.
Recordings made from AXIS Companion or AXIS Camera Station Edge on AXIS OS Recorder can't be played in AXIS Camera Station 5.
AXIS S3008 and S3008 Mk II Recorders support up to 64 virtual inputs.
Each camera that records on AXIS S3008 Mk II Recorder uses three virtual inputs; one for motion recording, one for continuous recording, and one for manual recording.
For example, 8 cameras use 24 virtual inputs (8×3) out of 64, leaving 40 virtual inputs for action rules.
Each network door station that records on AXIS S3008 Mk II Recorder uses four virtual inputs; one for motion recording, one for continuous recording, one for manual recording, and one for the default action rule.
For example, 7 cameras and 1 door station use 25 virtual inputs (7×3 + 1×4) out of 64, leaving 39 virtual inputs for additional action rules.
Each action rule that triggers recording on AXIS OS Recorder uses one virtual input.
Fallback recording doesn’t use a virtual input.
AXIS S3016 and AXIS S4000 Rack Recorders support up to 128 virtual inputs.
Workflow
Add your recorder
AXIS Camera Station 5 removes recordings from any previous system when you add the recorder to a new system.
Go to Configuration > Devices > Add devices.
Select your recorder in the list and click Add. If your recorder is not listed, use Manual search to find it manually.
Use the default settings and click Next.
Create a new password for storage encryption, or use your current one, see below for more details. Click Next.
Go to Configuration > Devices > Other devices and check the recorder has been added.
Go to Configuration > Storage > Management and check the recorder has been added to the storage list.
Storage encryption password
- You need the password for storage encryption to access the recorder hard drive outside AXIS Camera Station 5 or when the recorder is reset to factory default settings from the device’s web interface.
- If the device isn’t formatted, then the you must choose a new password for disk encryption. This formats the disk and previous recordings are removed.
- If the device is already formatted you can choose if you want to use your current password, or if you want to create a new one.
Using your current password, the system deletes all recordings but doesn’t format the device. This option can save time.
Creating a new password, formats the device and deletes all recordings.
- If you’ve selected more than one device, and choose to create a new password, then all devices are formatted and assigned the new password.
- If you’ve selected more than one device, and choose to use your current password, then only the devices with a matching password are added.
Add devices and select the recorder as recording storage
Go to Configuration > Devices > Add devices.
Select your devices in the list and click Add. If your devices are not listed, use Manual search to find them manually.
Use the default settings and click Next.
Manually select the recorder from the Recording storage drop-down list and click Install.
- Note
The recorder will not be selected as recording storage if you select Automatic.
Go to Configuration > Storage > Selection. Click your devices and check that the recording storage is the recorder.
Configure recordings
Go to Configuration > Storage > Selection and select your device.
Configure Retention time.
Select Unlimited retention time to keep recordings until the storage becomes full.
Select Limited and set the maximum number of days to keep recordings.
Click Apply.
Fallback recording is enabled by default to store the recordings on your recorder when the connection between AXIS Camera Station 5 and the recorder is lost. See Fallback recording.
Change storage location
You can change a device's storage location from one recorder to another and keep all the recordings.
Go to Configuration > Storage > Selection and select your device.
Select the new storage location.
Click Apply.
If the recorder you select already uses the maximum number of action rules with recording actions, do one of the following:
- Remove action rules with recording actions from the existing devices using the recorder as storage.
- Move devices using action rules with recording actions to another storage.
Set up an Axis network door controller
This section explains how to set up an Axis network door controller in AXIS Camera Station 5. To see the videos about how to set up, go to this playlist.
- It requires AXIS Camera Station 5.35 or later.
- HTTPS is required to be enabled on the controller for AXIS Camera Station 5.37 or later.
Add the Axis network door controller to AXIS Camera Station 5. See Add devices.
Upgrade the door controller firmware. See Upgrade firmware.
Turn on time synchronization to use the AXIS Camera Station 5 server as the NTP server. See Server settings.
Set date and time for the controller. See Set date and time.
Enable HTTPS on the controller. See Security.
Configure access control.
To edit the predefined identification profiles or create a new identification profile, see Identification profiles.
To use a custom setup for card formats and PIN length, see Card formats and PIN.
Add a door and apply an identification profile to the door. See Add a door.
Configure the door.
Add a zone and add doors to the zone. See Add a zone.
Manage access control.
Add schedules. See Schedules.
Choose a workflow and add the following: See Access management.
Apply cardholders, groups, doors and zones to the access rules.
Export reports. See Export reports.
Monitor and manage the door manually in door dashboard. See Door dashboard in split view.
Search for access control data.
Connect a view to the door. See External data sources.
Search for specific event data within a period or with specific keywords. See Data search.
When you remove a door controller in AXIS Camera Station 5, the data on the door controller is not removed. To remove the data on it, make a default reset and restore all factory default values.
Set up 2N desktop USB card reader
Go to https://www.elatec-rfid.com/int/, download TWN4 DevPack and extract it to a folder.
Go to the extracted folder, run AppBlaster.exe.
Select the Multi keyboard V4.80 keyboard firmware to program the reader.
Define the format for the reader by creating a project. You need to define the following:
Transponder type including frequency, type, and sub type.
For example: MIFARE Classic (UID, any length)
Bit manipulation for the transponder type.
For example: Reverse byte order
Output format for the transponder type.
For example: Decimal
Remove the predefined suffix for the output data.
Load the project file to the reader.
When you add a card credential in AXIS Camera Station 5, present your access control card to the reader to get the card details.
Set up an Axis body worn system
For more information about Axis body worn solution, see Axis body worn user manual.
For an existing AXIS Camera Station 5 installation, renew your server certificate used to communicate with the client.
In AXIS Camera Station 5, go to Configuration > Security > Certificates > Certificate renewal.
Click Renew.
Restart AXIS Camera Station 5 service.
Create a connection file.
In AXIS Camera Station 5, go to
 > Other > Connection file....
To change the default site name displayed in your body worn system, type a new name.
Click Export.
Set up your body worn system. See Access AXIS Body Worn Manager for the first time. When you are prompted to set the content destination, select the connection file that you have exported from AXIS Camera Station 5.
In AXIS Camera Station 5, check that a virtual camera with the username is added under the Recordings tab.
To change the retention time, go to Configuration > Storage > Selection.
Make a recording with the body worn camera and place the camera back in the docking station. The recordings will be automatically uploaded to AXIS Camera Station 5.
Playback and export recordings from the body worn camera in AXIS Camera Station 5.
Always use AXIS Body Worn Manager to remove users. Never remove body worn users from AXIS Camera Station 5.
Set up Axis network door station
This example explains how to:
Add an Axis network door station to AXIS Camera Station 5
Configure an audible alert on the client
Operate incoming calls
Disable a door station incoming call notification
Limitations:
Calls from the door station to AXIS Camera Station 5 can’t be put on hold.
Motion detection can’t be enabled for the door station.
Only recordings from the caller can be recorded. The audio from the operator can’t be recorded.
Add Axis network door station to AXIS Camera Station 5
In AXIS Camera Station 5, go to Configuration > Devices > Add devices.
Select the network door station and click Add.
Use the default settings, click Next and Install.
Go to Configuration > Devices > Cameras to check that the door station has been added.
Go to Configuration > Recording and events > Action rules to check that the following action rules have been added automatically.
Open door rule: The Open Door action button is added. Click the button in the live view to open the I/O port of the door station for 7 seconds by default.
Record ongoing call: When there is an ongoing call, start recording on the door station.
- Configure an incoming call sound
In AXIS Camera Station 5, go to Configuration > Client > Settings.
Under Sound on incoming call, select Sound file.
Click Browse and navigate to the sound file in .wav or .mp3 format.
Click Play to test the sound.
- Operate an incoming call
When a call is activated, a notification window appears.
Hover your mouse on the thumbnail to see a larger image of the caller.
To answer the call, click Accept. A new tab appears containing the view from the door station. Click Open door to open the I/O port of the door station for 7 seconds by default.
To ignore the call on this client only, click Ignore. The call can be still answered on another client.
To end the call, click Decline. The call is ended and call notification on all clients is removed.
- Note
When multiple calls occur, we recommend that you answer one at a time. The other calls will continue to be displayed until they are answered or time-out.
- Disable the door station notification
Create a separate user for the client.
Go to Configuration > Security > User permissions.
Click Add.
Select a user from the list and click Add.
Configure the user.
Under Role, select Operator.
Select Access for the door station, but clear Audio Listen and Audio speak.
Click Save.
Set up audio in AXIS Camera Station 5
- This example explains how to:
Add an Axis network audio device to AXIS Camera Station 5 and associate it with an Axis network camera.
Create a button in the camera’s live view in AXIS Camera Station 5, that makes the audio device play an audio clip.
This system setup is suitable for non-life critical systems, for example intruder alarms or staff and customer address. Specific guidelines and standards (local to the installation) have to be met for implementation in critical systems, such as fire evacuation.
- Limitations:
Audio sent from AXIS Camera Station 5 to Axis network audio device can’t be recorded.
An audio device must be associated with a camera in AXIS Camera Station 5.
You can only associate one audio device per camera.
There is no volume control for the audio device in AXIS Camera Station 5.
Add Axis network audio device to AXIS Camera Station 5:
In AXIS Camera Station 5, click
 and select Configuration.
Go to Devices > Add devices.
Select the network audio device from the list and click Add.
Go to Other devices to check that the audio device has been added to the list.
Associate the audio device with a camera:
In AXIS Camera Station 5, go to Devices > Streaming profiles and select the camera that you want to associate the audio device with.
In the device’s streaming profile, select the audio device from the Speaker drop-down.
Click Apply.
To test the association, go to the camera’s Live view in AXIS Camera Station 5 and click the Speak button. When you speak into the computer’s microphone, the audio device plays the audio.
Prepare audio clip link:
Go to Audio > Audio clips.
Click the link icon for an audio clip.
Set the volume and number of times to repeat the clip.
Click the copy icon to copy the link.
Create a button that triggers the audio clip:
In AXIS Camera Station 5, go to Configuration > Recording and events > Action rules and click New.
Click Add to add a trigger.
In the list of triggers, select Action button and click OK.
If a button has been created, then select Create new button and click Next.
Select Command button and click Next.
Enter the button details, for example:
Button label: Staff to till
Tooltip: Call staff to come to till
Add to camera: select the camera associated with the audio device.
Add to map.
Click OK.
- Note
You can associate the button with multiple maps or cameras.
Click Next.
Click Add to add an action.
In the list of actions, select Send HTTP Notification and click OK.
Paste the configured link from the audio device in the URL field.
Check Authentication required and enter the User name and Password of the audio device.
Click OK.
Click Next twice.
Enter a Name for the rule and click Finish.
In the camera’s live view in AXIS Camera Station 5, there is now a button labelled Staff to till. When you click the button, the audio device plays the audio clip.
Set up Axis analytics
Set up AXIS Barcode Reader
This section explains how to set up AXIS Barcode Reader on Axis intercoms and cameras and how to configure it in AXIS Camera Station Secure Entry. For more information about AXIS Barcode Reader, see user manual.
- It requires AXIS Camera Station 5 5.44 or later, or an Axis network door controller with firmware 10.11.9 or later.
- It requires a license.
Limitations
You can only send QR Code® after you save the cardholder with QR credential.
Install AXIS Barcode Reader
Download the application installation file from axis.com.
Go to the webpage of your Axis intercom or camera.
Install the application.
Activate the license.
Start the application.
We recommend changing the following camera setting for better QR accuracy.
Go to camera settings.
Under Image > Exposure, move the Blur-noise trade-off slider to the middle.
Configure AXIS Barcode Reader
To change the QR identification profile, go to Configuration > Access control > Identification profiles and click
 . See Identification profiles.
Add a door. See Add a door.
Select QR as the identification profile for this door. See Door settings.
Add a barcode reader. See Add a reader.
Under one side of the door, click Add reader.
Select AXIS Barcode Reader from the Reader type drop-down list. Enter a name and click OK.
To change the QR identification profile, go to Configuration > Access control > Identification profiles and click
. See Identification profiles.Add a door. See Add a door.
Select QR as the identification profile for this door. See Door settings.
Add a barcode reader. See Add a reader.
Under one side of the door, click Add reader.
Select AXIS Barcode Reader from the Reader type drop-down list. Enter a name and click OK.
Create a connection with door controller
Create a connection with door controller
In AXIS Camera Station 5:
Go to Configuration > Access control > Encrypted communication.
Under External Peripheral Authentication Key, click Show authentication key and Copy key.
In the device web interface where AXIS Barcode Reader runs:
Open AXIS Barcode Reader application.
If the server certificate wasn’t configured in AXIS Camera Station 5, turn on Ignore server certificate validation. See Certificates for more information.
If the server certificate wasn’t configured in AXIS Camera Station 5, turn on Ignore server certificate validation. See Certificates for more information.
Turn on AXIS Camera Station Secure Entry.
Click Add and enter the IP address of the door controller and paste the authentication key.
Select the reader that reads barcodes from the door drop-down menu.
Configure QR credential
Under Credentials, click and .
Enter a name.
Dynamic QR is turned on by default. Dynamic QR must be used with PIN credential together.
Set the expiration date and click Add.
Add an access rule for the cardholder on the door that is configured with AXIS Barcode Reader.
Send QR Code®
QR Code is a registered trademark of Denso Wave Incorporated in Japan and other countries.
Ensure the cardholder is configured with a correct email address. See Add a cardholder.
Configure an SMTP server to send email. See Server settings.
Edit the email template if you want. See Access management settings.
Go to Access management > Settings.
Under Email template, change the subject and body text.
Include visiting time in the email is selected by default.
Click Apply.
Send the QR code. See Add a cardholder.
Go to Access management > Dashboard > Cardholders.
Select a cardholder, click
 and Send QR code.
Click OK.
Set up AXIS Mobile Credential
To use dynamic QR code, you need to set up AXIS Mobile Credential.
Follow the instructions in the email that you have received:
Download the AXIS Mobile Credential app.
Click the activation link in the email.
Open the application on your mobile device, the credential is shown under My credentials.
Click it and enter the PIN to active the dynamic QR code.
Set up AXIS Perimeter Defender PTZ Autotracking
When an Axis PTZ camera is configured with AXIS Perimeter Defender PTZ Autotracking, you can use the camera in AXIS Camera Station 5 to automatically detect and follow moving objects such as people or vehicles in its field of view. It is intended for indoor or outdoor use in low-traffic areas such as parking lots or during after-business hours at schools, offices and stores.
- It requires AXIS Camera Station 5.38 or later.
- You can only track one object at a time.
Limitations:
In a split view, the trigger areas and object indicators might not show up in correct position.
Refresh the camera’s configuration page or reopen the application settings page:
After the camera is under maintenance in AXIS Camera Station 5
If the camera orientation has been rotated
If the preset position that is used in your autotracking profile is deleted, the trigger area will not work and no warning is triggered in AXIS Camera Station 5.
Go to the camera’s configuration page and set up the trigger areas.
Go to Settings > Apps.
Click AXIS PTZ Autotracking and start the application.
Click Open to open the application settings page.
Go to Settings > Profiles.
Click
and create a profile.Move the trigger area and modify the size and shape by dragging the anchor points. Each trigger area can have up to ten primary anchor points.
Create more profiles and trigger areas if you want. You can create up to 10 profiles.
Close the application settings page.
In AXIS Camera Station 5:
Go to Configuration > Devices > Add devices.
Select the PTZ camera and click Add.
Click Next and Install.
Go to the camera’s live view, you can see:
Yellow areas: The trigger areas that you have configured in the camera’s configuration page. Any object that enters a yellow trigger area will be automatically tracked.
Green areas: The object indicators that the camera has detected. The object indicators are only available if Show PTZ autotracking object indicators is selected under Streaming profiles.
Click a green area to start tracking the detected object.
Click the object to stop tracking.
Create an action rule to trigger an action when autotracking is started.
Go to Configuration > Recording and events > Action rules and click New.
Add the autotracking event trigger.
Click Add and select Device event. Click OK.
Under Configure device event trigger:
Select your PTZ camera from the Device drop-down list.
Select PtzAutotracking > Autotracking is tracking from the Event drop-down list.
Set Trigger period and set stateInfo to
yes.
Click OK.
Click Next.
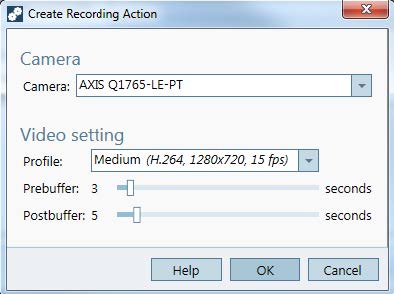
Add a record action.
Click Add and select Record. Click OK.
Select your PTZ camera from the Camera drop-down list.
Configure Video setting.
Click OK.
Click Next and select a schedule.
Click Finish.
Set up AXIS License Plate Verifier
When a device is configured with AXIS License Plate Verifier, it is considered as an external data source in the video management system. You can connect a view to the data source, search for the license plates that are captured by the device, and view the related image.
- It requires AXIS Camera Station 5.38 or later.
- AXIS License Plate Verifier requires a license.
Download and install the application on your device.
Configure the application. See AXIS License Plate Verifier user manual.
For an existing AXIS Camera Station installation, renew your server certificate that is used to communicate with the client. See Certificate renewal.
Turn on time synchronization to use AXIS Camera Station server as the NTP server. See Server settings.
Add the device to AXIS Camera Station. See Add devices.
When the first event is received, a data source is automatically added under Configuration > Devices > External data sources.
Connect the data source to a view. See External data sources.
Search for license plates that are captured by the device. See Data search.
Click
 to export the search results to a .txt file.
Set up AXIS Speed Monitor
The AXIS Speed Monitor app can be installed on a device that is connected to a radar, or directly installed on a radar.
If a device or radar is configured with AXIS Speed Monitor, it is considered as an external data source in AXIS Camera Station 5. You can connect a view to the data source, search for the object speeds that are captured by the device, and view the related image.
Requires AXIS Camera Station 5.47 or later.
Download and install the application on your device.
Configure the application and the radar. See AXIS Speed Monitor user manual.
For an existing AXIS Camera Station 5 installation, renew your server certificate that is used to communicate with the client. See Certificate renewal.
Turn on time synchronization to use AXIS Camera Station 5 server as the NTP server. See Server settings.
Add the related devices to AXIS Camera Station 5. See Add devices.
If the app is installed on a device connected to radar, add the device and radar.
If the app is installed on a radar, add the radar.
When the first event is received, a data source is automatically added under Configuration > Devices > External data sources.
Connect the data source to a view. See External data sources.
Search for object speeds that are captured by the device. See Data search.
Click
to export the search results to a .txt file.
Set up AXIS Perimeter Defender
This section explains how to integrate AXIS Perimeter Defender with AXIS Camera Station 5 event system. You’ll learn how to:
Configure an AXIS Camera Station 5 rule to trigger when an intrusion takes place.
Verify that the configuration is done correctly.
Configure and calibrate AXIS Perimeter Defender in the AXIS Perimeter Defender setup software. For help with the installation and calibration of AXIS Perimeter Defender, refer to AXIS Perimeter Defender user manual or or product page.
Add the camera to AXIS Camera Station 5 by following the Add Camera wizard.
Configure a Device Event trigger:
Go to Configuration > Recording & Events and open the Advanced rules tab.
Create a new rule and select the Device Event trigger.
Select the camera where AXIS Perimeter Defender is installed.
In the Event list, select AXISPerimeterDefender.
In the Feature list, select the name of the configured Intrusion (in this case “Intrusion-1”). If you want to trigger the rule for all the configured scenarios, select ALL_SCENARIOS.
Select Yes if the trigger should be activated when there is an intrusion. When an intrusion is detected, the Activity window will show a status change that helps to verify if the setup is correct.
Click OK and Next to configure the action(s).
In the Add Action dialog, you can add one or several actions for the rule.
Click Finish.
In this example we add a recording action and an alarm action. 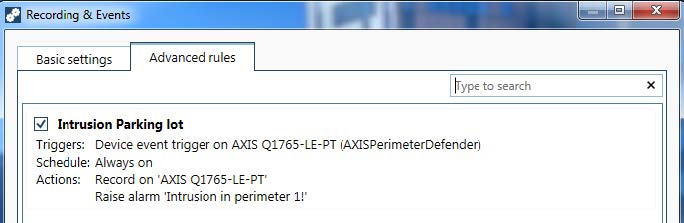
The example shows a rule that triggers two actions when an intrusion takes place. Test that your configuration works as expected by simulating an intrusion, for example by physically entering the monitored area.
Need more help?
Useful links
Contact support
If you need more help, go to axis.com/support.